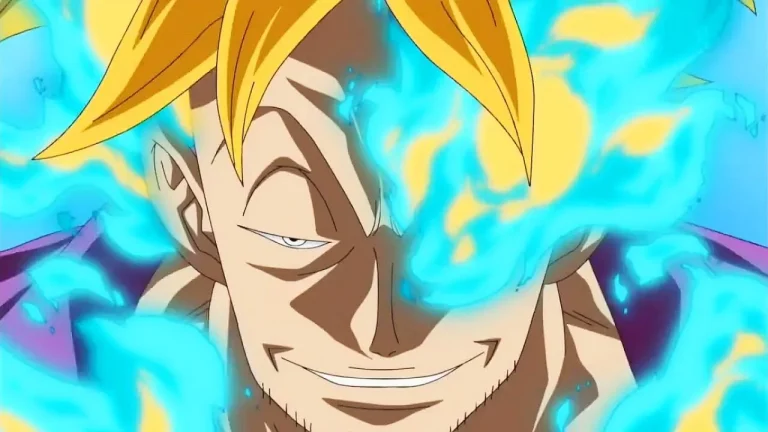
Red Blue Marco is appearing in OP11 tournaments and winning them! The OP08 Leader has a unique and powerful effect that filters your hand and helps control the field, but he never fully established himself in the meta.
During OP08 meta, Marco snuck into tournament top cuts, but he was quickly overshadowed by stronger decks. Now, the {Whitebeard Pirates} Leader is pushing into the OP11 meta, and so far, he’s killing it! This deck is heavy on the control aspect, KOing opponent’s Characters to slow them down and eventually overwhelm them with the high-cost Characters it can drop.
Leader
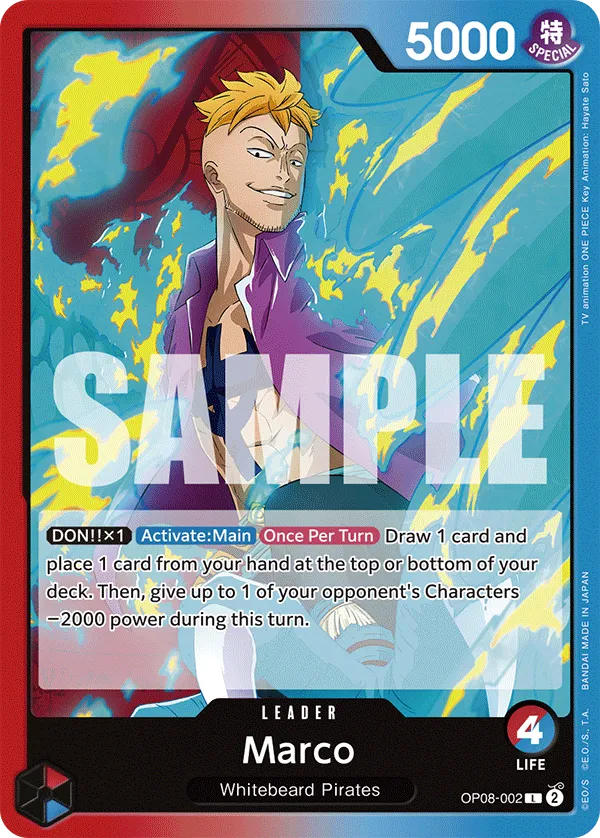
Red Blue Marco is a 4 Life card Leader with an Activate:Main effect that can be used once per turn, as early as turn 1. If you attach a Don to Leader Marco, you can activate his effect to draw a card and choose a card in your hand to add to the top or bottom of your deck. Then we can reduce the Power of one of the opponent’s characters by -2,000, making it easier for us to attack and KO them.
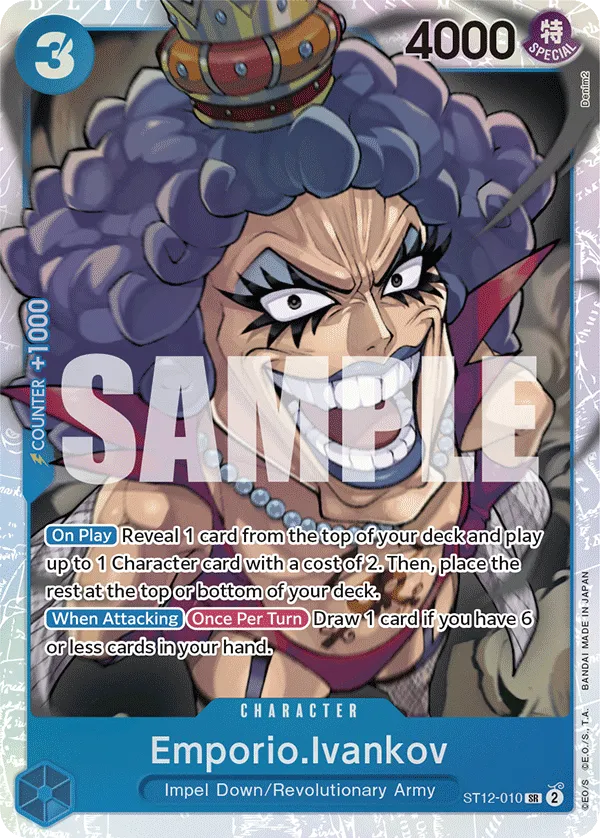
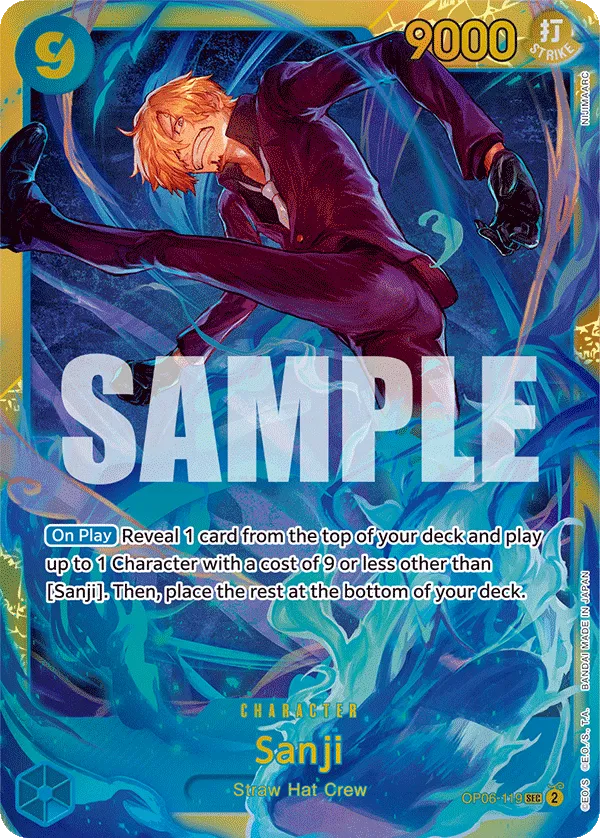
Let’s talk about the first effect first. Marco‘s draw effect helps you find better cards, removing the cards you don’t need by placing them at the bottom of your deck. However, the ability to put a card at the top of the deck gives you the ability to control your next draw and can be comboed with your cards. We want to run cards that can take advantage of that effect, so 3-cost Emporio.Ivankov and 9-cost Sanji are perfect here. The effect is also good to filter our hand, and put cards we don’t want at the bottom of the deck.
As for the -2,000 Power reduction, it can be huge for attacking and KOing a rested Character, forcing more Counter cards out of your opponent. Additionally, the Power reduction can put a high-power Character in range for your removal cards such as 7-cost Edward.Newgate and Silvers Rayleigh.
Red Blue Marco Decklist
How to Play
Early Plays
Emporio.Ivankov is your strongest play on turn 2 if you’re going second. Through its effect, you can look at the top card of your deck, and if it’s a 2-cost or less, you can play it for free. So we’re usually cheating out Duval or Monet, and to make sure we have one of them at the top of our deck, we’ll use Leader Marco‘s effect to place them there.
If you have 6 cards or less in your hand, Emporio.Ivankov‘s attack will draw you a card, adding more resources to your hand. With 4,000 Power, you often will attach a Don to Emporio.Ivankov to threaten a Leader’s Life card, but you can still attack with the 4,000 Power to gain the card draw.
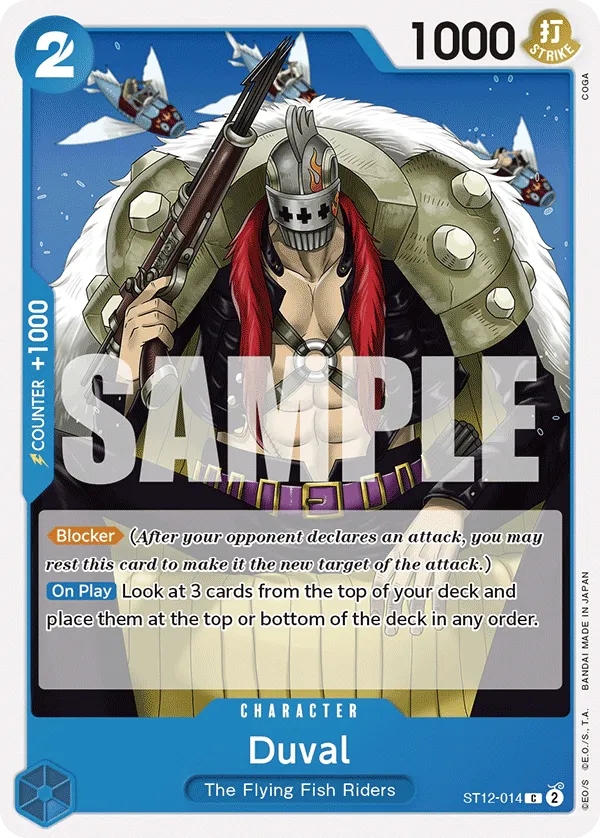
Duval is a 2-cost Blocker, protecting you from one of the opponent’s attacks. His effect will let us look at the top 3 cards of our deck, and either keep them at the top or put them at the bottom in any order want. This effect can help us draw better cards for future turns, especially if we’re missing a 9-cost Sanji or a high-cost control Character.
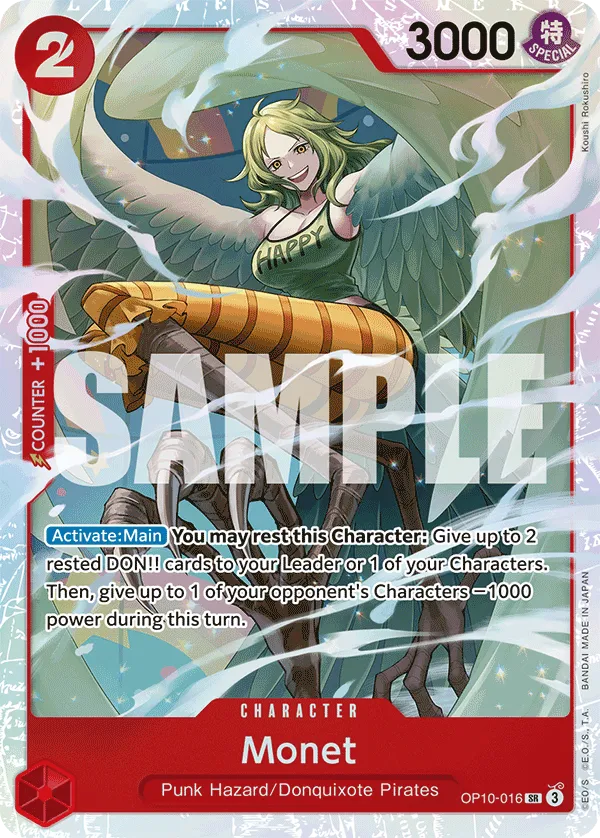
As for Monet, she’s attaching 2 rested Don to the Leader or one of the Characters, adding more Power to your attacks and enabling you to activate your Leader effect. She’s also reducing the Power of an opponent’s Character by 1,000, making it vulnerable to your attackers or removal cards. However, to activate Monet‘s effect, you will have to rest her, so she becomes an easy target for the opposing player to attack, but if they’re committing one of their 5,000+ Power attacks, we’re not too upset with that, since that’s an attack not targeting our Leader.
Power Reduction
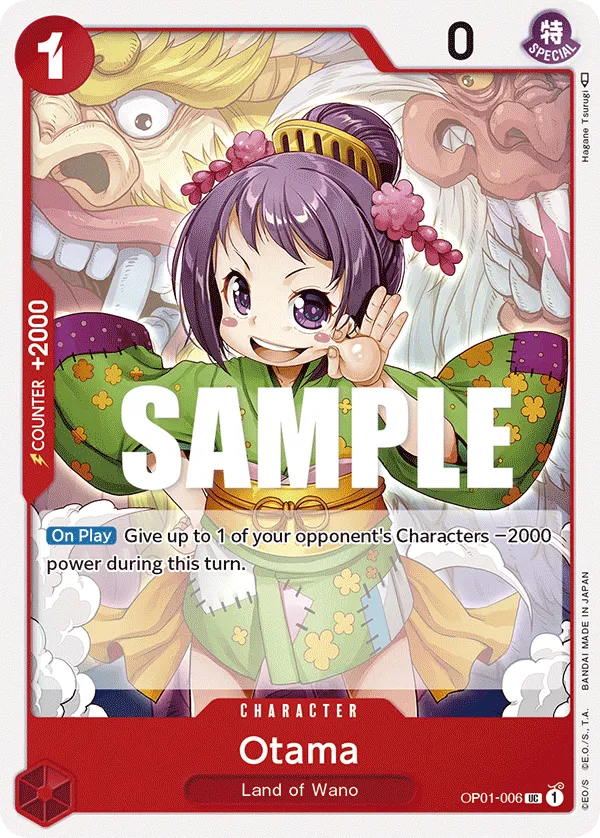
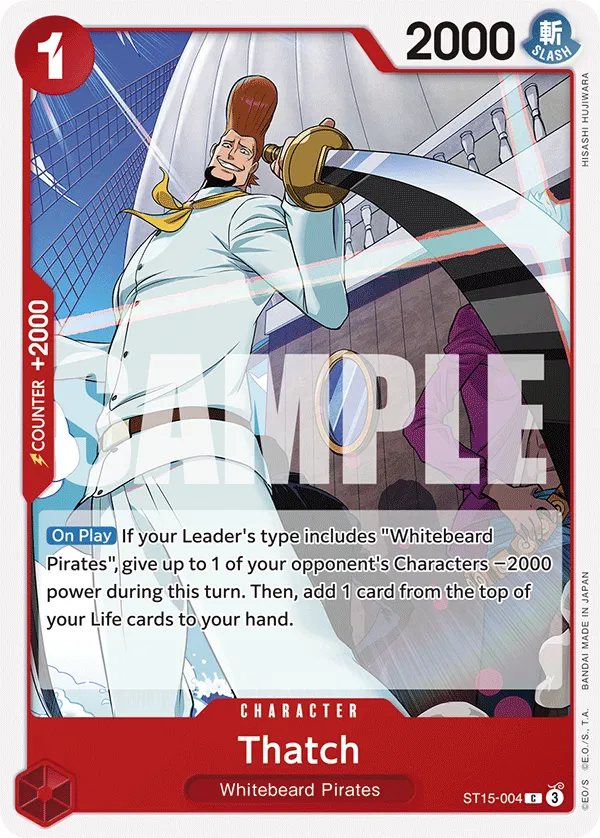
Otama and Thatch are +2,000 Counter cards, so we often use them to protect Leader Marco or a rested Character from attackers. However, when played, they can reduce the Power of an opponent’s Character by 2,000, which will play a role in removing it off the field.
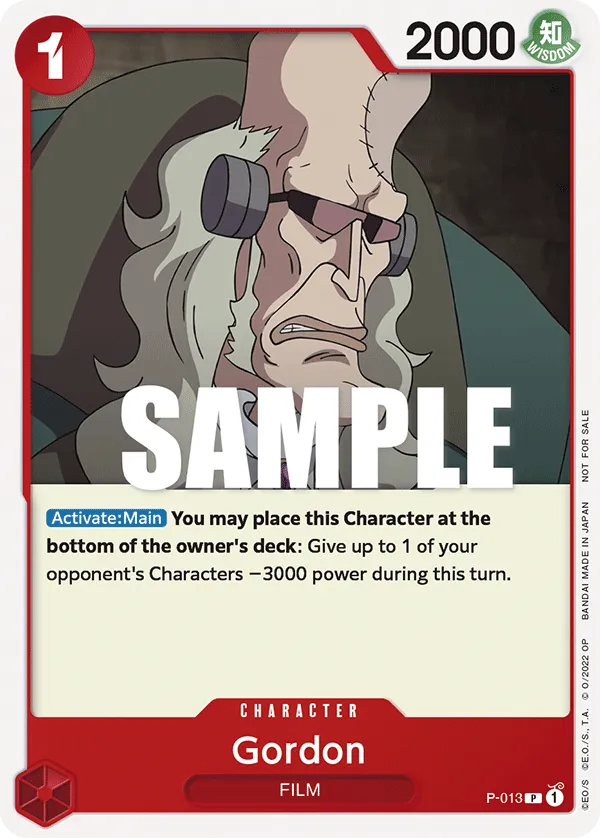
Gordon reduces the Power of an opponent’s character by 3,000, which is a huge play for 1 Don to weaken a high-power character, making it easier to KO. Since Gordon doesn’t have a counter effect, we can put him at the bottom of the deck if we don’t need him on the upcoming turns.
Blockers
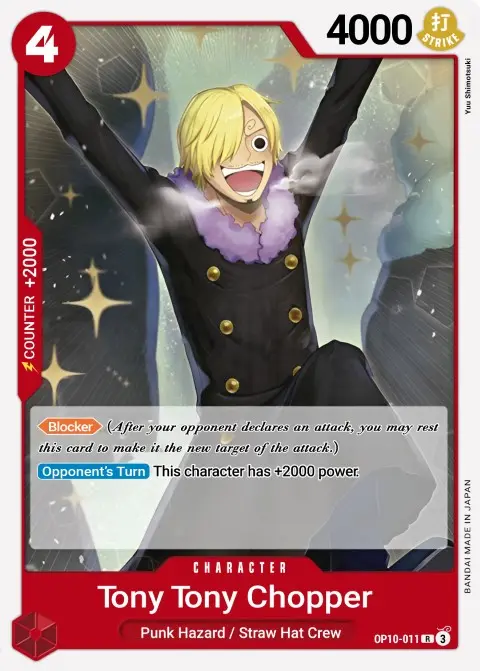
4-cost Tony Tony Chopper is a +2,000 Counter card but we can make use of his Blocker keyword. Chopper can protect us from an attack, especially since he gains +2,000 Power during your opponent’s turn, turning him into a 6,000 Power Character. This makes him harder to KO, and we can block an attack and still keep him in play, saving a Life Card and a Counter card.
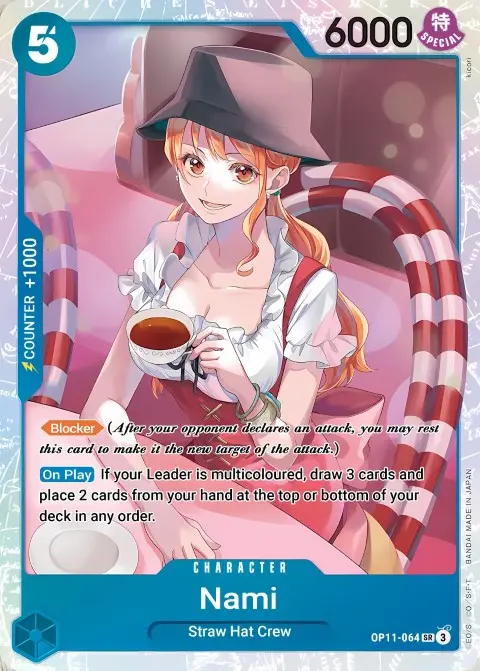
As for 5-cost Nami, she plays a key role in this deck. First, she helps add more cards to our hand by drawing 3 cards and allowing us to choose 2 cards from our hand to place either at the top or bottom of the deck in the order we prefer.
If we play Nami on Don 7, we can place a high-cost Character as the second card from the top of our deck, setting up the 9-cost Sanji play without needing to rely on Leader Marco‘s effect. So, by using Nami, we can play Sanji a turn earlier if you’re going first.
Rush Characters
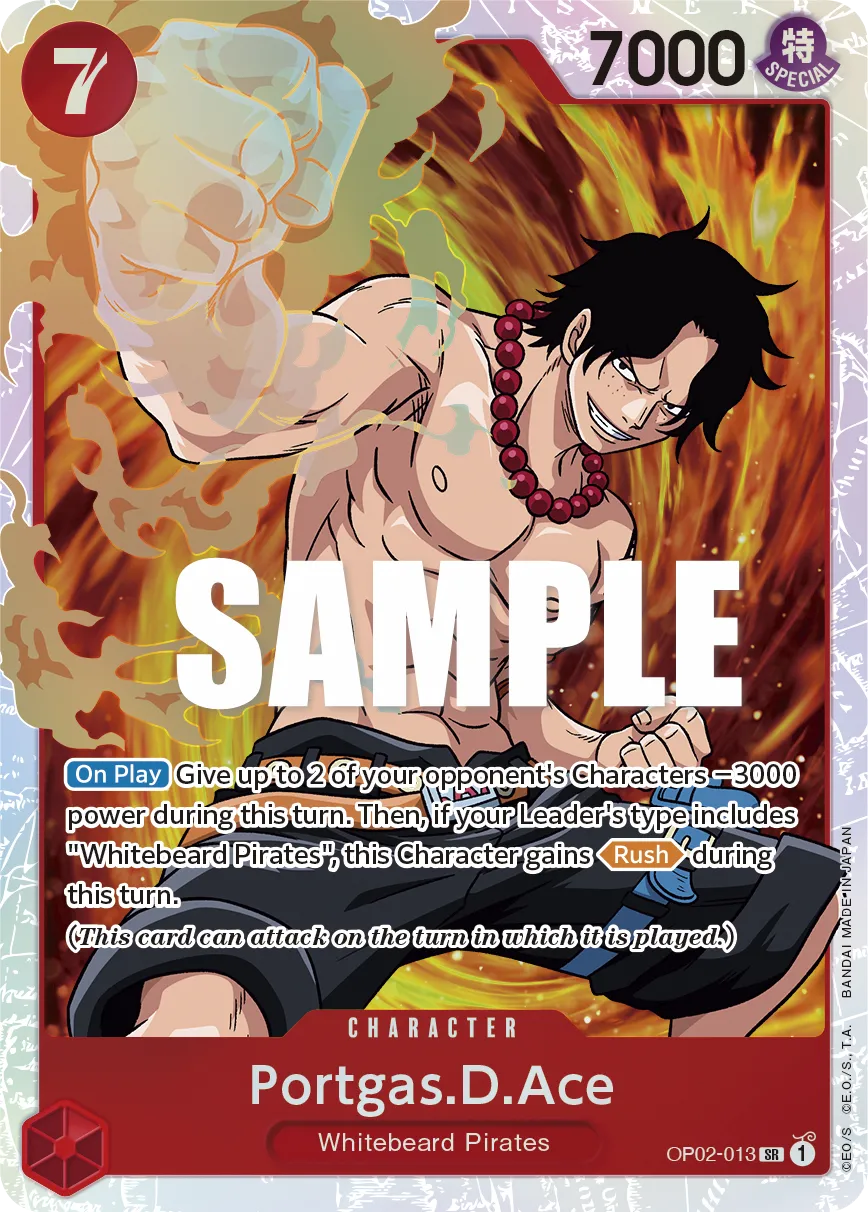
Since Marco is a {Whitebeard Pirates} type Leader, 7-cost Portagas.D.Ace gains Rush when played, enabling an aggressive turn with his 7,000 Power attack. Ace can also reduce the Power of two Characters by 3,000, making them weaker targets to KO with your attacks.
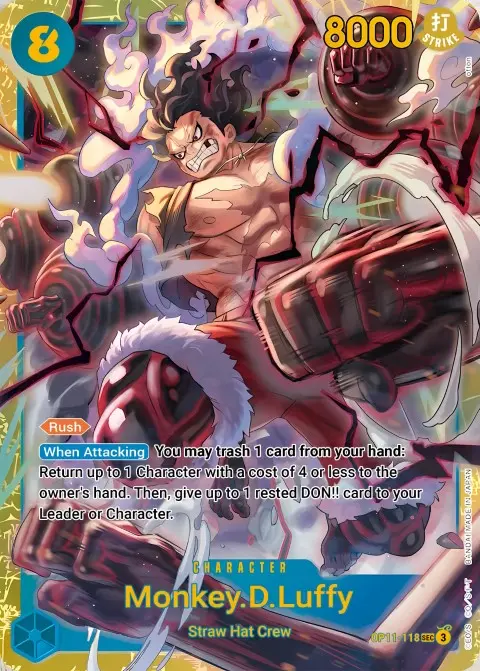
8-cost Mokey.D.Luffy is an 8,000 Power Rush Character if we need an additional attack. When attacking, Luffy can trash a card from your hand to return a 4-cost or less Character to the hand and then attach 1 Don to your Leader or a Character for a stronger attack turn.
Since we can only return a 4-cost or less Character to the owner’s hand, it’s a bit restrictive, but can still be useful for removing an opponent’s Character, especially a blocker. It can also be used on your Characters, so you can get back a +2,000 Counter like Otama to your hand.
Control Characters
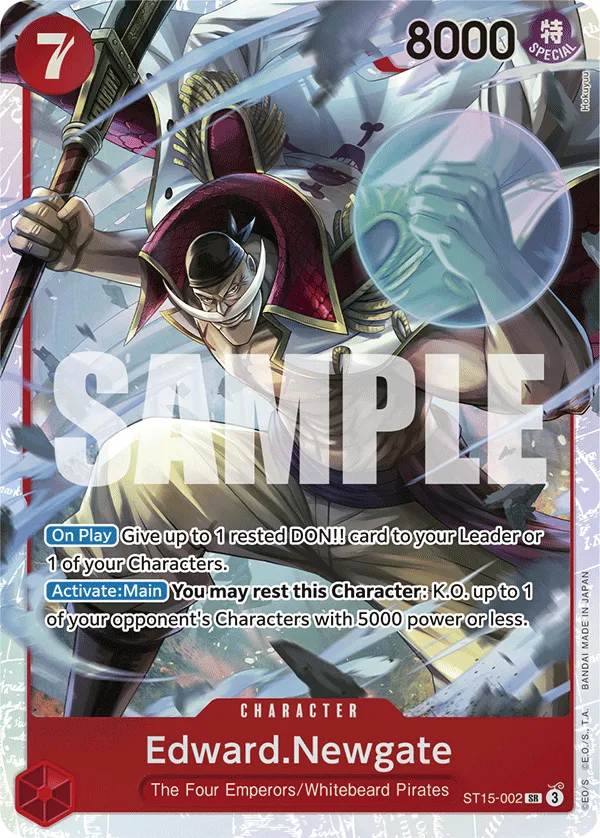
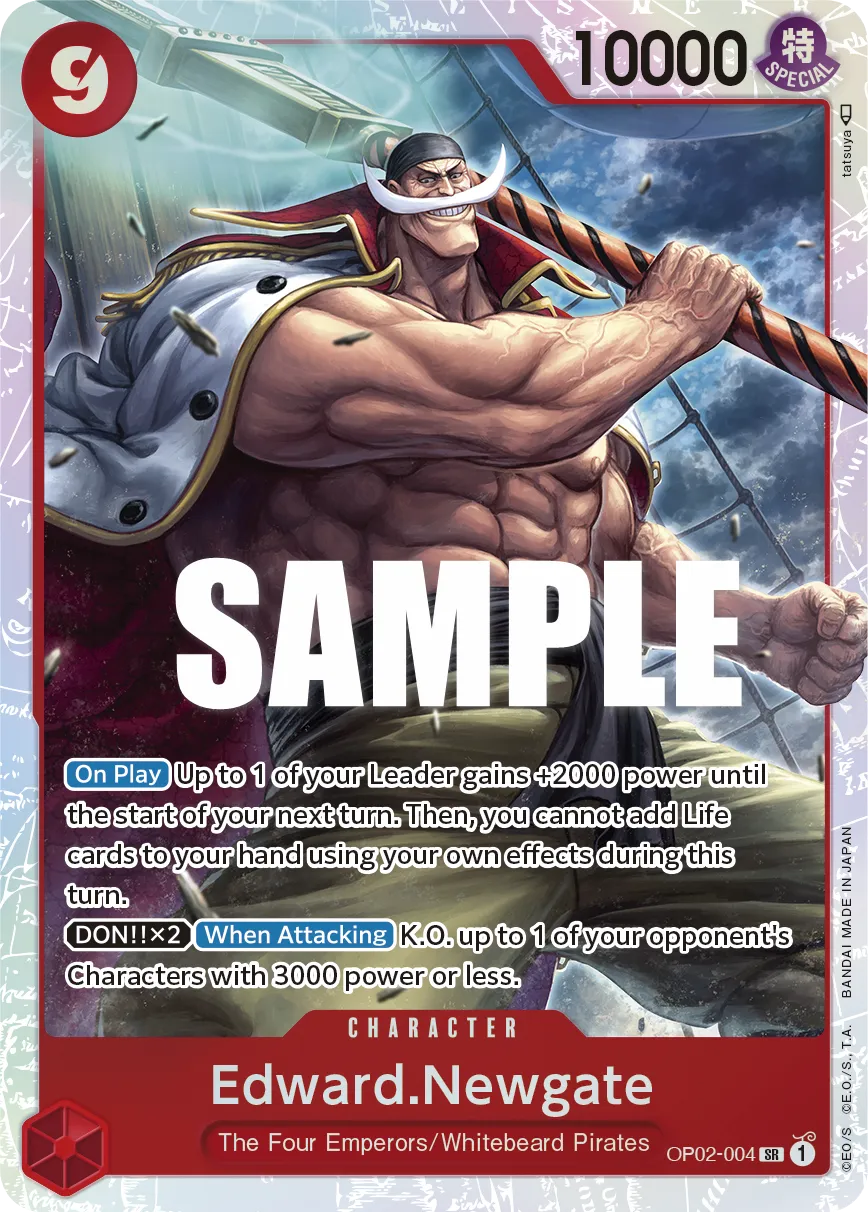
7-cost Edward Newgate is usually the best play on Don 7 if there’s a Character for you to remove. He’s an 8,000 Power Character that gives one rested Don to your Leader or Character On Play. This lets you activate Marco‘s effect on Don 7 even if you spend all your Don developing Edward Newgate. His Main effect is where his true strength lies. You can rest Edward Newgate to KO a 5,000 Power or less Character, combined with Leader Marco‘s Power reduction effect, you can KO a Character with up to 7,000 Power.
You can keep activating Edward Newgate‘s KO effect once per turn, but since you have to rest him to activate the effect, you’re missing out on the 8,000-power attack.
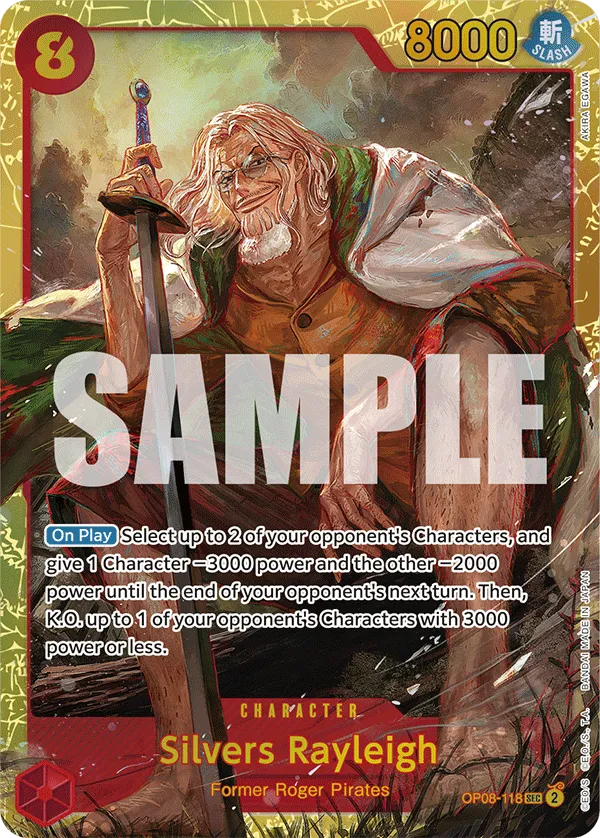
Silvers Rayleigh gives one of the opponent’s Characters -3,000 Power and another Character -2,000 Power, then he KO’s a Character with 3,000 Power or less. This means through Silvers Rayleigh, you can KO a 6,000 Power Character after you’ve reduced its Power. The other Character will be vulnerable to our attacks if it’s rested, and even if it stays in play, it’ll have less offensive pressure since the Power reduction sticks until the end of your opponent’s turn.
Sanji Combo
9-cost Sanji is this deck’s strongest play, setting the stage for 2 big bodies to join the battle. We have to wait until 10 Don, give 1 Don to Leader Marco to activate his effect, and put one of our high-cost Characters at the top of our deck. So cards like Silvers Rayleigh, 8-cost Monkey.D.Luffy, or 7-cost Edward.Newgate would be ideal cards for the combo.
We then play Sanji, look at the top card in our deck (which will be the card we placed through Leader Marco‘s effect), and play it. In one turn, we’re developing two big bodies on the field and activating the effect of the second Character to gain more value during that turn.
The only time we can play Sanji a turn earlier is if we’re going first and we played Nami on Don 7, allowing us to drop a Sanji on Don 9.
Event
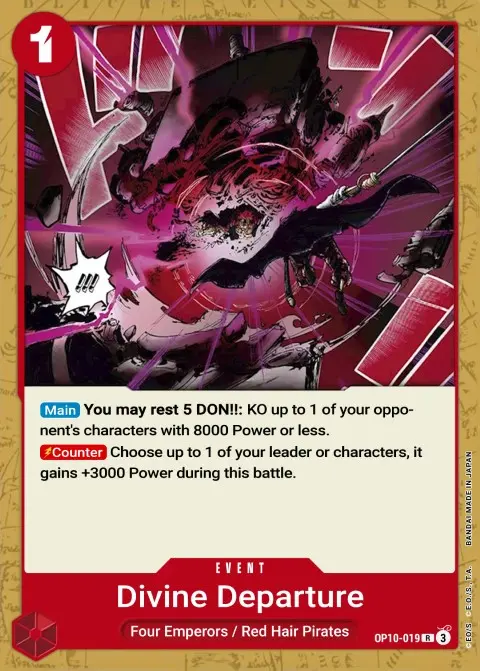
Divine Departure is a versatile event that serves two key functions: it can KO an opponent’s Character with 8,000 Power or less, or it can be used as a Counter event to block an attack. To KO a Character, you must rest 5 DON!!, so you’re paying 6 DON to activate it. Alongside your Leader effect or low-cost Power reduction cards like Gordon or Otama, you can KO higher Power Characters with Divine Departure.
Mulligan
- Emporio.Ivankov + 2-cost Character for the combo play.
- 9-cost Sanji to drop two big bodies on Don 10.
Turn-Based Gameplay
Going First
- Turn 1 (1 Don): Activate Leader effect.
- Turn 2 (3 Don): 2-cost Duval or Monet.
- Turn 3 (5 Don): 5-cost Nami or Emporio.Ivankov to cheat out a 2-cost Character.
- Turn 4 (7 Don): 7-cost Edward Newgate + Leader effect.
- Turn 5 (9 Don): Leader effect+ 8-cost Silvers Rayleigh.
- Turn 6 (10 Don): Leader effect + Sanji Combo.
Going Second
- Turn 1 (2 Don): 2-cost Duval or Monet.
- Turn 2 (4 Don): Emporio.Ivankov to cheat out a 2-cost Character or 4-cost Tony Tony Chopper.
- Turn 3 (6 Don): 5-cost Nami or Emporio.Ivankov to cheat out a 2-cost Character.
- Turn 4 (8 Don): Silvers Rayleigh, 8-cost Luffy, 7-cost Edward Newgate, or 7-cost Ace.
- Turn 5 (10 Don): Leader effect + Sanji Combo.
Other Cards to Include
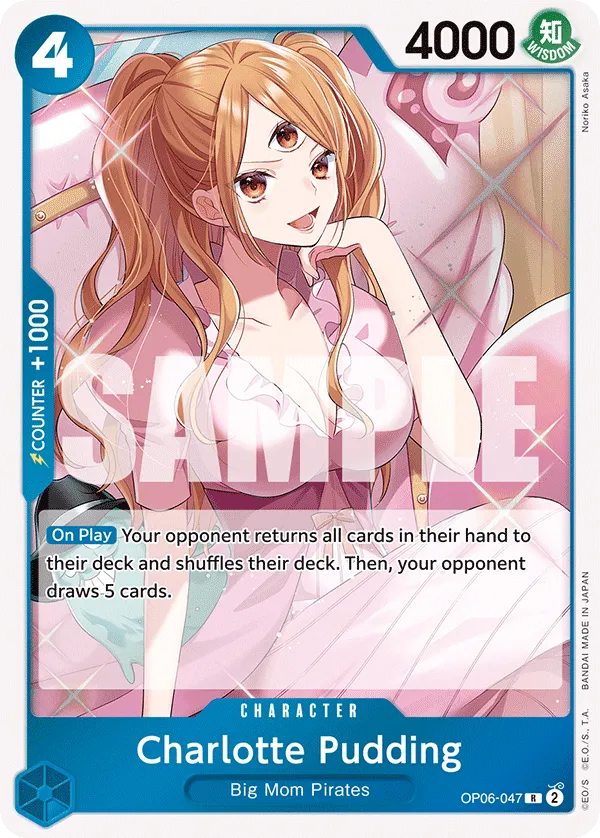
- A copy or two of Pudding to reduce the cards in the opponent’s hand.
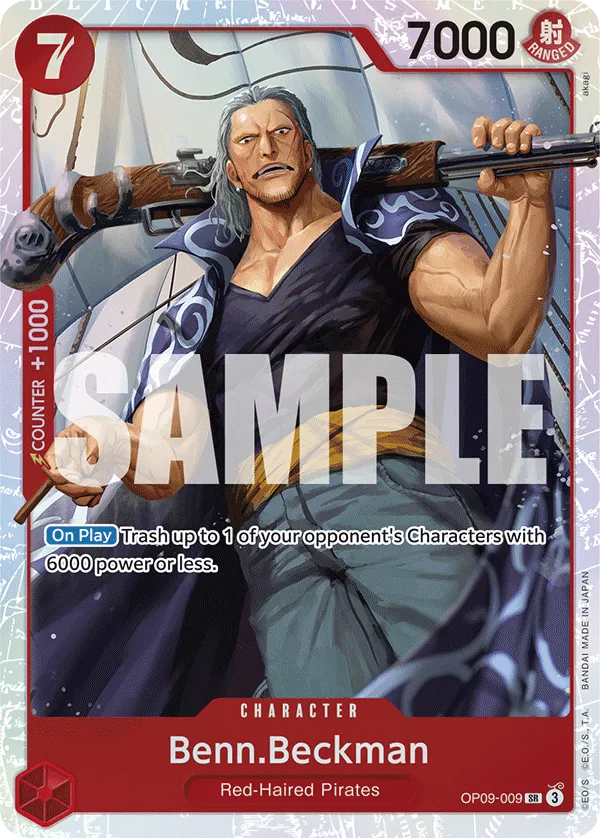
- 7-cost Benn.Beckman can trash an opponent’s Character with 6,000 Power or less. A great addition in a meta where KO immunity is popular.
- 9-cost Edward Newgate can be played through 9-cost Sanji, giving your Leader Marco +2,000 Power for the upcoming turn.
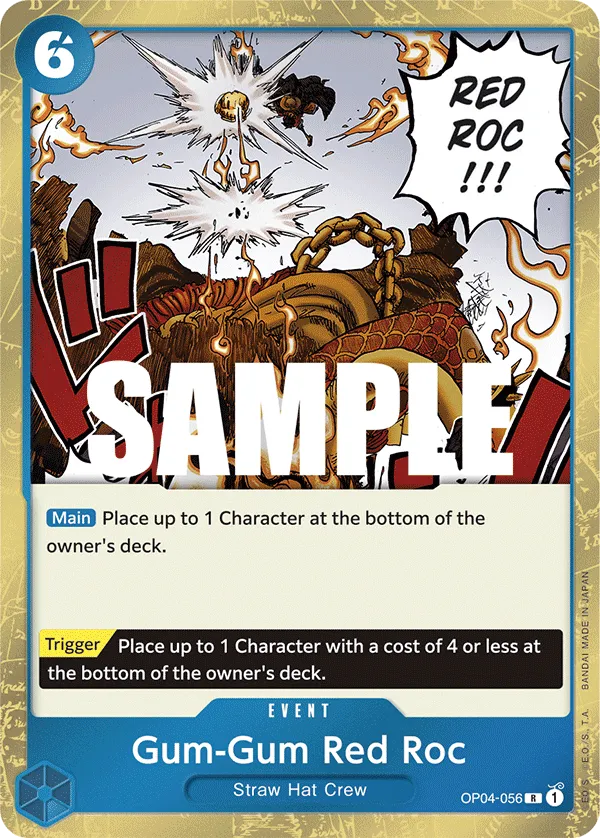
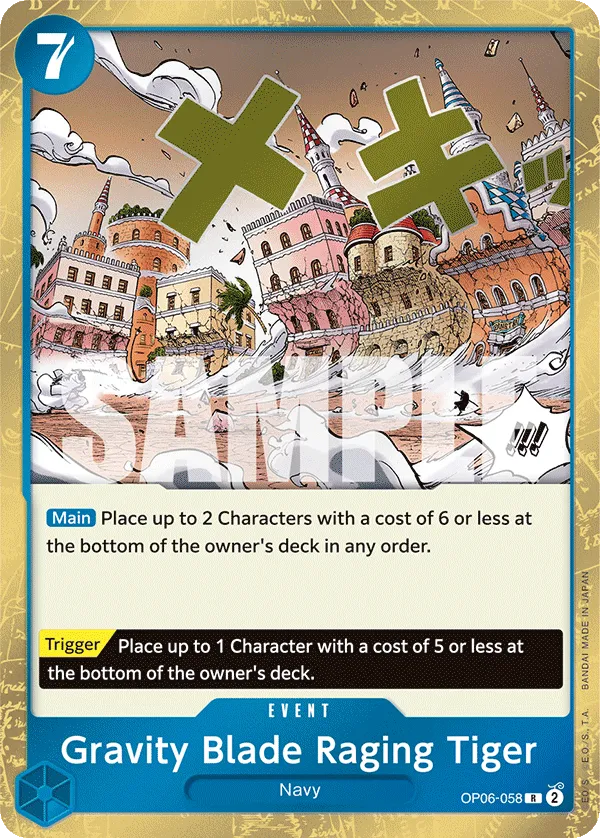
- Two control cards to place your opponent’s Characters back in the deck. Gravity Blade Raging Tiger is more suited for decks going wide on the field, whereas Gum-Gum Red Roc is an answer for high-cost Characters.
Matchups
Blue Purple Monkey D.Luffy is a ramp deck that plays high-cost Characters. We can remove 8,000 Power Charlotte Katakuri easily through Leader effect + Silvers Rayleigh or Divine Departure. As for 9,000+ Characters (Sanji or Charlotte Linlin), we’ll have to use power reduction cards like Gordon.
Games will stretch out since both players have many high-cost win conditions, which means blockers are essential to protect your Life cards or your rested win con.
EB02 Monkey D.Luffy is an aggressive deck, that gains 2 Don through its Leader effect, enabling it to make more plays during specific turns. Their goal is to drop you to 1 Life card and plan two huge attacks with 6-cost Monkey D.Luffy.
We have to stay at 2 Life cards and KO 5-cost Sanji & Pudding and 6-cost Monkey D.Luffy. Since all their Characters are at 8,000 Power or less, we won’t struggle to KO their Characters through effects, removing them before they attack. If you’re still at 6 Don, you can KO 5-cost Sanji & Pudding with Divine Departure to prevent the ramp effect on the upcoming turn.
They don’t have a reliable way to remove our Characters, and thanks to blockers, we can push the game to the late turns and shift it in our favor.
Red Roronoa Zoro is an aggressive deck that tries to pressure us by going wide on the field and lining up multiple attacks before shifting to Rush aggression. We can’t afford to keep OP08 Tony Tony Chopper in play for too long, the value he provides will be problematic, so our number 1 priority is to KO him.
They don’t have high Power Characters, so Gordon won’t be useful much, and we’ll place him at the bottom of our deck. As long as we protect our last Life card, they can’t break through easily, especially with Duval, Sanji, or Nami blocking attacks. Since Divine Departure can give you +3,000 Power, we might hold off a Sanji play in the late game to save 1 Don for the opponent’s turn.