The Pokemon Meta page is your best place for competitive Pokemon! Tables are updated as the meta changes, you’ll find top decks in the Journey Together meta.
Meta Decks
| S |    |
| A |     |
| B |      |
| C |    |
Dragapult ex Dusknoir
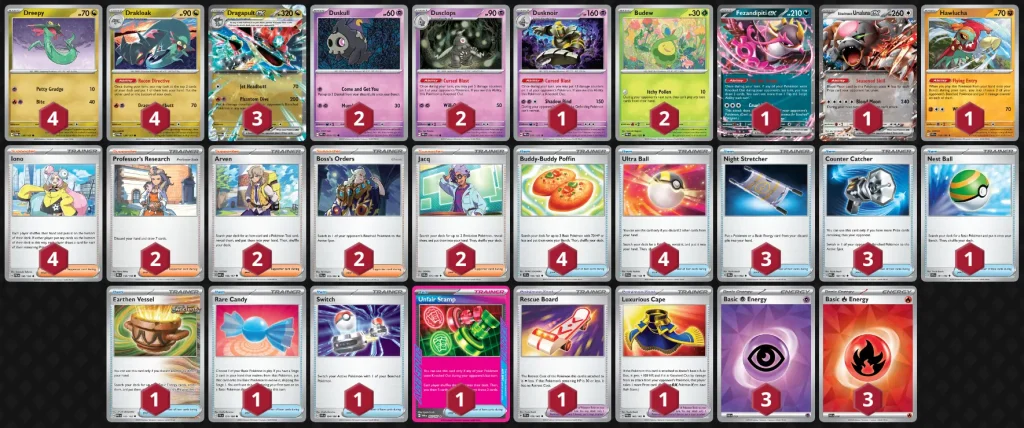
Pokémon: 21
4 Dreepy TWM 128
4 Drakloak TWM 129
3 Dragapult ex TWM 130
2 Duskull PRE 35
2 Dusclops PRE 36
1 Dusknoir PRE 37
2 Budew PRE 4
1 Fezandipiti ex SFA 38
1 Bloodmoon Ursaluna ex TWM 141
1 Hawlucha SVI 118

Trainer: 33
4 Iono PAL 185
2 Professor's Research JTG 155
2 Arven OBF 186
2 Boss's Orders PAL 172
2 Jacq SVI 175
4 Buddy-Buddy Poffin TEF 144
4 Ultra Ball SVI 196
3 Night Stretcher SFA 61
3 Counter Catcher PAR 160
1 Nest Ball SVI 181
1 Earthen Vessel PAR 163
1 Rare Candy SVI 191
1 Switch SVI 194
1 Unfair Stamp TWM 165
1 Rescue Board TEF 159
1 Luxurious Cape PAR 166

Energy: 6
3 Psychic Energy SVE 13
3 Fire Energy SVE 10
Dragapult ex plays aggressively, dealing 200 damage with Phantom Dive to the Active Pokemon and 60 damage to the Bench. This lets you get knockout on low-health Pokemon sitting on the Bench or helps you put things in range for your 200-damage Phantom Dive to knock out.
Rare Candy speeds up the game plan, letting you get Dragapult ex in play a turn earlier to start putting the pressure on the opponent. This is the Pidgeot ex list, which has more draw power with Pidgeot ex to find the cards you need for your strategy. Another version adds Dusknoir, focusing more on the aggression side with the added damage from Dusclop and Dusknoir‘s Cursed Blast.
Gardevoir
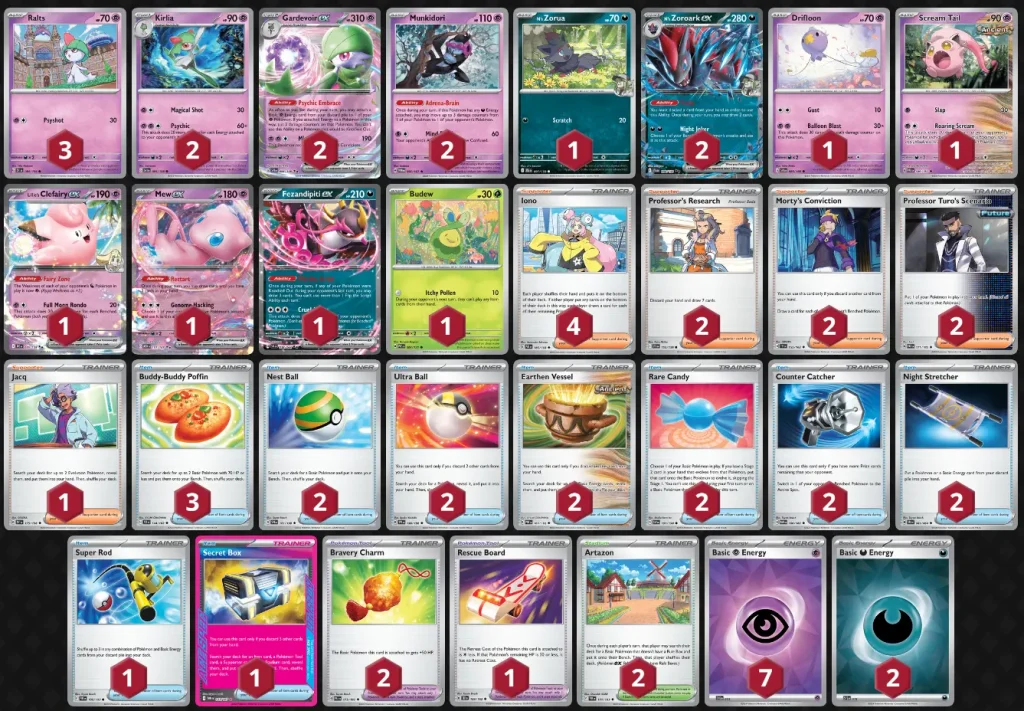
Pokémon: 18
3 Ralts SVI 84
2 Kirlia SVI 85
2 Gardevoir ex SVI 86
2 Munkidori TWM 95
1 N's Zorua JTG 97
2 N's Zoroark ex JTG 98
1 Drifloon SVI 89
1 Scream Tail PAR 86
1 Lillie's Clefairy ex JTG 56
1 Mew ex MEW 151
1 Fezandipiti ex SFA 38
1 Budew PRE 4

Trainer: 33
4 Iono PAL 185
2 Professor's Research JTG 155
2 Morty's Conviction TEF 155
2 Professor Turo's Scenario PAR 171
1 Jacq SVI 175
3 Buddy-Buddy Poffin TEF 144
2 Nest Ball SVI 181
2 Ultra Ball SVI 196
2 Earthen Vessel PAR 163
2 Rare Candy SVI 191
2 Counter Catcher PAR 160
2 Night Stretcher SFA 61
1 Super Rod PAL 188
1 Secret Box TWM 163
2 Bravery Charm PAL 173
1 Rescue Board TEF 159
2 Artazon PAL 171

Energy: 9
7 Psychic Energy SVE 13
2 Darkness Energy SVE 15
This deck relies heavily on Gardevoir ex’s ability to attach Psychic Energy to your Pokémon, enabling their attacks and setting you up to win the game. Each time you attach Psychic Energy through Gardevoir ex, you place 2 damage counters on a Pokémon.
You can use this to your advantage by moving those damage counters to the opponent’s Pokémon using cards like Munkidori. This makes it easier for you to knock them out with your attacks or eventually have enough Counters to knock out a Pokemon on the Bench.
Gardevoir ex can still attack for 190 damage with Miracle Force, but you also have Drifloon and Scream Tail as high-damage dealers. Although Drifloon and Scream Tail are easy to knock out, they only give 1 Prize Card to opponents.
Gholdingo
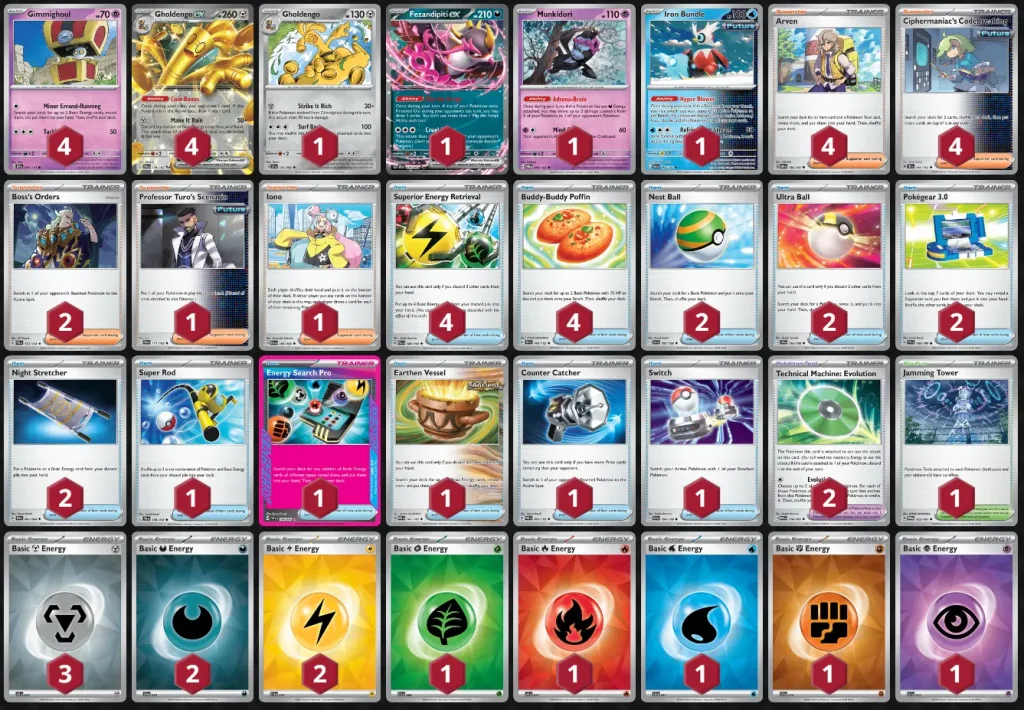
Pokémon: 12
4 Gimmighoul SSP 97
4 Gholdengo ex PAR 139
1 Gholdengo SSP 131
1 Fezandipiti ex SFA 38
1 Munkidori TWM 95
1 Iron Bundle PAR 56

Trainer: 36
4 Arven OBF 186
4 Ciphermaniac's Codebreaking TEF 145
2 Boss's Orders PAL 172
1 Professor Turo's Scenario PAR 171
1 Iono PAL 185
4 Superior Energy Retrieval PAL 189
4 Buddy-Buddy Poffin TEF 144
2 Nest Ball SVI 181
2 Ultra Ball SVI 196
2 Pokégear 3.0 SVI 186
2 Night Stretcher SFA 61
1 Super Rod PAL 188
1 Energy Search Pro SSP 176
1 Earthen Vessel PAR 163
1 Counter Catcher PAR 160
1 Switch SVI 194
2 Technical Machine: Evolution PAR 178
1 Jamming Tower TWM 153

Energy: 12
3 Metal Energy SVE 16
2 Darkness Energy SVE 15
2 Lightning Energy SVE 12
1 Grass Energy SVE 9
1 Fire Energy SVE 10
1 Water Energy SVE 11
1 Fighting Energy SVE 14
1 Psychic Energy SVE 13
Gholdengo ex decks focus on its “Make It Rain” attack, which deals 50 damage per Basic Energy discarded from your hand, making Energy retrieval and draw power essential. Its “Coin Bonus” ability helps sustain resources, while cards like Superior Energy Retrieval and Earthen Vessel ensure Energy flow. Radiant Greninja and other draw engines accelerate setup, and the deck’s simplicity as a Stage 1 evolution offers consistency. Success relies on managing resources to maintain high-damage output.
Origin Forme Palkia VSTAR is the second damage dealer if Gholdengo ex is knocked out. You can attach discarded Energy through its ability to activate Subspace Swell to knock out a Pokemon and win you the game.
Gholdengo ex Dragapult ex
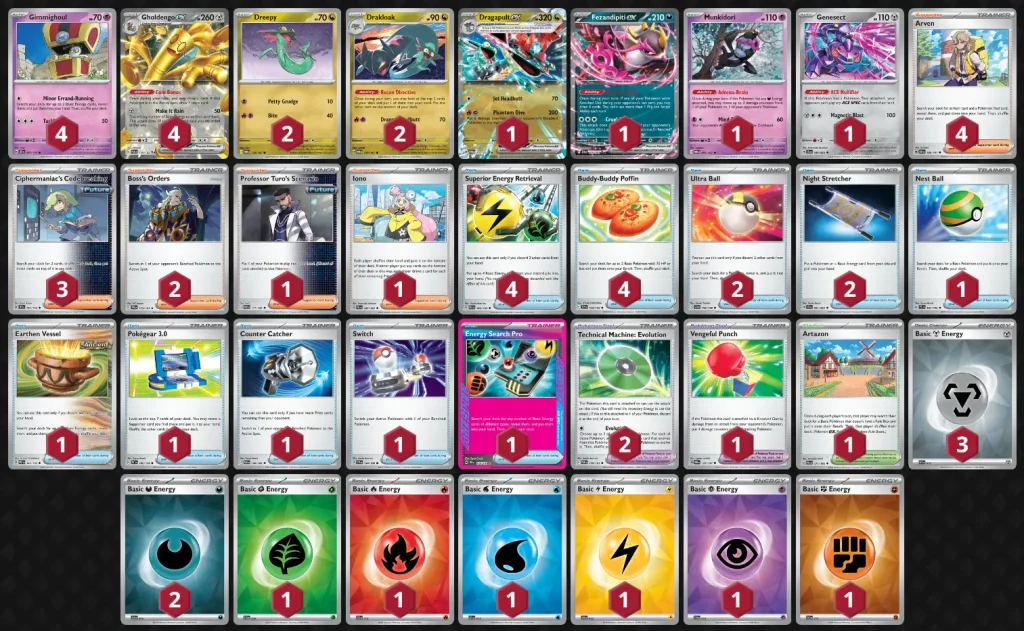
Pokémon: 16
4 Gimmighoul SSP 97
4 Gholdengo ex PAR 139
2 Dreepy TWM 128
2 Drakloak TWM 129
1 Dragapult ex TWM 130
1 Fezandipiti ex SFA 38
1 Munkidori TWM 95
1 Genesect SFA 40

Trainer: 33
4 Arven OBF 186
3 Ciphermaniac's Codebreaking TEF 145
2 Boss's Orders PAL 172
1 Professor Turo's Scenario PAR 171
1 Iono PAL 185
4 Superior Energy Retrieval PAL 189
4 Buddy-Buddy Poffin TEF 144
2 Ultra Ball SVI 196
2 Night Stretcher SFA 61
1 Nest Ball SVI 181
1 Earthen Vessel PAR 163
1 Pokégear 3.0 SVI 186
1 Counter Catcher PAR 160
1 Switch SVI 194
1 Energy Search Pro SSP 176
2 Technical Machine: Evolution PAR 178
1 Vengeful Punch OBF 197
1 Artazon PAL 171

Energy: 11
3 Metal Energy SVE 16
2 Darkness Energy SVE 15
1 Grass Energy SVE 9
1 Fire Energy SVE 10
1 Water Energy SVE 11
1 Lightning Energy SVE 12
1 Psychic Energy SVE 13
1 Fighting Energy SVE 14
Gholdengo ex’s Coin Bonus and Drakloak’s Recon Directive will draw you cards, adding more resources to your hand and enabling stronger plays. Gholdengo ex’s Make It Rain attack deals 50 damage for each Basic Energy you discard from your hand. So you want to fill up your hand with Basic Energy to one-shot an opponent’s Pokémon.
Dragapult ex’s Phantom Dive deals 200 damage to the opponent’s Active Pokemon, but it also allows you to place 6 counters on the opponent’s Benched Pokemon, allowing you to snipe and knock out weaker Pokemon.
Terapagos Noctowl
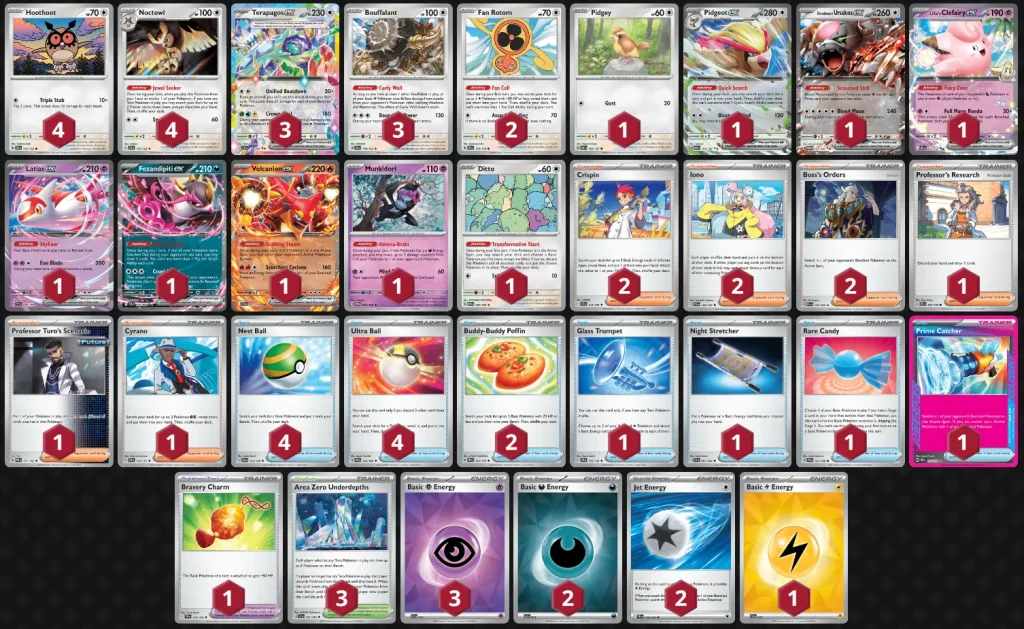
Pokémon: 25
4 Hoothoot SCR 114
4 Noctowl SCR 115
3 Terapagos ex SCR 128
3 Bouffalant SCR 119
2 Fan Rotom SCR 118
1 Pidgey OBF 162
1 Pidgeot ex OBF 164
1 Bloodmoon Ursaluna ex TWM 141
1 Lillie's Clefairy ex JTG 56
1 Latias ex SSP 76
1 Fezandipiti ex SFA 38
1 Volcanion ex JTG 31
1 Munkidori TWM 95
1 Ditto MEW 132

Trainer: 27
2 Crispin SCR 133
2 Iono PAL 185
2 Boss's Orders PAL 172
1 Professor's Research JTG 155
1 Professor Turo's Scenario PAR 171
1 Cyrano SSP 170
4 Nest Ball SVI 181
4 Ultra Ball SVI 196
2 Buddy-Buddy Poffin TEF 144
1 Glass Trumpet SCR 135
1 Night Stretcher SFA 61
1 Rare Candy SVI 191
1 Prime Catcher TEF 157
1 Bravery Charm PAL 173
3 Area Zero Underdepths SCR 131

Energy: 8
3 Psychic Energy SVE 13
2 Darkness Energy SVE 15
2 Jet Energy PAL 190
1 Lightning Energy SVE 12
Raging Bolt Ogerpon
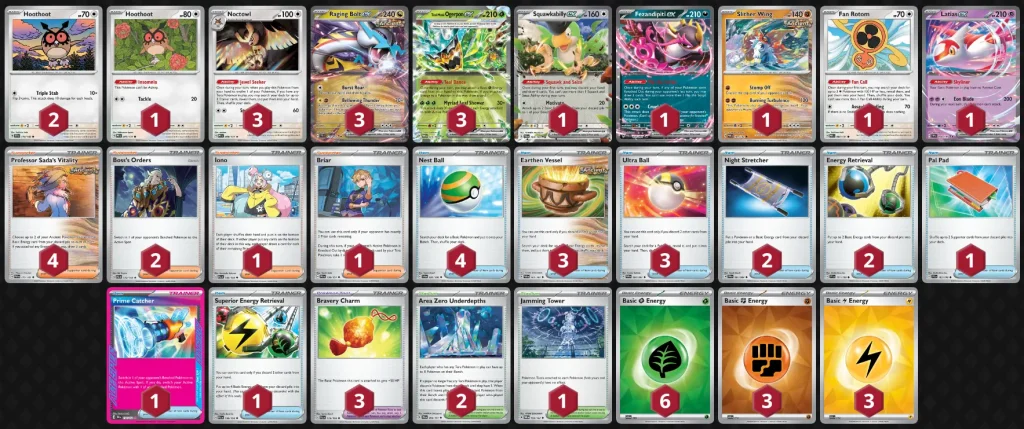
Pokémon: 17
2 Hoothoot SCR 114
1 Hoothoot PRE 77
3 Noctowl PRE 78
3 Raging Bolt ex TEF 123
3 Teal Mask Ogerpon ex TWM 25
1 Squawkabilly ex PAL 169
1 Fezandipiti ex SFA 38
1 Slither Wing PAR 107
1 Fan Rotom PRE 85
1 Latias ex SSP 76

Trainer: 31
4 Professor Sada's Vitality PAR 170
2 Boss's Orders PAL 172
1 Iono PAL 185
1 Briar PRE 100
4 Nest Ball SVI 181
3 Earthen Vessel PAR 163
3 Ultra Ball PAF 91
2 Night Stretcher SFA 61
2 Energy Retrieval SVI 171
1 Pal Pad SVI 182
1 Prime Catcher TEF 157
1 Superior Energy Retrieval PAL 189
3 Bravery Charm PAL 173
2 Area Zero Underdepths PRE 94
1 Jamming Tower TWM 153

Energy: 12
6 Grass Energy SVE 9
3 Fighting Energy SVE 14
3 Lightning Energy SVE 12
Raging Bolt ex works alongside Teal Mask Ogerpon ex to activate Bellowing Thunder and deal tons of damage to the opponent’s Pokemon.
Teal Mask Ogerpon ex can attach a Basic Grass Energy through Teal Dance ability, and at the same time, it draws a card. So you’re not losing card value, and you’re attaching Basic Energy for Ranging Bolt ex to discard and power up Bellowing Thunder’s damage. Make sure to discard just enough Energy cards to knock out a Pokemon as you don’t want to push more damage than needed and burn resources.
Teal Mask Ogerpon ex can also act as a damage dealer with its Myriad Leef Shower. This attack relies on the number of Energy cards attached to both Active Pokemon to boost its damage output.
Ogerpon Tera Box
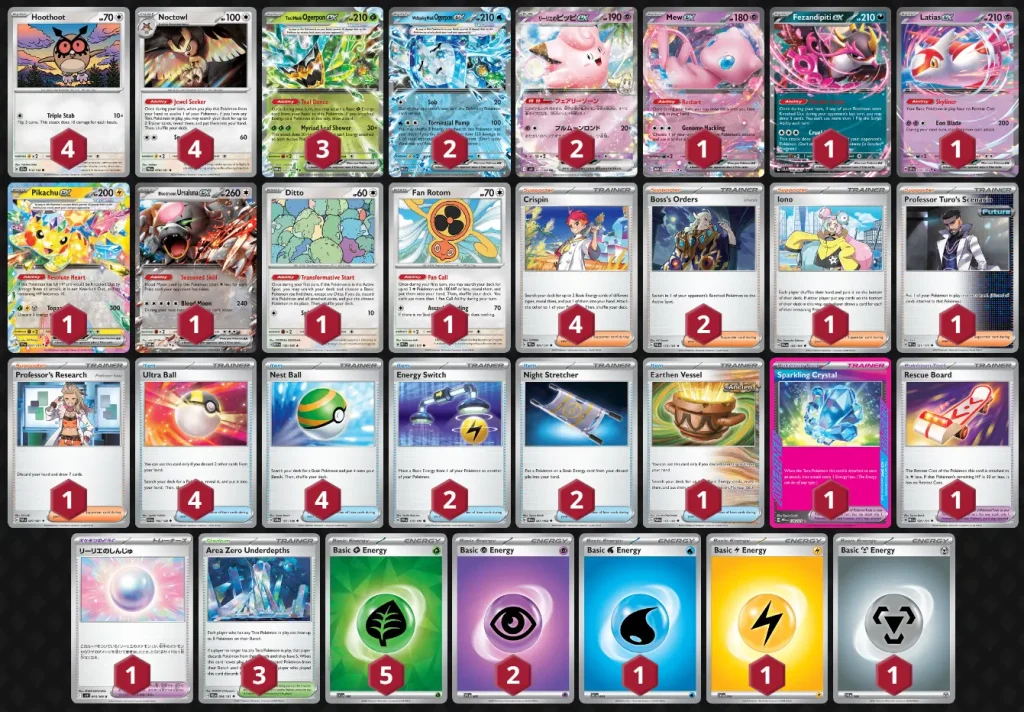
Pokémon: 22
4 Hoothoot SCR 114
4 Noctowl PRE 78
3 Teal Mask Ogerpon ex TWM 25
2 Wellspring Mask Ogerpon ex PRE 27
2 Lillie's Clefairy ex SV9 33
1 Mew ex MEW 151
1 Fezandipiti ex SFA 38
1 Latias ex SSP 76
1 Pikachu ex SSP 57
1 Bloodmoon Ursaluna ex TWM 141
1 Ditto MEW 132
1 Fan Rotom PRE 85

Trainer: 28
4 Crispin PRE 105
2 Boss's Orders PAL 172
1 Iono PAL 185
1 Professor Turo's Scenario PRE 121
1 Professor's Research PAF 87
4 Ultra Ball SVI 196
4 Nest Ball SVI 181
2 Energy Switch SVI 173
2 Night Stretcher SFA 61
1 Earthen Vessel PAR 163
1 Sparkling Crystal PRE 129
1 Rescue Board PRE 126
1 Lillie's Pearl SV9 93
3 Area Zero Underdepths PRE 94

Energy: 10
5 Grass Energy SVE 9
2 Psychic Energy SVE 5
1 Water Energy SVE 3
1 Lightning Energy SVE 4
1 Metal Energy SVE 8
This has been one of the strongest decks in the meta, and it can be teched differently depending on which deck you’re targeting. It makes it difficult for your opponent to set up their strategy, sniping out the opponent’s Benched Pokemon with Wellspring Mask Ogerpon ex. Lillie’s Clefairy ex’s ability weakens opponent’s Dragons, adding more damage to your Psychic attacks.
Teal Mask Ogerpon ex’s Teal Dance is a draw engine, drawing you a card when attaching Grass Energy. Eventually, Teal Mask Ogerpon ex’s Myriad Leaf Shower becomes a deadly attack, dealing 30 extra damage for each Energy attached to both Active Pokemon.
Bloodmoon Ursaluna ex and Pikachu ex are alternative damage dealers, whom you’ll rely on to one-shot an opponent’s Pokemon and secure Prize cards to win the game.
Poison Archaludon ex
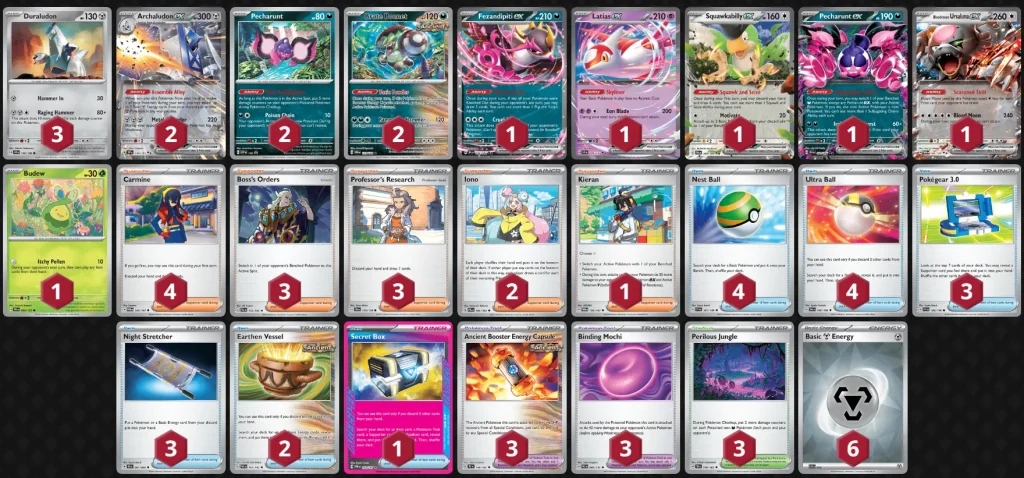
Pokémon: 15
3 Duraludon SCR 106
2 Archaludon ex SSP 130
2 Pecharunt PR-SV 149
2 Brute Bonnet PAR 123
1 Fezandipiti ex SFA 38
1 Latias ex SSP 76
1 Squawkabilly ex PAL 169
1 Pecharunt ex SFA 39
1 Bloodmoon Ursaluna ex TWM 141
1 Budew PRE 4

Trainer: 39
4 Carmine TWM 145
3 Boss's Orders PAL 172
3 Professor's Research JTG 155
2 Iono PAL 185
1 Kieran TWM 154
4 Nest Ball SVI 181
4 Ultra Ball SVI 196
3 Pokégear 3.0 SVI 186
3 Night Stretcher SFA 61
2 Earthen Vessel PAR 163
1 Secret Box TWM 163
3 Ancient Booster Energy Capsule TEF 140
3 Binding Mochi PRE 95
3 Perilous Jungle TEF 156

Energy: 6
6 Metal Energy SVE 16
Archaludon ex is a Stage 1 Pokémon that evolves from Duraludon. This Pokémon relies on your discard pile to get the most out of its Assemble Alloy ability, attaching 2 Metal Energy from your discard pile to your Metal Pokémon in any way you like. This makes Archaludon ex a solo carry Pokémon, capable of setting itself to attack with Metal Defender and dealing 220 damage to the opponent’s Pokémon.
Metal Defender also removes the weakness from Archaludon ex, which is useful against Fire-type Pokémon. Relicanth’s Memory Dive allows Archaludon ex to copy Duraludon Raging Hammer, so if it has a lot of damage, it can go for an attack stronger than Metal Defender.
Joltik Box
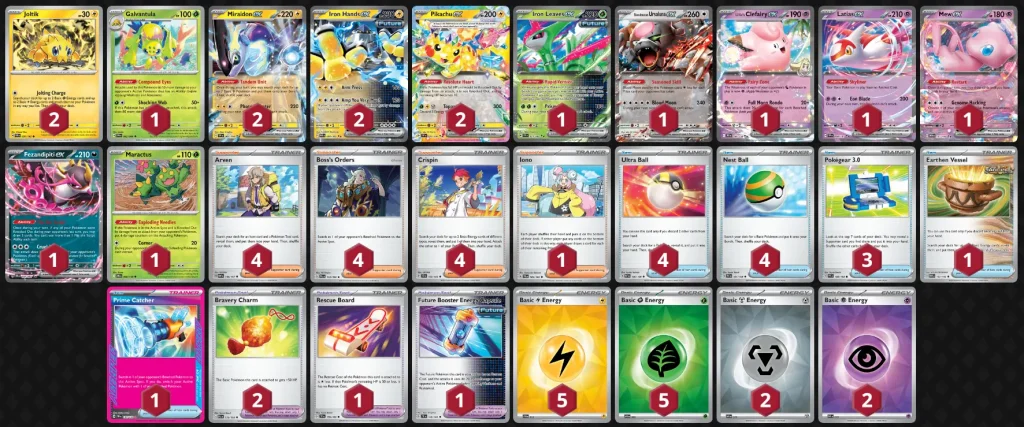
Pokémon: 16
2 Joltik SCR 50
1 Galvantula SFA 2
2 Miraidon ex SVI 81
2 Iron Hands ex PAR 70
2 Pikachu ex SSP 57
1 Iron Leaves ex TEF 25
1 Bloodmoon Ursaluna ex TWM 141
1 Lillie's Clefairy ex JTG 56
1 Latias ex SSP 76
1 Mew ex MEW 151
1 Fezandipiti ex SFA 38
1 Maractus JTG 8

Trainer: 30
4 Arven OBF 186
4 Boss's Orders PAL 172
4 Crispin SCR 133
1 Iono PAL 185
4 Ultra Ball SVI 196
4 Nest Ball SVI 181
3 Pokégear 3.0 SVI 186
1 Earthen Vessel PAR 163
1 Prime Catcher TEF 157
2 Bravery Charm PAL 173
1 Rescue Board TEF 159
1 Future Booster Energy Capsule TEF 149

Energy: 14
5 Lightning Energy SVE 12
5 Grass Energy SVE 9
2 Metal Energy SVE 16
2 Psychic Energy SVE 13
Joltik’s Jolting Charge attack lets you search your deck for 2 Basic Grass Energy cards and 2 Basic Lightning Energy cards and attach them to your Pokémon in any way you like. This enables you to attack with Miraidon ex, Iron Hands ex, and Pikachu ex to get earlier knockouts and secure your Prize cards.
Charizard Pidgeot
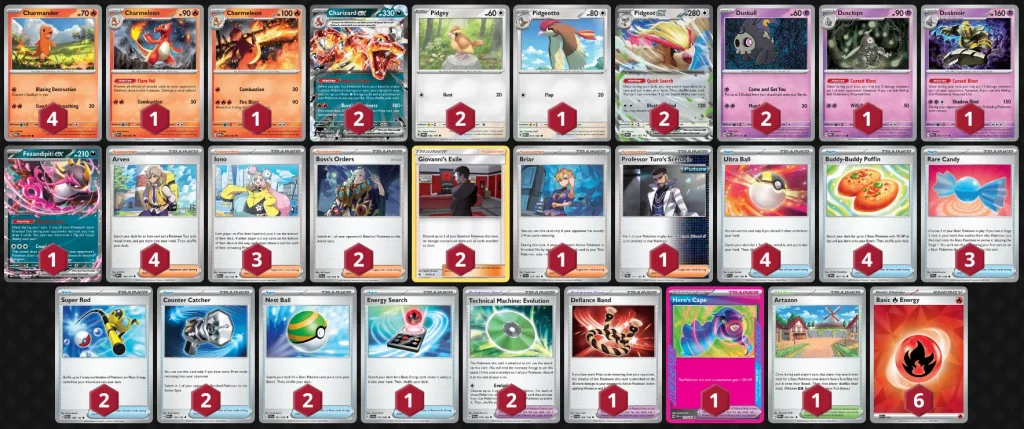
Pokémon: 18
4 Charmander MEW 4
1 Charmeleon PAF 8
1 Charmeleon MEW 5
2 Charizard ex OBF 125
2 Pidgey OBF 162
1 Pidgeotto MEW 17
2 Pidgeot ex OBF 164
2 Duskull PRE 35
1 Dusclops PRE 36
1 Dusknoir PRE 37
1 Fezandipiti ex SFA 38

Trainer: 36
4 Arven OBF 186
3 Iono PAL 185
2 Boss's Orders PAL 172
2 Giovanni's Exile HIF 57
1 Briar SCR 132
1 Professor Turo's Scenario PAR 171
4 Ultra Ball SVI 196
4 Buddy-Buddy Poffin TEF 144
3 Rare Candy SVI 191
2 Super Rod PAL 188
2 Counter Catcher PAR 160
2 Nest Ball SVI 181
1 Energy Search SVI 172
2 Technical Machine: Evolution PAR 178
1 Defiance Band SVI 169
1 Hero's Cape TEF 152
1 Artazon PAF 76

Energy: 6
6 Fire Energy SVE 10
Pidgeot ex sits in the back and starts searching for the cards you need to set up your win condition. Charmander + Charizard ex + Rare Candy is usually the go-to play to have a Charizard ex as soon as possible. From there, Charizard ex carries the game, capable of attaching Energy to himself through his Infernal Reign ability. Infernal Reign will look into your deck for three Basic Fire Energy and attach them.
Charizard ex‘s Burning Darkness deals 180 damage. However, that attack gains more damage the more Prize cards your opponent takes. With each card they take Burning Darkness gains 30 extra damage, so you can push up to 330 damage if your opponent took 5 Prize cards.
Flareon ex Noctowl Box
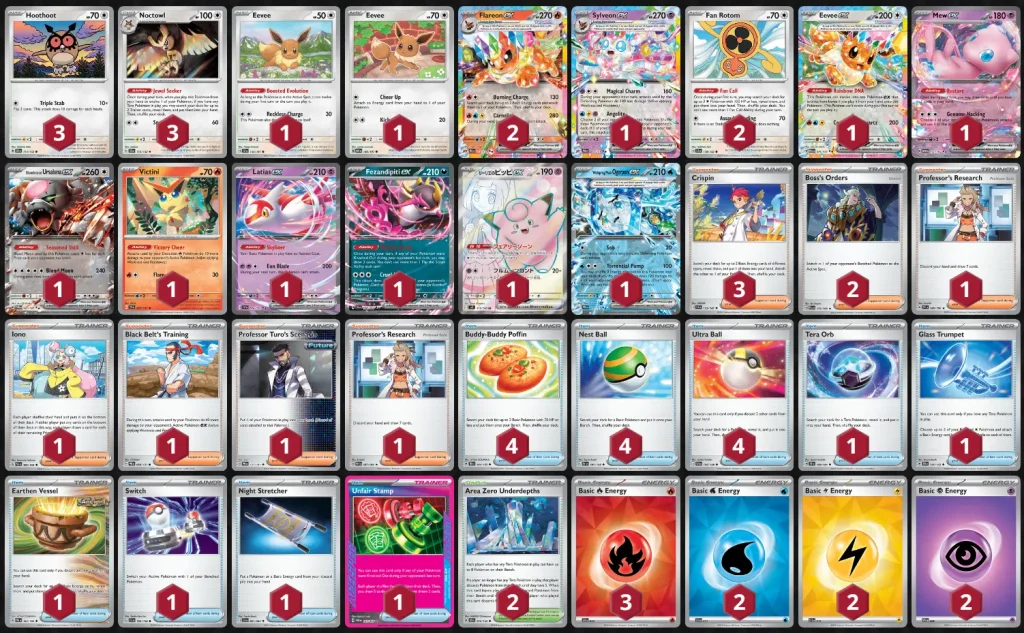
Pokémon: 21
3 Hoothoot SCR 114
3 Noctowl SCR 115
1 Eevee SSP 143
1 Eevee OBF 166
2 Flareon ex PRE 14
1 Sylveon ex PRE 41
2 Fan Rotom SCR 118
1 Eevee ex PRE 75
1 Mew ex MEW 151
1 Bloodmoon Ursaluna ex TWM 141
1 Victini SSP 21
1 Latias ex SSP 76
1 Fezandipiti ex SFA 38
1 Lillie's Clefairy ex SV9 115
1 Wellspring Mask Ogerpon ex PRE 27

Trainer: 30
3 Crispin SCR 133
2 Boss's Orders PAL 172
1 Professor's Research SVI 189
1 Iono PAL 185
1 Black Belt's Training PRE 99
1 Professor Turo's Scenario PRE 121
1 Professor's Research PAF 87
4 Buddy-Buddy Poffin TEF 144
4 Nest Ball SVI 181
4 Ultra Ball SVI 196
1 Tera Orb SSP 189
1 Glass Trumpet SCR 135
1 Earthen Vessel PAR 163
1 Switch SVI 194
1 Night Stretcher SFA 61
1 Unfair Stamp TWM 165
2 Area Zero Underdepths SCR 131

Energy: 9
3 Fire Energy SVE 10
2 Water Energy SVE 11
2 Lightning Energy SVE 12
2 Psychic Energy SVE 5
Flareon ex is the main damage dealer, which we’ll evolve from an Eevee. Flareon ex’s Burning Charge deals 130 damage to the opponent’s Active Pokemon and searches your deck for 2 Basic energy cards, and attaches them to one of your Pokemon. A great attack to get another one of your Pokemon ready to take over.
Carnelian is the real damage dealer, pushing 280 damage to the opponent’s Active Pokemon, but it means Flareon ex won’t be able to attack on your upcoming turn. If you have Victini on the bench, your Flareon ex attacks will deal an extra 10 damage, which can one-shot higher HP Pokemon.
Sylveon ex and Lillie’s Clefairy ex synergize together to one-shot Dragon type Pokemon like Dragapult with Sylveon ex’s Magical Charm attack.
Milotic
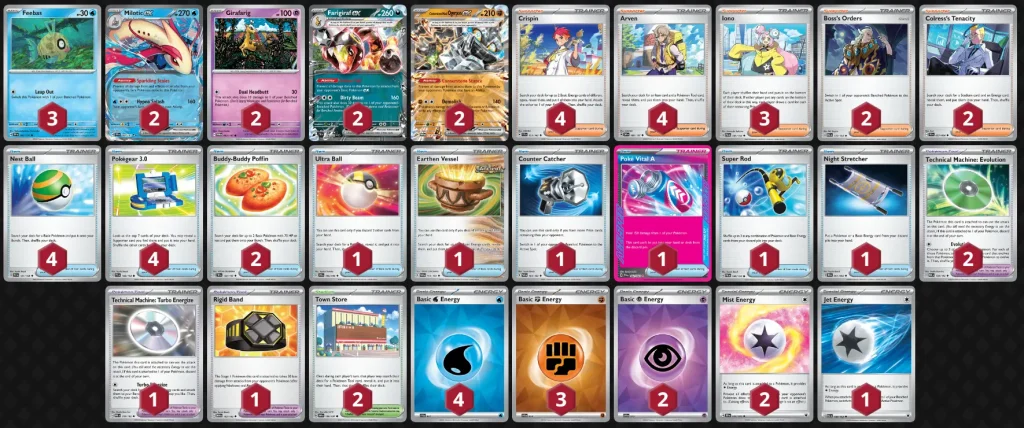
Pokémon: 11
3 Feebas SSP 41
2 Milotic ex SSP 42
2 Girafarig TWM 83
2 Farigiraf ex TEF 108
2 Cornerstone Mask Ogerpon ex TWM 112

Trainer: 37
4 Crispin SCR 133
4 Arven OBF 186
3 Iono PAL 185
2 Boss's Orders PAL 172
2 Colress's Tenacity SFA 57
4 Nest Ball SVI 181
4 Pokégear 3.0 SVI 186
2 Buddy-Buddy Poffin TEF 144
1 Ultra Ball SVI 196
1 Earthen Vessel PAR 163
1 Counter Catcher PAR 160
1 Poké Vital A SFA 62
1 Super Rod PAL 188
1 Night Stretcher SFA 61
2 Technical Machine: Evolution PAR 178
1 Technical Machine: Turbo Energize PAR 179
1 Rigid Band MEW 165
2 Town Store OBF 196

Energy: 12
4 Water Energy SVE 11
3 Fighting Energy SVE 14
2 Psychic Energy SVE 13
2 Mist Energy TEF 161
1 Jet Energy PAL 190
Roaring Moon
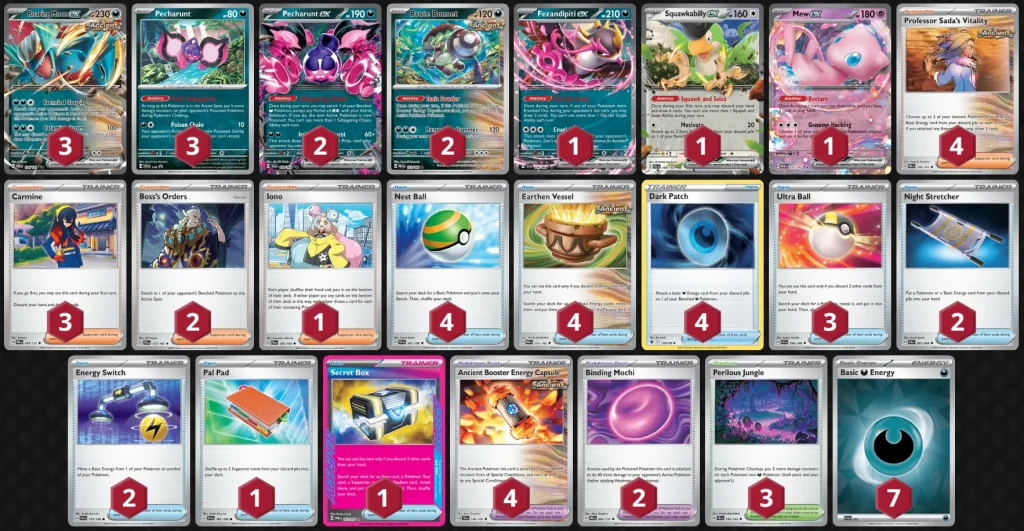
Pokémon: 13
3 Roaring Moon ex PAR 124
3 Pecharunt PR-SV 149
2 Pecharunt ex SFA 39
2 Brute Bonnet PAR 123
1 Fezandipiti ex SFA 38
1 Squawkabilly ex PAL 169
1 Mew ex MEW 151

Trainer: 40
4 Professor Sada's Vitality PRE 120
3 Carmine PRE 103
2 Boss's Orders PAL 172
1 Iono PAL 185
4 Nest Ball SVI 181
4 Earthen Vessel PAR 163
4 Dark Patch ASR 139
3 Ultra Ball SVI 196
2 Night Stretcher SFA 61
2 Energy Switch SVI 173
1 Pal Pad SVI 182
1 Secret Box TWM 163
4 Ancient Booster Energy Capsule TEF 140
2 Binding Mochi PRE 95
3 Perilous Jungle TEF 156

Energy: 7
7 Darkness Energy SVE 15
Roaring Moon ex relies on Calamity Storm as a damage dealer, but it has to discard a Stadium in play for the Power boost. However, Frenzied Gouging can knock out Pokemon with more than 220 HP, but the drawback is that Roaring Moon will deal 200 damage to itself, putting you at risk of a knockout on the upcoming turn.
Future Iron Hands
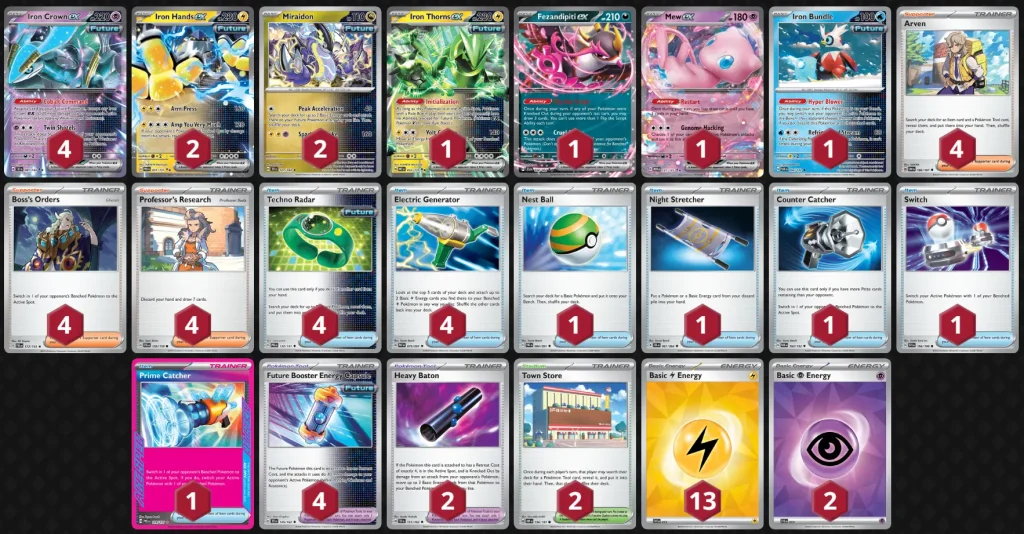
Pokémon: 12
4 Iron Crown ex TEF 81
2 Iron Hands ex PRE 31
2 Miraidon TEF 121
1 Iron Thorns ex PRE 32
1 Fezandipiti ex SFA 38
1 Mew ex MEW 151
1 Iron Bundle PAR 56
Trainer: 33
4 Arven OBF 186
4 Boss's Orders PAL 172
4 Professor's Research PAF 87
4 Techno Radar PRE 130
4 Electric Generator PAF 79
1 Nest Ball PAF 84
1 Night Stretcher SFA 61
1 Counter Catcher PAR 160
1 Switch SVI 194
1 Prime Catcher PRE 119
4 Future Booster Energy Capsule TEF 149
2 Heavy Baton TEF 151
2 Town Store OBF 196
Energy: 15
13 Lightning Energy SVE 12
2 Psychic Energy SVE 13
Ceruledge ex
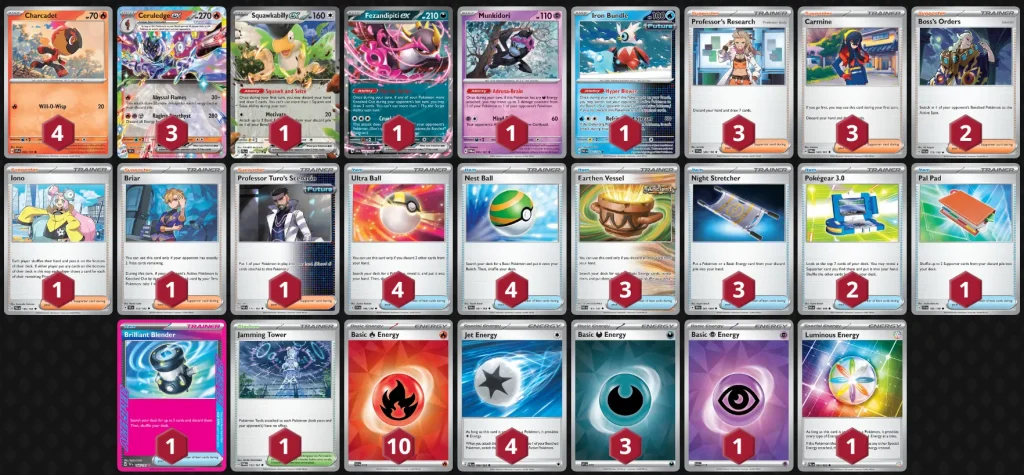
Pokémon: 11
4 Charcadet SSP 32
3 Ceruledge ex SSP 36
1 Squawkabilly ex PAL 169
1 Fezandipiti ex SFA 38
1 Munkidori TWM 95
1 Iron Bundle PAR 56

Trainer: 30
3 Professor's Research SVI 189
3 Carmine TWM 145
2 Boss's Orders PAL 172
1 Iono PAL 185
1 Briar SCR 132
1 Professor Turo's Scenario PAR 171
4 Ultra Ball SVI 196
4 Nest Ball SVI 181
3 Earthen Vessel PAR 163
3 Night Stretcher SFA 61
2 Pokégear 3.0 SVI 186
1 Pal Pad SVI 182
1 Brilliant Blender SSP 164
1 Jamming Tower TWM 153

Energy: 19
10 Fire Energy SVE 10
4 Jet Energy PAL 190
3 Darkness Energy SVE 15
1 Psychic Energy SVE 13
1 Luminous Energy PAL 191
Iron Thorns
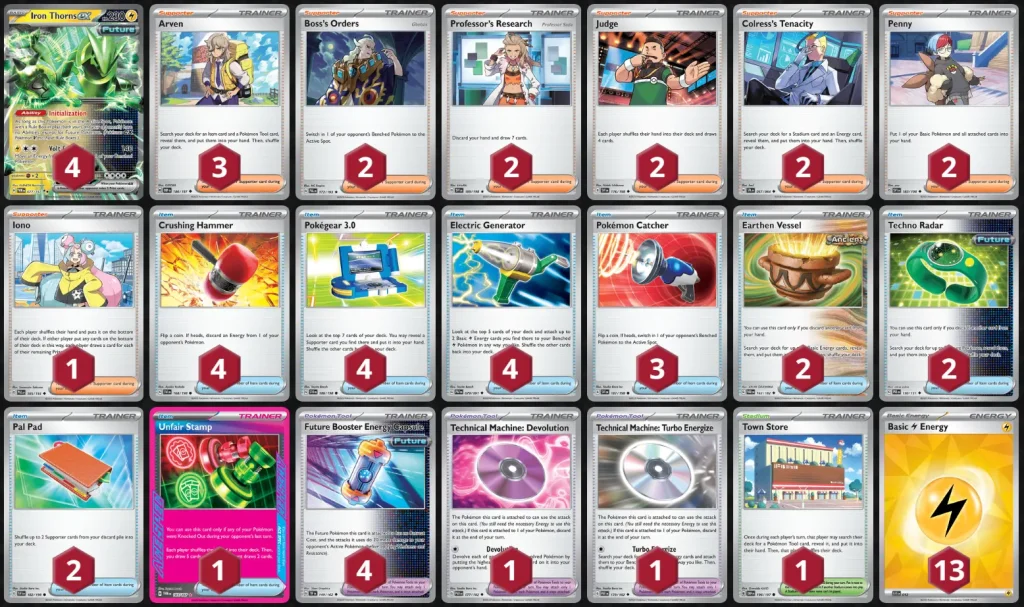
Pokémon: 4
4 Iron Thorns ex TWM 77

Trainer: 43
3 Arven OBF 186
2 Boss's Orders PAL 172
2 Professor's Research SVI 189
2 Judge SVI 176
2 Colress's Tenacity SFA 57
2 Penny SVI 183
1 Iono PAL 185
4 Crushing Hammer SVI 168
4 Pokégear 3.0 SVI 186
4 Electric Generator PAF 79
3 Pokémon Catcher SVI 187
2 Earthen Vessel PAR 163
2 Techno Radar PRE 130
2 Pal Pad SVI 182
1 Unfair Stamp TWM 165
4 Future Booster Energy Capsule TEF 149
1 Technical Machine: Devolution PAR 177
1 Technical Machine: Turbo Energize PAR 179
1 Town Store OBF 196

Energy: 13
13 Lightning Energy SVE 12
This is a meta call, which uses Iron Thorn’s Initialization to take advantage of decks that rely on their Pokemon’s abilities. By shutting opponents from activating their Pokemon’s Ability, you’re slowing them down immensely, giving you enough time to start Knocking Out their Pokemon with Iron Thorn’s Volt Cyclone.


