Red Purple Monkey D. Luffy starts with 3 Life cards, which can be daunting for newer players. However, his base 6,000 Power puts pressure on opponents, often forcing them to overcommit Don just to land successful attacks. Combined with strong ramp effects—both from the Leader effect and supporting cards—this deck can accelerate its curve and play high-cost Characters earlier than most.
Thanks to this consistent ramping, it makes sense to run several powerful late-game win conditions. These threats are tough for most decks to remove, and if they stick around, they can quickly turn the tide in your favor and secure victory.
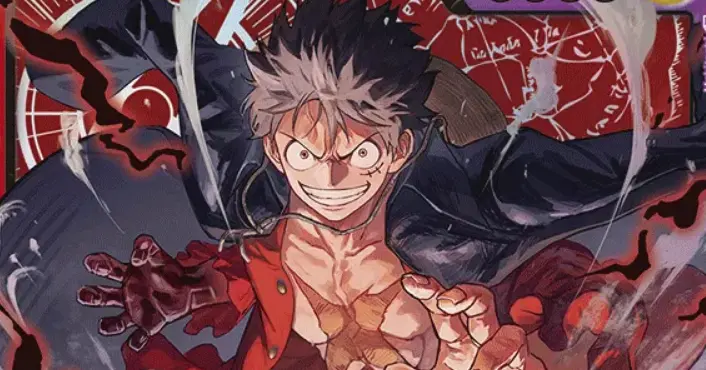
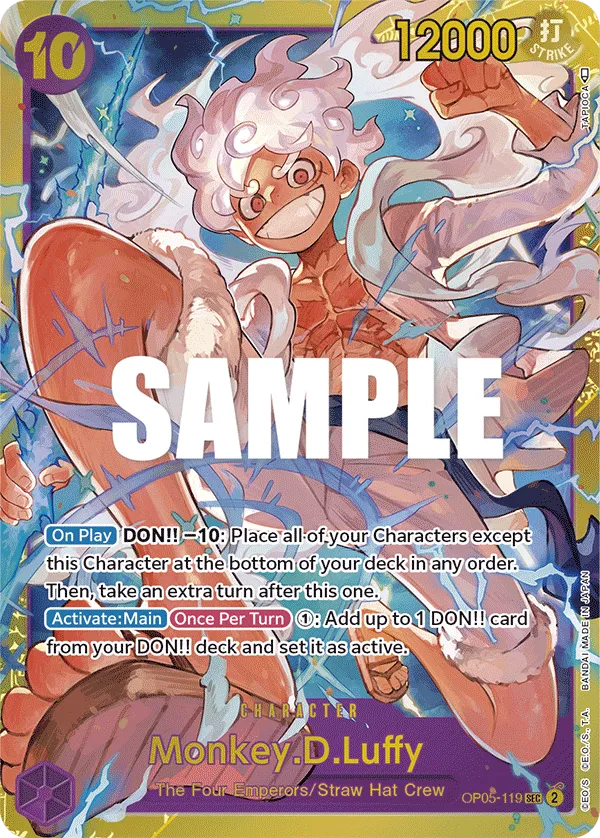
Leader

Leader Red Purple Luffy only has 3 Life cards, so he might seem vulnerable to aggressive decks. However, the 6,000 Power makes it more of a challenge for opponents to get their attacks through and will require fewer Counter resources from your end to shut down attacks. On top of that, the 6,000 Power on your Leader proves useful when going for attacks, exerting more pressure with each Leader swing, and forcing the opposing player to commit more Counter cards.
Leader Red Purple Luffy‘s effect lets you ramp 1 Active Don, allowing you to make bigger plays on earlier turns. However, you can only activate it on Don 0 and 8, which means when we’re at Don 8+, we can play a higher-cost Character or set up a stronger turn.
RP Luffy Decklist


How to Play
Searcher
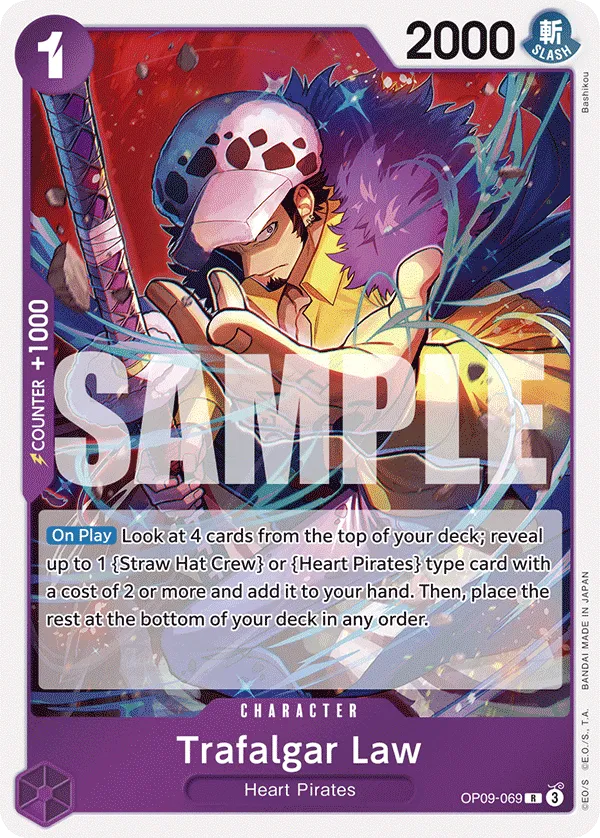
The 1-cost Nami and 1-cost Trafalgar Law are searcher cards, letting you choose 1 {Straw Hat Crew} type card from the top of your deck. Your card choice will depend on your current hand and what you’re planning to play on the upcoming turns. You can choose a Character to develop, a late-game carry, or a defensive card to Counter an attack.
Trafalgar Law is more limited; he only looks at the top 4 cards of your deck, and the {Straw Hat Crew} type card has to be a 2-cost or more. So you can’t draw cards like Radical Beam, Gum Gum Giant, or 1-cost Nami.
Early Plays
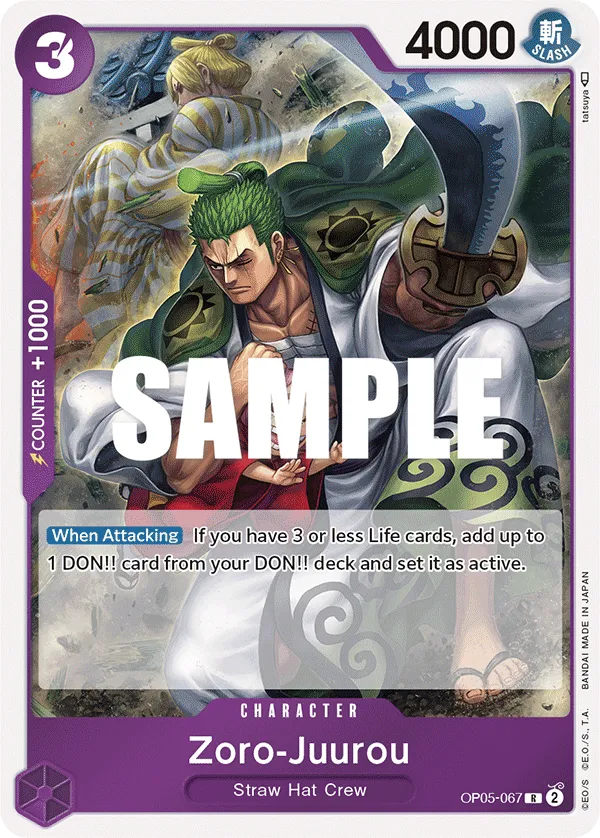
If you go first, Zoro-Juurou is your best play. Zoro-Juurou only ramps when he attacks, so you’ll have to wait until the upcoming turn, but he does give an Active Don. On turn 3, you’ll be at 5 Don, attacking with Zoro-Juurou will put you at 6 Don, but since he’s only a 4,000 Power attacker, in most cases you’ll attach Don to him to force the opponent into playing a Counter card. In some cases, you might avoid attaching a Don to him to play a high-cost card. For example, you can play a 6-cost Luffy on turn 3 if you’re going first, or a 7-cost Sanji if you’re going second.
If you’re going first, the ramp effect is extremely valuable since it puts us at 8 Don on turn 4, allowing us to activate our Leader Luffy‘s ramp effect to drop a 9-cost Character.
As for 3-cost Sanji, he’s more of an aggressor, gaining +3,000 Power during your turn to go for a 6,000 Power attack. We often won’t protect him from an attacker, but we’re not too upset about seeing him getting KO’d since we’ll trigger his card draw effect.
4-cost Zoro-Juurou is best played on turn 2 if you’re going second, offering a searcher effect to look at the top 5 cards of your deck to add a {Straw Hat Crew} type card to your hand. Zoro-Juurou being a 6,000 Power Character means we can put some pressure on the opponent, and if possible, we’ll protect him from an attacker to keep the pressure. Since Zoro-Juurou doesn’t have a Counter effect, he’ll end up a dead card in our hand if we don’t play him. We might have to trash him with Gum Gum Giant to prioritize the Characters with a Counter.
Nico Robin is a low-cost blocker to protect you from one of the opponent’s attacks. When KO’d Robin returns 1 Don to look at the top 3 cards of your deck and add up to 1 {Straw Hat Crew} type card. This can find you your upcoming play or a card with a Counter effect to protect you from an attack.
Mid-game Rushers
6-cost Monkey D.Luffy is an aggressor, a perfect Rush attacker who can attack twice per turn. However, to attack a second time with Luffy, you’ll have to return 2 Active Don and take a Life card. This is a huge drawback, and you’ll usually hold off on activating it until the late game when you’re trying to win the game.
As for 7-cost Sanji, you can return 1 Don to activate his effect, gaining the Rush keyword and resting one of the opponent’s 6-cost or less Characters. This allows you to attack that rested Character with your Leader and/or Sanji to KO it and remove an attacker from the opponent’s side. Sanji is a great play if there’s a Character you want to try and remove from play, helping you keep control of the field.
The Carry
9-cost Monkey D. Luffy is your best play when you’re at 9 Don. He’s a 10,000 Power Character that gains the Rush keyword and draws you a card when you return a Don. Returning a Don at 9 Don won’t put you behind on the upcoming turn, you’ll still be at 10 Don to keep making meaningful plays.
We usually want to slam 9-cost Luffy on turn 4, developing a big body which can prove challenging for most decks to remove in the mid-game.
Keep in mind, when 9-cost Luffy deramps, you can activate your Leader effect to gain an Active Don, which you can use for a higher-power attack or bank it to play a Counter Event.
Control Events
Gum Gum Mole Pistol is a control event, reducing the Power of one of the opponent’s Characters by 5,000 and then KOing a Character with 2,000 Power or less. This means you can KO a 7,000 Power or less with Gum Gum Mole Pistol, removing a key Character on your opponent’s side of the board and maintaining control over it. However, to activate Gum Gum Mole Pistol‘s KO effect, you need to have a Character with 6,000 Power or more in play, which shouldn’t be too difficult to have for this deck, especially with 3-cost Sanji in the list.
Counter Events
Gum-Gum Giant is a powerful defensive event that returns 2 Don and trashes a card from your hand to give your Leader or one of your Characters +4,000 Power. It also draws two cards, ensuring you have more plays to make or even find more Counter cards. Since Gum-Gum Giant is returning 2 Don, you want to hold off on playing it until you’re at 8+ Don so you don’t struggle to play your high-cost Characters on the upcoming turn.
Radical Beam gives your Leader or one of your Characters a +2,000 Power boost, helping you Counter out of an attack. If your Leader is at 2 Life cards or less, Radical Beam will give a +4,000 Power boost, shutting down a more threatening attack to keep you longer in the game.
+2,000 Counters
2-cost Sanji can target one of your 6,000 Power or more {Straw Hat Crew} type Characters, preventing your opponent from activating their Blocker when that Character attacks. It can be used along with 6-cost Monkey D.Luffy to attack once and guarantee no blocker can stand in your way. It can also work with 9-cost Monkey D.Luffy if your opponent is at 0 Life cards and you can go for the finisher play.
Uso-Hachi can be used to rest one of the opponent’s 5-cost or less Characters, enabling you to attack and KO that Character or ignore it if it’s a blocker and focus your attacks on their Leader.
6-cost Sanji is a blocker, but you’ll usually play him as a Counter card.
General Tips
- Protect your Life cards. You’re a 3 Life card Leader, so protecting your last 2 Life cards is important if you want to stay out of the danger zone and potentially use your 6-cost Luffy‘s effect.
- Leader Ramp. When you’re at 8 Don or more, you can start ramping with your Leader to playing a higher-cost Character or go for stronger attacks. You have multiple deramp cards, so even if you’re at 10 Don, after you’ve deramped, you can ramp with your Leader to gain an Active Don.
- Identify when you should switch to full aggro. Since your Leader has 6,000 Power, and you have access to Gum Gum Giant, you can focus your attacks on the opponent’s Leader, trying to race them for the win or forcing them to play defensively.
Mulligan Tips
Going First: 1-cost Nami or Trafalgar Law, 3-cost Zoro-Juuro.
Going Second: 1-cost Nami or Trafalgar Law, 4-cost Zoro-Juuro, 6-cost Luffy.
Turn-Based Gameplay
Going First
- Turn 1 (1 Don): 1-cost Nami or Trafalgar Law.
- Turn 2 (3 Don): 3-cost Zoro-Juurou, 3-cost Sanji, or 3-cost Nico Robin.
- Turn 3 (5 Don 6 Don): If you ramped, you can play 6-cost Monkey D.Luffy, but you can’t Rush attack. Else, you can play 4-cost Zoro-Juurou.
- Turn 4 (7 Don 8 Don): Ramp with Leader Luffy to get to 9 Don and play 9-cost Monkey D.Luffy. If you don’t have Luffy you can consider playing 7-cost 7-cost Sanji.
- Turn 5 (9 Don 10 Don): 9-cost Monkey D.Luffy then ramp with your Leader.
- Turn 6 (10 Don): 9-cost Monkey D.Luffy then ramp with your Leader.
Going Second
- Turn 1 (2 Don): 1-cost Nami or Trafalgar Law.
- Turn 2 (4 Don): 4-cost Zoro-Juurou.
- Turn 3 (6 Don): 6-cost Monkey D.Luffy.
- Turn 4 (8 Don 9 Don): Ramp with Leader and play 9-cost Monkey D.Luffy.
- Turn 5 (10 Don): 9-cost Monkey D.Luffy then ramp with your Leader.
Other Cards to Include


- Nico Robin is a meta choice to KO a 1,000 Power Character like Mr 2 Bon Clay, Rebecca, and Doc Q.
- Mr 2 Bon Clay can be played on turn 2 if you’re going second, giving you an Active Don to attach to your Leader and attack for 7,000 Power or play a 1-cost Nami. Mr 2 Bon Clay can match the Power of one of the opponent’s Characters when it goes for the attack, so its pressure relies on what the opponent has in play. When rested, Mr 2 Bon Clay is extremely vulnerable with their 1,000 Power, so you’ll almost always let them go when the opponent attacks them.
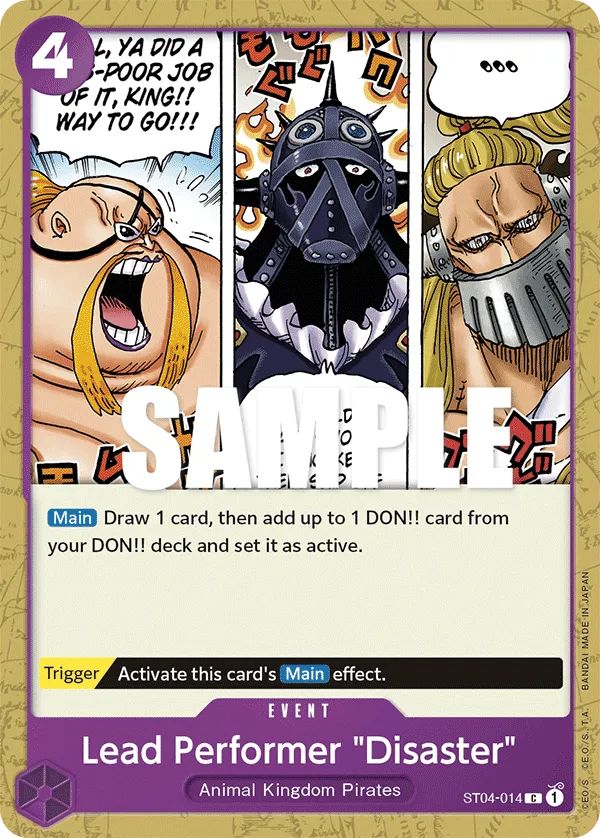
- Lead Performer “Disaster” is another ramp option, but you won’t be developing anything on the field. Instead, this event draws you a card and ramps an Active Don. It’s best played on turn 2 if you’re going second and you don’t have Mr 2 Bon Clay.
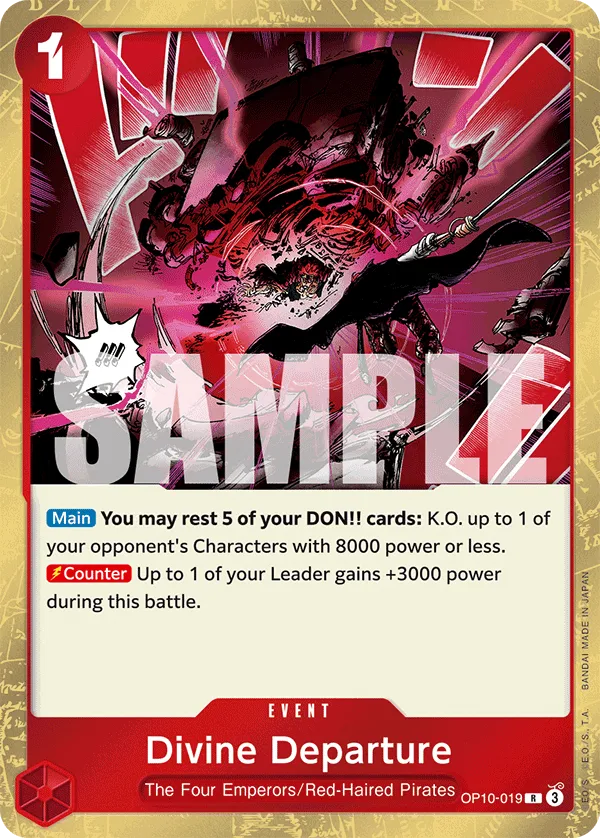
- Divine Departure is a flexible event that serves two key functions: it can KO an opponent’s Character with 8,000 Power or less, or it can be used as a Counter event to block an attack. To KO a Character, you must rest 5 DON!!, so you’re using 6 Don to play it.

- 5-cost Luffy is a Rush attacker that can go for 6,000 Power attacks but will also attach a Don to a Character or your Leader, giving you a more aggressive turn.
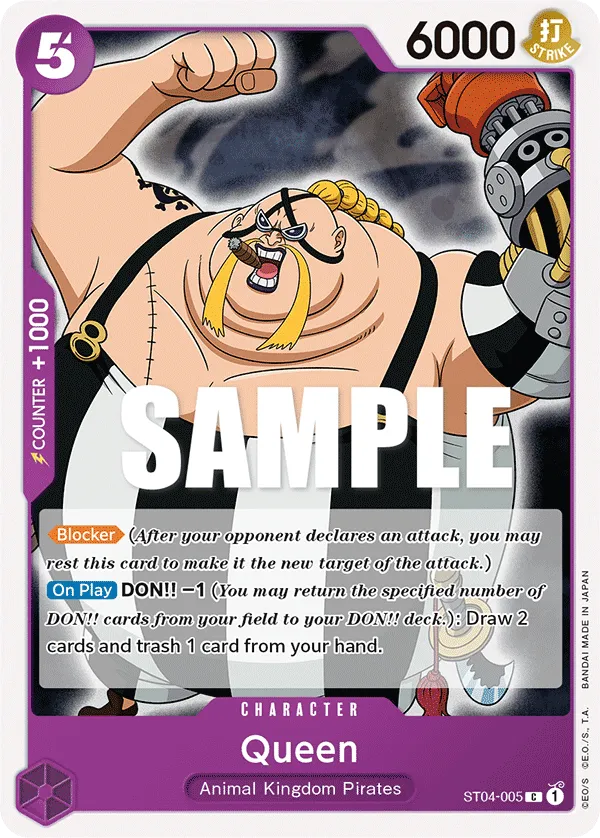
- As for Queen, he’s more of a value card, drawing 2 cards and trashing one from your hand. You will though have to return 1 Don, so it might not be the best play early into the game. Queen having the Blocker keyword means he can protect from one of the opponent’s attacks.
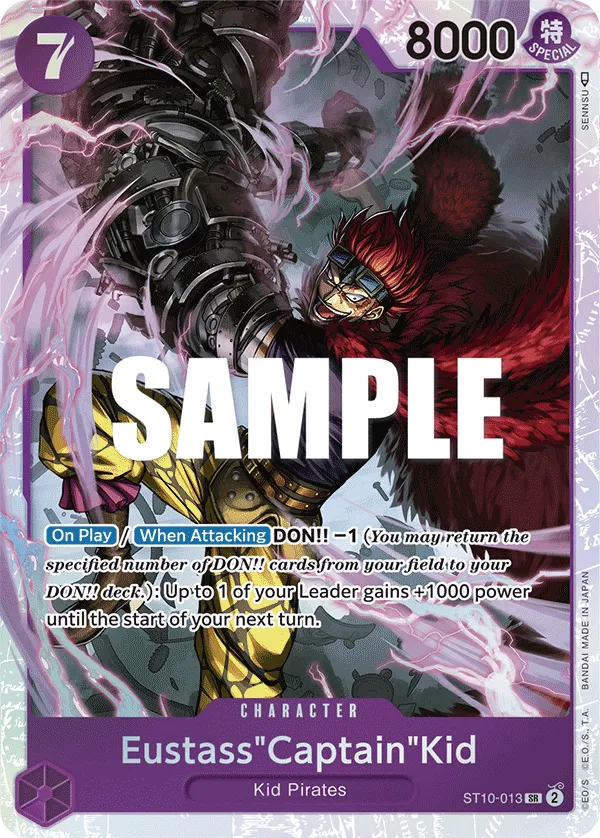
- 7-cost Eustass”Captain”Kid gives your Leader +1,000 Power that remains on him until the end of the opponent’s turn. This turns Luffy into a 7,000 Power Leader, making it difficult for your opponent’s attacks to go through. However, to get the +1,000 Power, you will have to return a Don, so it could prevent you from playing a 10-cost Shanks on the upcoming turn if Eustass”Captain”Kid is played on Don 7. If he’s played on Don 8, you won’t be behind on Don thanks to your Leader’s ramp effect.
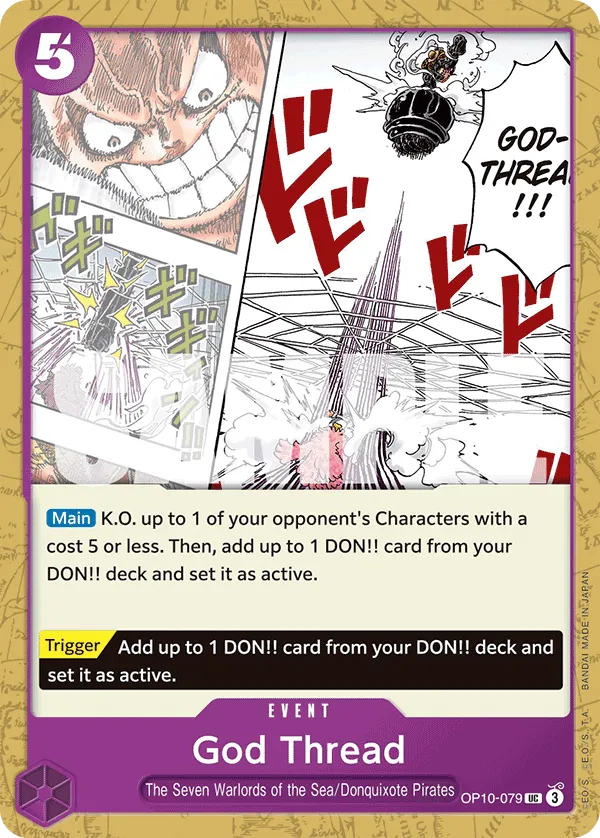


- 5-cost God Thread is a control event that KO’s one of your opponent’s 5-cost Characters. It also ramps you up by 1 Active Don.
- 7-cost Benn Beckman is a control option capable of KOing one of the opponent’s Characters. Benn Beckman can trash one of the opponent’s Characters with a power of 6,000 or less. The ability to trash instead of KO is more valuable as it bypasses the KO immunity of cards like 4-cost Borsalino and 5-cost Sabo.
- 9-cost Edward Newgate gives your Leader +2,000 Power on the turn he’s played. That +2,000 Power will remain on your Leader until the end of the opponent’s upcoming turn. So with that extra Power, Leader Luffy packs a heavier punch when he attacks, and at the same time, it will be difficult for opponents to damage an 8,000 Power Leader.
- 10-cost Monkey D.Luffy can be a late-game winner, returning all your Don to give you an extra turn.
Important Matchups
Green Purple Luffy
- You want to pressure Green Purple Luffy in the early to mid-game, trying to take their Life cards to deter them from using their 6-cost Luffy’s re-stand effect.
- They can rest your 3-cost Zoro-Juurou with their 4-cost Zoro, shutting down your early ramp.
- Sanji & Pudding ramps for them, allowing them to activate their Leader effect more often. We need to use Gum Gum Mole Pistol to remove it immediately.
- Their deck runs multiple Counter cards, so if they’re holding on Active Don, we should expect a Gum Gum Giant to protect their Leader.
- Electrical Luna can keep all your 7-cost or less Characters rested, preventing them from attacking on the upcoming turn. 4-cost Zoro-Juurou, 6-cost Luffy, and 7-cost Sanji are in range for Electrical Luna. 9-cost Luffy will be the carry, since your opponent can’t stop him from attacking, and they can’t easily KO him.
Black Marshall D.Teach
- Black Teach can shut off our On Play effects, preventing cards like 4-cost Zoro-Juurou, 7-cost Sanji, and 9-cost Luffy from activating their effects. Regardless, we have to drop bodies on the field to try and rush their Leader.
- The plan is to have multiple Characters in play and start hitting their Leader to drop them low on Life cards. They’ll often play defensively, trying to KO your rested Characters through Jesus Burgess.
- 10-cost Teach prevents one of our Characters from attacking and acts as a defensive wall. So, if we don’t have multiple Characters to attack, we’ll struggle to break through. We might even attach Don to our 1-cost Characters and use them as attackers.
- Since they have to trash a card to activate their Leader effect, they’ll burn their resources in the late-game, and we should be able to start pressuring their Leader with 7,000+ Power attacks.
Green Bonney
- Green Bonney is a stall Leader, using 1 Active Don to rest one of our attackers. This means we want to attack with our highest Power Character first before they get to rest it. (Unless we have 2 Characters with the same Power, two 9-cost Luffy).
- We want to KO key Characters like Urouge, Cavendish, and Carrot. Sanji is perfect here to rest and kill them.
- The Fortress Strategy can be problematic, we’ll rely on 9-cost Luffy to go for high-power attacks, forcing them to use their Counter cards or blockers.
- 9-cost Shanks is problematic, capable of KOing your 9-cost Luffy and shifting the game in your favor.
Closing Words
Red Purple Luffy has been gaining traction again, fighting the top meta performers along with the Straw Hat Crew! This deck’s built-in ramp effect allows for a stronger mid-game, which can overwhelm opponents and put them behind in the game.
This is it from me! If you want to keep up with my card game shinganingans, consider following me on Twitter.


