
Purple Kaido is making a strong comeback in the OP14 meta, fueled by the powerful new cards from EB04 like King. One of the oldest Leaders in the One Piece Card Game, the ST04 Purple Kaido has always offered a unique ramp-and-deramp playstyle, and recent support has finally pushed it back into competitive relevance. With Kaido seeing a lot more play time on the SIM and showing up in locals, Purple Kaido is once again a Leader worth paying attention to.
Legend

Kaido‘s ability requires you to return 7 Don cards to the deck, allowing you to trash one of your opponent’s Life Cards. While this is a costly move that can slow your next turn, removing an opponent’s Life Card can set you up for a decisive attack, especially if you have a Rush attacker ready. At the same time, trashing a card puts the opponent behind in terms of resource value.
Given its high cost, it’s best to use Kaido‘s ability in the later stages of the game, where losing the Don cards doesn’t shut down your upcoming turn.
Our deck includes several Ramp tools, so recovering the Don won’t be a major concern. Black Maria makes life extremely easier when going for the Leader Kaido’s effect, as she makes sure we can still make meaningful plays thanks to her massive ramp effect.
Decklist


How to Play
Purple Kaido focuses on quickly ramping up your Don to play high-cost Characters on earlier turns. With many cards returning Don, your game plan involves consistently generating more Don, particularly through the Onigashima Island Stage or Black Maria. This stage card provides a Rested Don each turn, accelerating your strategy and compensating for the Don returned by other cards.
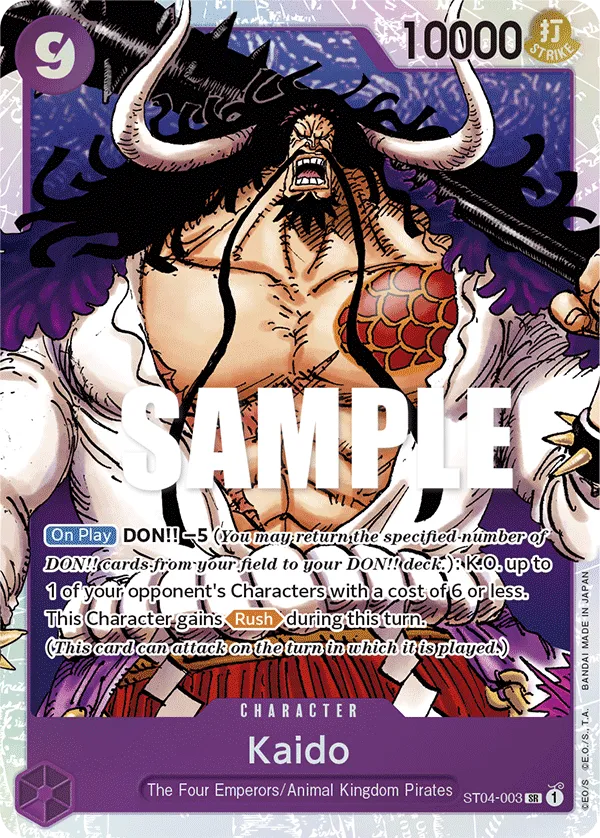
The objective is to play the 9c and 10c Kaido and dominate the board with their high Power. They’re difficult for most decks to remove and although they return a lot of our Don, we can quickly Ramp up again and play other big plays a turn later.
Ramp Cards
Ramp cards are essential for accelerating our strategy and recovering after returning Don cards due to one of our card effects.
Onigashima Island is crucial for our Ramp game plan. Finding it early is key, as it grants us a rested Don each turn, boosting our subsequent turns.
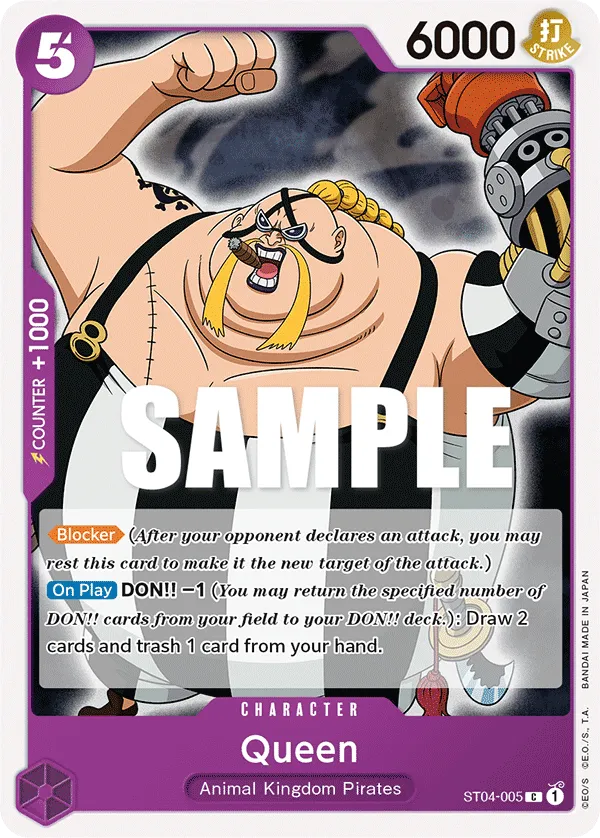
The 1-cost Queen lets you trash an {Animal Kingdom Pirates} type card from your hand to draw 2 cards, adding more resources to your hand. You can also activate Queen‘s effect, resting 2 Don to ramp 1 rested Don. We typically aim for this effect in the early game if we don’t draw Onigashima Island, and we can still go for it in the mid-game to help us reach 10 Don faster. We want to trash dead cards in our hand like other copies of Onigashima Island.
Black Maria enables us to use our Leader effect in the mid-game without worrying about lagging behind. Opponents must deal with Black Maria quickly; otherwise, your Leader will consistently trash one of their Life Cards each turn. This reduces their resources, weakens their late game, and makes them more vulnerable to your attacks.
The ideal scenario is to start using the Leader effect at turn 4, and through Black Moria‘s Ramp effect, we gain back the returned Don, making sure we continue the pressure on upcoming turns.
Bon Clay is great if we’re going second, ramping 1 Active Don, and he’ll remain in play as a potential attacker, capable of copying the Power of an opponent’s Character when he goes for the attack. He’s vulnerable during the opponent’s turn, but if we manage to get 1 attack out of him, he’ll be well worth the development.
Bon Clay is also nice against 6,000 Power Leaders, as we can attach the 1 Don to Leader Kaido and threaten one of their Life cards.
King is a 7,000 Power Character who we want to have in play on Don 6/7. He’s great for putting pressure through his attacks, and the opposing player can’t KO him easily through attacks or effects. King‘s effect lets you return 1 Don to keep him in play if he’s KO’d, making sure you keep a threat on the board and forcing the opponent to find other means to deal with him.
As for King‘s Activate: Main effect, we get to ramp 1 rested and 1 Active Don, perfect for mitigating our deramp effects, and the Active Don we gain can be used offensively to power up our attacks or banked for our Counter events.
Defensive Value
Queen is a value card, drawing 2 cards, and trashing 1 from hand. This helps cycle out any additional copies of Onigashima Island, which are otherwise dead cards, or dead cards with no counter that we don’t expect to play later on.
Queen is a 6,000 Power Blocker, capable of protecting us from an attack, but can also become an offensive attacker if need be, when we’re trying to put more pressure to win the game.
Aggressive Kaido
The 7-cost, 9,000 Power Kaido is where we turn up the pressure and shift into aggressive attacks. By returning 2 DON!!, Kaido gains Rush and rests one of the opponent’s 7-cost or lower Characters. If a blocker is in play, Kaido effectively shuts it down, letting us attack the opponent’s Leader without worrying about our attack being blocked.
Kaido’s resting effect can also be used for board control, tapping down a key opposing Character and setting it up to be KO’d through our attacks.
Similar to King, the 7-cost Kaido is difficult to remove. By returning 1 DON!!, he can keep himself in play, forcing the opponent to either ignore him or rely on alternative removal to deal with the threat.
When playing the 7-cost Kaido, it’s important to plan ahead for the following turn. Returning 2 DON!! can prevent us from reaching 10 DON!!, which may lock us out of powerful follow-up plays like 10-cost Kaido or Gol D. Roger.
In the late game, if the opponent is down to 1 Life card, we want rested Don to activate Leader Kaido‘s effect and trash a Life card before we start going for attacks. Instead of wasting our Don on non-threatening units, we can develop Rush Kaido, trash a Life card, and start going for our attacks, making it even harder for the opposing player to counter all of our attacks.
Defensive Kaido
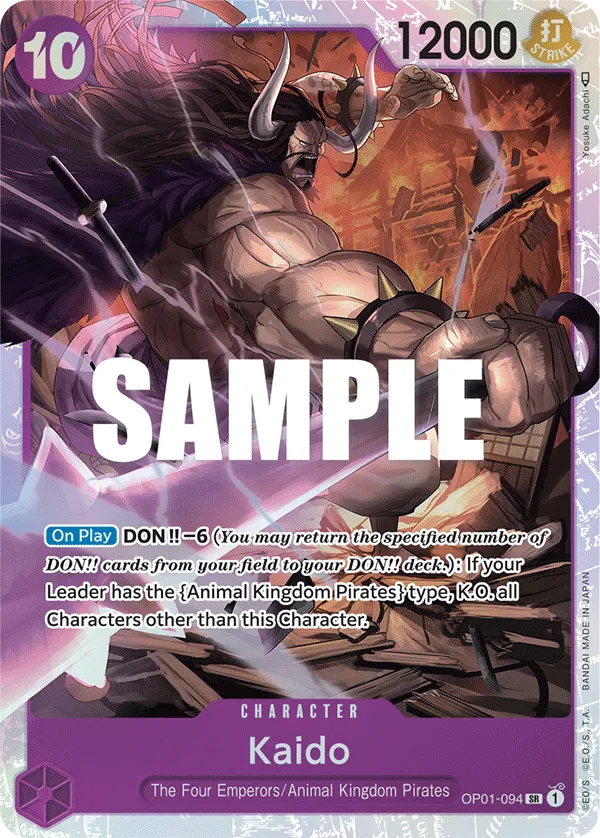
The 10-cost Kaido completely shifts the game by KO’ing all Characters except himself, leaving behind a massive 12,000 Power heavy hitter to slam the opponent’s Leader. Since this effect also clears your own Characters, it’s important to attack with them first before deploying 10-cost Kaido. This card shines when the opponent has multiple threats on board or in slower matchups where a single, high-power Character can dominate the late game.
Activating Kaido’s effect requires returning 6 DON!!, making it expensive—but often worth it if it wipes the opponent’s board. This also synergises perfectly with 6-cost King and 7-cost Kaido, both of which can stay on the field even when they would be KO’d. By returning 1 DON!! to activate their KO-prevention effects, you can keep King and 7-cost Kaido in play after resolving 10-cost Kaido’s board wipe, leaving the opponent facing multiple high-impact threats instead of just one.
+2,000 Counters
Uso-Hachi can be used to rest one of the opponent’s 5-cost or less Characters, enabling you to attack and KO that Character or ignore it if it’s a blocker and focus your attacks on their Leader.
6-cost Sanji is a blocker, but you’ll usually play him as a Counter card. However, with your deck’s capability to deramp, you’ll be able to play Sanji for 3 Don only, making him a perfect blocker in the late-game to buy you some time.
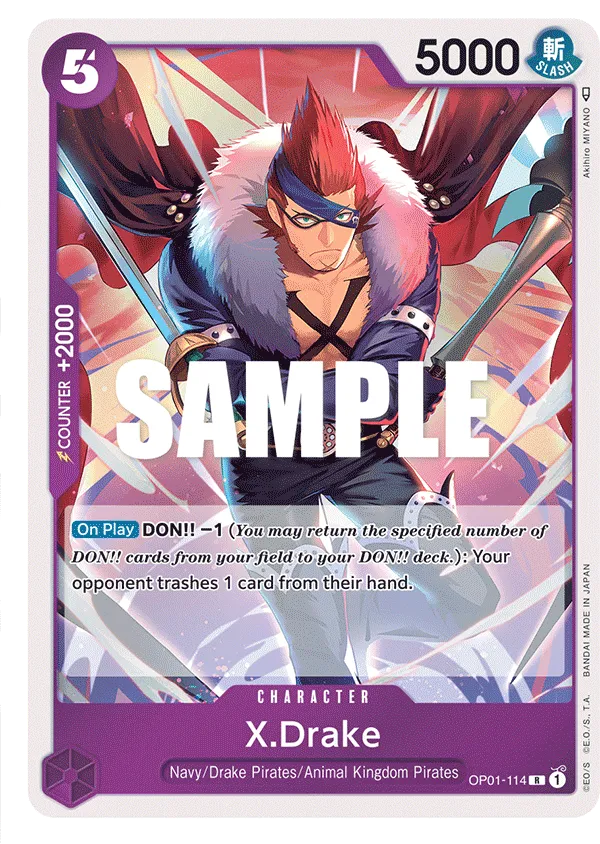
X.Drake is a searchable +2,000 Counter and can be played to for the opponent to trash a card from their hand, bleeding them out of resources.
Events
We’re going to claim the One Piece!!! allows you to look at the top 5 cards of your deck and draw an {Animal Kingdom Pirates} type card. This ability is crucial for finding the pieces necessary to execute our game plan effectively.
Gum-Gum Jet Gatling is a Counter Event to protect your Leader by granting them +3k Power. Trash a card that you don’t anticipate needing in later turns when using this event.
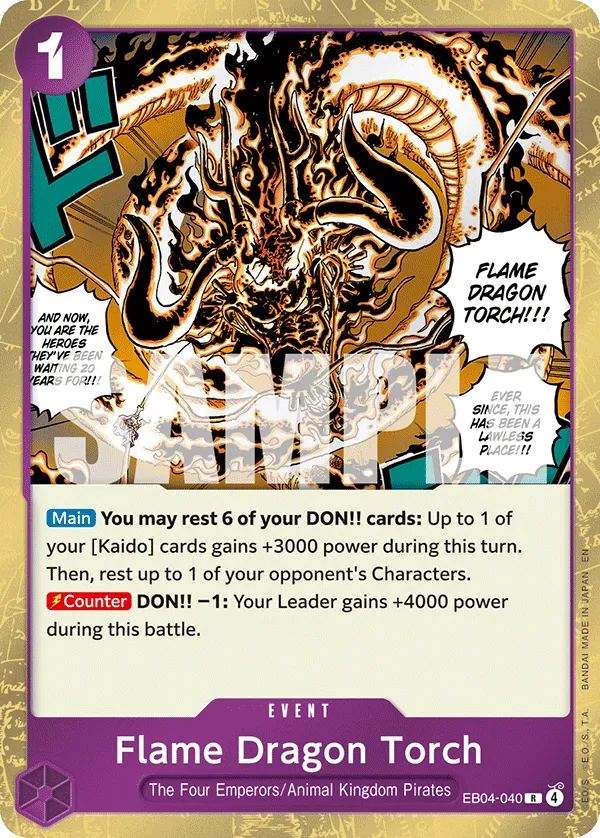
Flame Dragon Torch can be played during our turn, resting 6 additional Don to rest an opponent’s 6-cost or less Character and giving a Kaido card +3,000 Power boost. This is usually useful if there’s a Blocker in play you want to rest, making way for your attackers to start hitting the opponent’s Leader.
Flame Dragon Torch can also be used for its Counter effect, which often ends up being a game-saver. By returning 1 DON!!, you can give your Leader a +4,000 Power boost to counter a heavy attack.
Mulligan Tips
Our top priority card in the starting hand is Onigashima Island. It provides an additional Don every turn, which is invaluable as the game progresses.
We’re going to claim the One Piece!!! is also crucial to have early on, since it can find us Onigashima Island.
Other Cards to Include


- Divine Departure is a 0-cost Counter Event that lets you trash a card from your hand to give your Leader or one of your Characters a +3,000 Power boost. It can also be used during the opponent’s turn, resting 5 Don to give one of the opponent’s Characters -8,000 Power reduction and have one of your attackers attack and KO it.
- Ulti is less threatening on the board compared to King, but her ramp effect synergizes with Onigashima Island. Once per turn, when you return 2 Don cards to your Don deck, you can activate Ulti’s effect to ramp 1 rested Don and set Onigashima Island as Active. So, you’d want to activate Onigashima Island first, deramp, activate Ulti‘s effect to set Onigashima Island as Active, and activate Onigashima Island a second time in the same turn.
- Gol D.Roger is a massive play if you or your opponent has 10 Don, activating his On Play effect to give you a +2,000 Power boost that sticks until the end of the opponent’s turn. This turns your Kaido into a 7,000 Power Leader, capable of going for a stronger attack, but will also be tough for the opponent to deal damage to him.
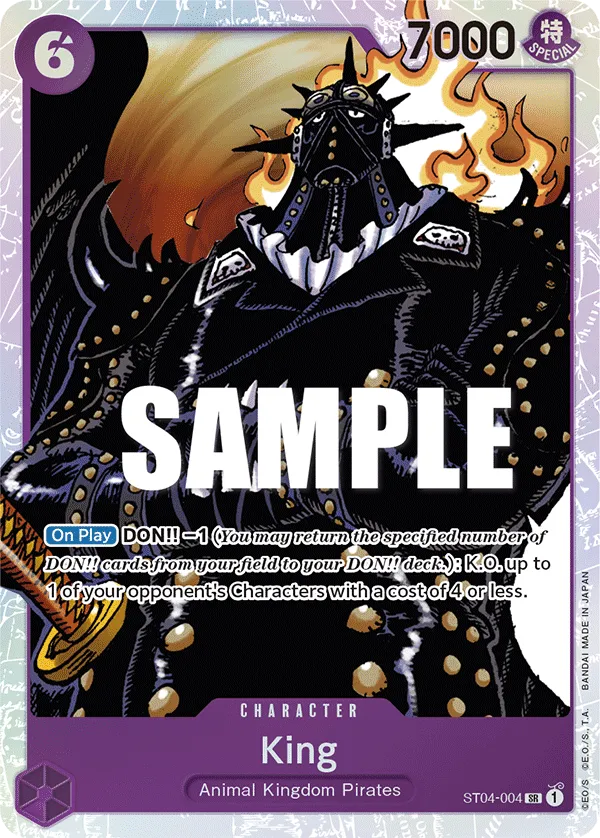

- Removal cards help you maintain board control and hinder your opponent’s plans. King is our earliest removal option, KOing a Character with a cost of 4 or less. We have to – 1 Don to activate King‘s effect. Our ramp strategy allows us to play King earlier, presenting a significant threat for the opponent to handle.
- 7c King serves as our primary aggressor with his powerful 8,000 Power Rush attack. When aiming to finish the game, we play 7c King, activate his -1 Don effect to gain Rush, activate Onigashima Island to regain the returned Don, and then activate Leader Kaido‘s effect to trash a Life Card.
- 9c Kaido is a stronger removal card compared to King, hitting Characters with a cost of 6 or less and also gaining Rush in the process. We’ll have to decide whether we prefer attacking the opponent’s Leader or a rested Character. In most cases, we want to target the opponent’s Leader, either ending the game or putting us one step closer to setting up the winning attack. To activate Kaido‘s removal effect and Rush, we’ll have to return 5 Don, but with our Ramp cards, we’re still able to play cards like 6c King or 7c King. 9-cost Kaido offers stronger removal by hitting Characters with a cost of 6 or less, while also gaining Rush. This flexibility lets us decide whether to attack the opponent’s Leader or a rested Character. Typically, we target the Leader to either end the game or put us a step ahead towards that. Activating Kaido’s removal and Rush requires returning 5 Don, but our Ramp cards enable us to still play powerful cards like 6-Cost King or 7-Cost King on the upcoming turn.
Closing Words
With the many new support cards introduced in EB04, we’re seeing more players pick up Purple Kaido in the OP14 meta. The deck thrives on both ramping and deramping, making it challenging to pilot correctly, as DON management is a core part of its identity. Its unique playstyle, combined with Purple Kaido being one of the oldest Leaders in the game, has resonated with many One Piece TCG players, encouraging them to bring the deck to their locals.


