
The Red Silvers Rayleigh Leader changes how you build your deck, restricting you to 4-cost or less cards. This creates a unique way of building this deck, especially since Silvers Rayleigh‘s second effect demands you have a lot of Events in your deck so you can consistently activate the Power boost effect.
This Red deck plays aggressively, trying to develop multiple Characters and boost their Power to threaten the opponent’s Life cards and line up the winning turn. In this guide, we’ll go through the general strategy of Red Silvers Rayleigh, the combo plays, and how cards synergize with one another!
Leader Silvers Rayleigh

Playing Red Silvers Rayleigh as your Leader means you can’t include any cards that cost 5 or more in your deck. Rayleigh’s Activate: Main effect allows you to reveal 2 Event cards from your hand to give one of your Characters with a base power of 4,000 or less a +2,000 Power boost.
This means that when building this deck, you’ll want to focus on cards that cost 4 or less and prioritize Characters with a base power of 4,000 or less. You’ll also need to include a high number of Events to consistently have 2 in hand to activate your Leader or other cards’ effects. The deck features several low-power Characters that can gain Power through their own effects, creating strong synergy with your Leader’s ability.
Red Silvers Rayleigh Decklist


How to Play
1-cost Characters
These are all 1-cost searcher cards to help you find the cards you need for your upcoming turns and add more consistency to your deck. They can also act as attackers thanks to your Leader and other cards’ Power boost effects.
1-cost Nami looks at the top 5 cards of your deck to add 1 {Straw Hat Crew} type card to your hand. This means we can draw any of our Sanji‘s, 4-cost Luffy, or Roronoa Zoro.
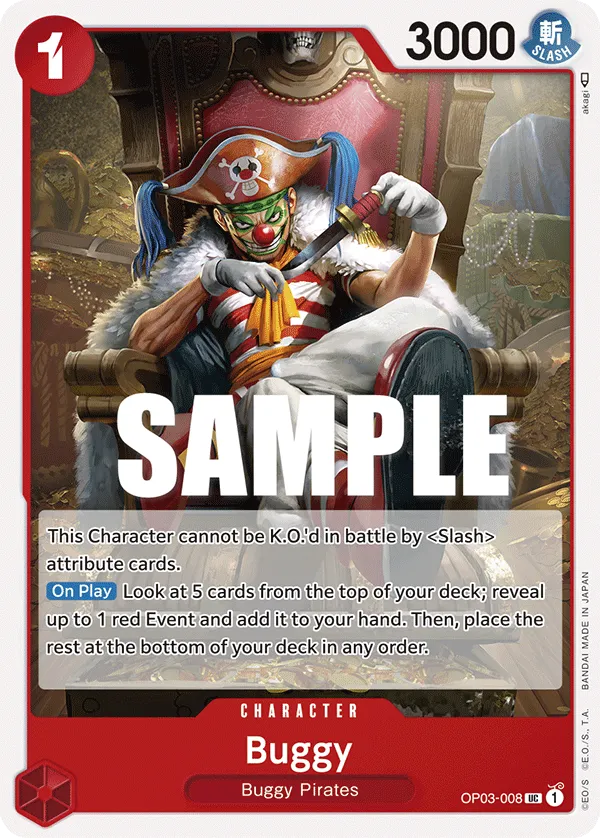
Since we’re running a lot of Events in the deck, 1-cost Buggy works in this list as an Event searcher, looking at the top 5 cards of your deck to find the card you need. Buggy can’t be KO’d against <Slash> attribute cards, which can, in some situations, be problematic for the opposing player. Shakuyaku works similarly to Buggy, but she can also draw you the 4-cost Luffy.
Assuming you’re against a 5,000 Power Leader, using your Leader effect, you can give these Characters a +2,000 Power boost, which means Buggy becomes a 5,000 Power attacker, capable of taking an opponent’s Life card or forcing Counter resources. As for your 2,000 Power 1-cost Characters, you’ll want to attach 1 Don to them if you want them to threaten a Life card.
2-cost Characters
2-cost Boa Hancock is another searcher who looks at the top 5 cards of your deck to add 1 Luffy or an Event to your hand. She’s a 3,000 Power Character, which means we can boost her Power to 5,000 through Leader effect. Boa Hancock’s Activate: Main effect lets you trash her to attach 2 rested Don to your Leader or one of your Characters. This empowers your aggressive strategy as you can attack with Boa Hancock and still use her to boost the Power of another attacker and make it harder for the opposing player to Counter out of your attack.
2-cost Sanji is a +2,000 Character but can be played aggressively. Sanji takes a Life card and adds it to your hand to gain a +2,000 Power boost and attaches 2 rested Don to himself. This turns Sanji into a 7,000 Power attacker, going for a heavy hit to aggro down your opponent’s Leader.
Early Sanji
The 3-cost Sanji is one of your strongest choices in this deck. He’s a 3,000 Power Character, which means you can boost his attack Power using your Leader’s effect. However, during your turn, Sanji gains +3,000 Power, turning him into a 6,000 Power Character who fits perfectly into your aggressive game plan.
If your opponent KO’s your 3-cost Sanji, you can draw a card, so you won’t be losing in card resources when you lose Sanji to an attacker or a KO effect.
Rush Attackers
3-cost Roronoa Zoro is a 5,000 Power Rush attacker. He can’t gain a Power boost from your Leader, but can fit in this deck as an aggressor who can be drawn through the 1-cost Nami. Jinbe is a popular consideration to add to this list, but unlike Zoro, he can’t be searched by your 1-cost Nami.
Once your opponent falls to 2 Life cards or less, Kid & Killer becomes a real aggressor, gaining +2,000 Power when they go for the attack. Kid & Killer pushes you to the next level, especially when you’re planning your winning turn, giving you a high-power attacker to try and close out the game. Since Kid & Killer is a 5,000 Power Character, you cannot use your Leader’s effect to boost their Power.
Luffy Carry
The 4-cost Luffy is a 4,000 Power attack that gains +2,000 Power if you have 2 attached Don to your Leader or one of your Characters. This makes him a stronger attacker and a tougher target for the opposing player to remove. Since Luffy‘s base Power is 4,000, you can give him a +2,000 Power boost through your Leader’s effect to become an 8,000 Power attacker.
Luffy‘s effect requires you to reveal 2 Events from your hand to play 1 Character with 3,000 Power or less from your hand. Then, you can attach 1 rested Don to your Leader or one of your Characters to create a stronger attack.
Through Luffy‘s effect, you can play one of your searcher cards, specifically Boa Hancock, to get a card draw, keep her on the field to attack with her on the upcoming turn, or activate her effect immediately for 2 rested Don attachement. However, 3-cost Sanji is your best target to cheat out on the field, setting up a wider field of 6,000 Power Characters to aggro down your opponent on the upcoming turn.
Luffy‘s +2,000 Power boost can be lost if your opponent removes the 2 attached Don from the field. This typically happens when the Don are attached to a Character that gets KO’d or removed. To protect the boost, consider attaching the 2 Don to your Leader instead, making it impossible for your opponent to reduce Luffy‘s Power.
If you go first, you can play Luffy on turn 3, attach a Don through his effect and your left with 1 Don to attach to the same card, giving Luffy the power boost and making it harder for the opponent to remove him.
Main Events
Observation Haki is a 0-cost Event, but you need 1 Active Don to activate it. Playing Observation Haki allows you to attach 1 Don to your Silvers Rayleigh before looking at the top 4 cards of your deck to add 1 red Event or up to 1 Character card with a cost of 3 or more to your hand. So, although we’re using 1 Don to activate it, that Don is going into our attack, forcing an additional Counter card from the opposing player. Since we can only attach Observation Haki to our Leader, we want to hold off our attack with him until we play Observation Haki.
As for the 2-cost Gum-Gum King Kong Gatling, you can give your Leader or one of your Characters a +3,000 Power boost, and if your opponent has a 7,000 Power or more Character in play, you can give your Leader or a Character another +1,000 Power boost. So for 2 Don, you’re gaining up to a 4,000 Power boost to go for an extremely aggressive turn.
Gum-Gum King Kong Gatling has a strong Trigger effect, letting you KO a 5,000 Power or less Character, which can shut down the opponent’s aggression.
Counter Events
To Never Doubt–That Is Power! and Color of Arms Haki are Counter Events with a Main effect, so you can either use them during your turn for additional offensive pressure or during your opponent’s turn to defend your Leader or a rested Character.
To Never Doubt–That Is Power! requires 2 Active Don to use its effect, attaching those Don to your Silvers Rayleigh and then preventing the opposing player from activating the Blocker keyword. This can be used as a finisher play, targeting your opponent’s Leader and not having to worry about a blocker. However, it’s tied to your Leader only, so you’ll have to use Silvers Rayleigh as the finisher over a Character with higher power.
As for Color of Arms Haki, you can attach 1 Active Don to your Silvers Rayleigh to give your Leader or one of your Characters a +1,000 Power boost. Usually, we’ll go for it if we need the additional +1,000 Power to ensure our attack goes through.
Both To Never Doubt–That Is Power! and Color of Arms Haki have the same Counter effect, giving your Leader or one of your Characters a +2,000 Power boost to protect you from an attack. These are 0-cost Events that give you +2,000 Power during your opponent’s turn, perfect to protect your Life Cards or key Characters when possible.
Finally, Color of the Supreme King Haki gives your Leader or one of your Characters a +2,000 Power boost. Then, you can rest 1 of your Don to give a -1,000 Power reduction to the opponent’s Leader and all their Characters, which works best if your opponent has multiple attackers lined up, making it harder for them to get their attacks through.
Control Events
Gum-Gum Mole Pistol reduces the Power of an opponent’s Character by 5,000, and then, if you have a 6,000 Power or more Character in play, you can KO a 2,000 Power or less Character. This means Gum-Gum Mole Pistol can KO a Character with up to 7,000 Power, removing a threat in play or a blocker to continue going for aggressive attacks.
Since Gum-Gum Mole Pistol is a {Straw Hat Crew} type card, we can draw it through 1-cost Nami. As for its Trigger effect, you can use it to KO a 7,000 Power or less Character, but you’ll need to have a 6,000 Power Character in play. However, the Power reduction during your defensive turn can be useful when used on a Character that hasn’t attacked yet.
General Tips
- Plan your Don attachment and order of plays. We want to make sure we get the most out of our Power boost effects and Don attachments. We don’t want to end up boosting a card too much; we’re trying to force Counter plays from the opposing player.
- The 4-cost Luffy Power boost. We want to prioritize attaching 2 Don to our Leader to prevent the opponent from removing the +2,000 Power and making Luffy an easier target to KO.
- Characters are tough to protect. Since most of our Characters have low power, it can be tough and not worth protecting during our defensive turns. We’ll prioritize protecting carry Characters like 4-cost Luffy or Kid & Killer when possible.
- Don’t give too much information. When you reveal your Events, you’re giving your opponent information on your hand. Make sure you continue to reveal the same cards throughout the game so you don’t give them more information than you should.
Mulligan Tips
Going First (preferred): 1-cost Nami, 3-cost Sanji, 3-cost Jinbe, 4-cost Luffy. Events for Leader effect.
Going Second: 1-cost Nami, 2-cost Boa Hancock, 4-cost Luffy. Events for Leader effect.
Other Cards to Include


- On Play, 3-cost Jinbe lets you reveal 2 Events in your hand to the opposing player, which lets you gain the Rush keyword and a +1,000 Power boost. Jinbe becomes a 5,000 Power Rush attacker, but since his base Power is 4,000, you can use your Leader Silvers Rayleigh‘s effect to boost his Power by +2,000, turning him into a 7,000 Power attacker.
- 2-cost Luffy is a 3,000 Power Character that attaches 2 rested Don to himself, turning him into a 5,000 Power attacker. While he has 2 attached Don, <Strike> attribute, Characters cannot KO him.
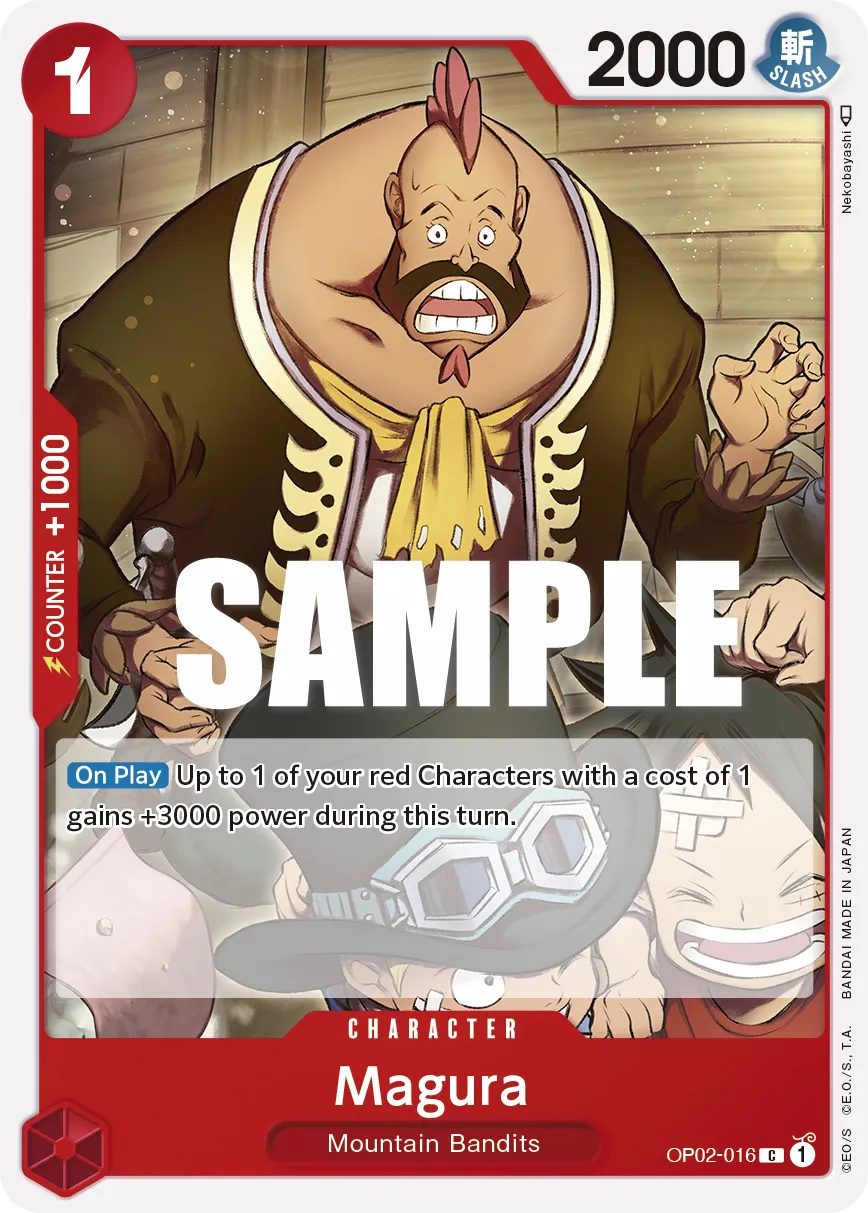
- Magura enables your 1-cost Characters to become strong aggressors. On play, Magura gives one of your 1-cost Characters a +3,000 Power boost, turning them into an attacker that can take a Life card or at least force counter resources.
Important Matchups

Blue Purple Luffy wants to ramp up and start dropping two big bodies in one turn using their 9-cost Sanji. The Leader, having 6,000 Power, can make it harder for us to get attacks through, but with 3 Life cards, we can definitely aggro our opponent down before they outvalue us in the late-game.
They have 8-cost Luffy and 9-cost Mihawk to help them control the field, but if we manage to establish a wide board, it’s difficult for them to catch up.

We can overwhelm the Green Roronoa Zoro by going wide on the field and lining up multiple attacks each turn. They don’t have the removal cards to control our side and will rely on their Leader’s attack to KO a Character. Since we’re a 5 Life card Leader, we’re not too worried about getting aggroed down and can prioritize sheer aggression. Using Kuina or Tashigi, they can rest one of our Characters for their Leader to attack. They want to remove our 4-cost Luffy, so if we boost his Power early in the game and can protect him, we can go for extremely aggressive upcoming turns.
Since the Zoro players run a lot of Slash attribute cards, they might struggle to remove your Buggy, keeping a Character in play that can act as an aggressor when you boost its Power. Mihawk blocker will mainly be the issue in the late game when you’re planning the finisher attack, but thanks to 0-cost To Never Doubt That is Power, we can bypass that Blocker and go straight for a Leader attack.
If possible, we should KO Cavendish to shut down the Don generation. We can commit attacks on a rested Cavendish or use Gum Gum Mole Pistol.

Green Purple Luffy heavily relies on Sanji & Pudding for the ramp effect, allowing them to activate their Leader’s effect in the mid-game. We want to keep Gum Gum Mole Pistol in our hand for the Sanji & Pudding, removing them can slow down your opponent’s pace immensely.
The main goal is to aggro down the opponent’s Leader, trying to put them low on Life cards and eventually line up the finishing attack. They don’t have removal tools to deal with your field, so if they choose to control the field rather than race you, they’ll be relying on their attacks to KO your rested Characters.
Gum Gum Giant gives them the survivability they need to push for additional turns.
Closing Words
Red Silvers Rayleigh has seen significant success in the OP12 format of the One Piece TCG, consistently performing well across multiple tournaments and establishing itself as one of the top decks in the meta. If you enjoy aggressive strategies, this deck is a strong choice, offering a unique playstyle where carefully planning your turns and timing your Power boosts can make all the difference in securing a win.
This is it from me! If you want to keep up with my content, consider following me on Twitter or BlueSky.


