
Heya everyone! I wrote an old guide back in OP07 on Red Monkey D. Dragon, which mostly revolved around the Revolutionary Army package, using Ivankov to go wide on the field. However, with the introduction of OP12 and ST21 cards, the lists have changed a lot since then.
You can still play Red Dragon with the Revolutionary Army package, but the list I’ll cover today is the community’s preferred choice, opting for the Straw Hat package, with the 4-cost Luffy to go wide and a lot of Events to ensure you can use your 4-cost Luffy’s effect.
This deck recently performed in the Singapore Grand Asia Open, managing to make it all the way to the top 16 with an 8-1 score!
Leader
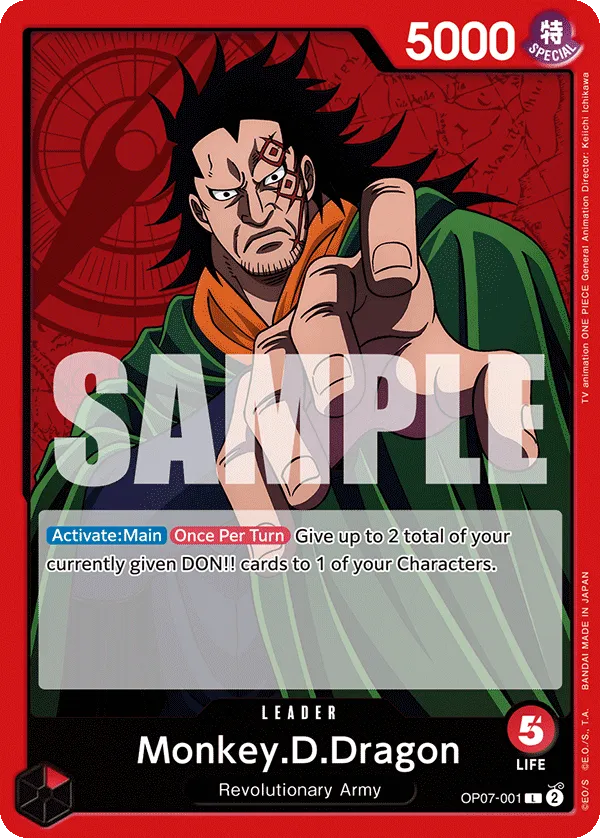
Red Monkey D.Dragon is a 5 Life card Leader, which means it can be tough for decks to match your aggression and try to race you. Dragon’s effect is straightforward, you get to move 2 attached Don from your Leader or one of your Characters to another Character.
This allows you to go for more aggressive attacks as you’re boosting one of your Characters for 2,000 Power, making it harder for the opponent to Counter your attack. Keep in mind that you can’t attach 2 rested Don to your Leader, it has to be a Character in play that receives the 2 Don.
Red Dragon Decklist


How to Play
Red Dragon is an aggressive deck, trying to develop multiple Characters to pressure the opposing player. Using your Leader effect, you get to set up heavier attacks, forcing the opponent to play more Counter cards to protect their Life cards. In most cases, we’ll opt to ignore controlling the field and try to rush down their Life cards. Once they’re down to 1 Life card, we can start creating a finisher turn with the help of our Rush attackers.
Searchers
1-cost Nami and 2-cost Boa Hancock are searcher cards to add more consistency to your deck. Nami can search for a {Straw Hat Crew} type card, so you have access to board development like 3-cost Sanji or 4-cost Luffy, rush aggression with 5-cost Luffy, Events, and +2,000 Counters.
As for Boa Hancock, she can draw you a 4-cost or 5-cost Luffy or one of your Red Events. However, she remains on the field as a 3,000 Power Character, which means we can attach 2 Don to her through Leader effect to turn her into an attack. You can also trash Boa Hanock to attach 2 rested Don to your Leader or one of your Characters, enabling a more aggressive turn to put your opponent in a tough spot.
Early Attackers
2-cost Sanji is a +2,000 Counter Character, but he can be played as an aggressor. Using Sanji’s effect, you can take a Life card to gain a +2,000 Power boost and attach 2 rested Don, turning Sanji into a 7,000 Power Character. Activating Sanji’s effect is putting you down on Life cards, but since Dragon is a 5 Life card Leader, we aren’t too stressed about losing 1 Life card.
2-cost Luffy works perfectly in this list. Once per turn, this Character can attach 2 rested Don to himself, turning himself into a 5,000 Power Character. This is also handy as you’re able to move those 2 attached Don to one of your other Characters. This is allowing a more aggressive turn using your Leader Dragon’s effect without sacrificing board development. Having 2 attached Don to Luffy means he can’t be KO’d by Strike attribute Characters, which can come in handy in certain situations.
3-cost Sanji is technically your strongest early play. He’s a 3,000 Power Character that turns into a 6,000 Power attacker during your turn. You can use him aggressively, but he’ll be vulnerable during your defensive turn, and often you won’t expend resources to protect him from an attacker. If Sanji is KO’d, he’ll draw you a card, which means we’re not losing on card resources when losing Sanji.
Luffy Wide
4-cost Luffy is how we go wide on the field, revealing 2 Events in hand for the opponent to see and then cheating out a 3,000 Power or less red Character from hand. Ideally, we want to cheat out the 3-cost Sanji, basically developing two 6,000 Power Characters. If we don’t have the 3-cost Sanji in hand, we can still go for 2-cost Sanji or 2-cost Luffy, two attacks that can still pose an offensive threat.
2-cost Boa Hancock is a consideration if we don’t have any of our other Characters. She’s a searcher that can later be trashed to push for a heavier attack.
The 4-cost Luffy is a 4,000 Power Character, but if you attach 2 Don to your Leader or one of your Characters, 4-cost Luffy gains a +2,000 Power boost to become a 6,000 Power Character. This makes him harder to remove during your defensive turn and a stronger attacker to threaten opponents’ Life cards.
Keep in mind that if the 2 attached Don are removed from play, Luffy will lose his 2,000 Power boost.
Rush Characters
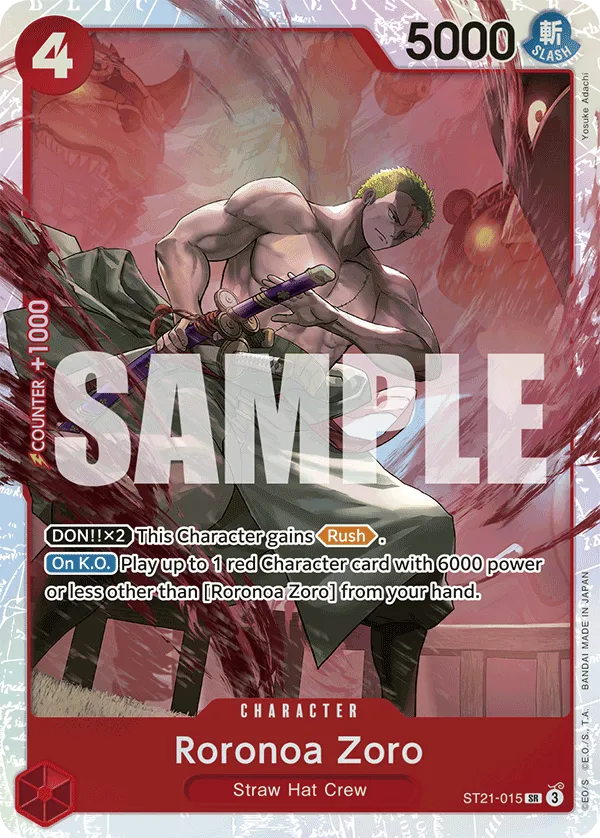
Let’s first talk about the 4-cost Rorornoa Zoro. He’s a 5,000 Power Character that only gains the Rush keyword if you attach 2 Don to him. So with your Leader’s effect, you can move 2 attached Don to him. Usually, on Don 4, you can’t gain the Rush keyword since there’s no attached Don, but with cards like Boa Hackock and 2-cost Luffy, we can use their effects alongside Leader Dragon’s effect to enable Roronoa Zoro.
2-cost Luffy can attach 2 rested Don to himself, and then Dragon can move those 2 Don to Roronoa Zoro, letting you go for a 7,000 Power attack. As for Boa Hacock, she can trash herself to attach 2 Don to your Leader, go for a 7,000 Power attack, and then move those 2 Don to Roronoa Zoro for another 7,000 Power attack.
If your opponent KO’s Roronoa Zoro, we can cheat out a red Character with 6,000 Power or less other than Zoro from our hand. This means we can go for 5-cost Luffy, Karasu, or 4-cost Luffy. If we don’t have 4-cost Luffy on hand early into the game, then the 4-cost Zoro is our best play.
5-cost Luffy is a 6,000 Power Rush attacker, activating his effect when he attacks to attach a rested Don to your Leader or one of your Characters. Keep in mind that Luffy can attach that rested Don to himself as well to become a 7,000 Power attacker.
8-cost Monkey D.Dragon is your strongest play when you hit Don 8+. You’re developing a 9,000 Power Rush attacker that attaches 2 rested Don to your Leader or one of your characters. So you’re going for two heavy attacks to aggro down the opposing player, and with your Leader’s effect, you can move those 2 attached Don to a Character for added offensive pressure.
8-cost Dragon is also difficult to remove, so if he gets to stick on the field, you can continue using his high power to go for a heavy attack and possibly plan your finishing turn.
Control Cards
Gum-Gum Mole Pistol reduces the Power of an opponent’s Character by 5,000, and then, if you have a 6,000 Power or more Character in play, you can KO a 2,000 Power or less Character. This means Gum-Gum Mole Pistol can KO a Character with up to 7,000 Power, removing a threat in play or a blocker to continue going for aggressive attacks.
Since Gum-Gum Mole Pistol is a {Straw Hat Crew} type card, we can draw it through 1-cost Nami. As for its Trigger effect, you can use it to KO a 7,000 Power or less Character, but you’ll need to have a 6,000 Power Character in play. However, just the Power reduction during your defensive turn can be useful when used on a Character that hasn’t attacked yet.
Nico Robin is a meta call to KO a low Power Character. She can hit 1,000 Power or less Characters like Bon Clay, Koushirou, or Rosinante, removing key cards on the opponent’s side of the field.
Power Reduction
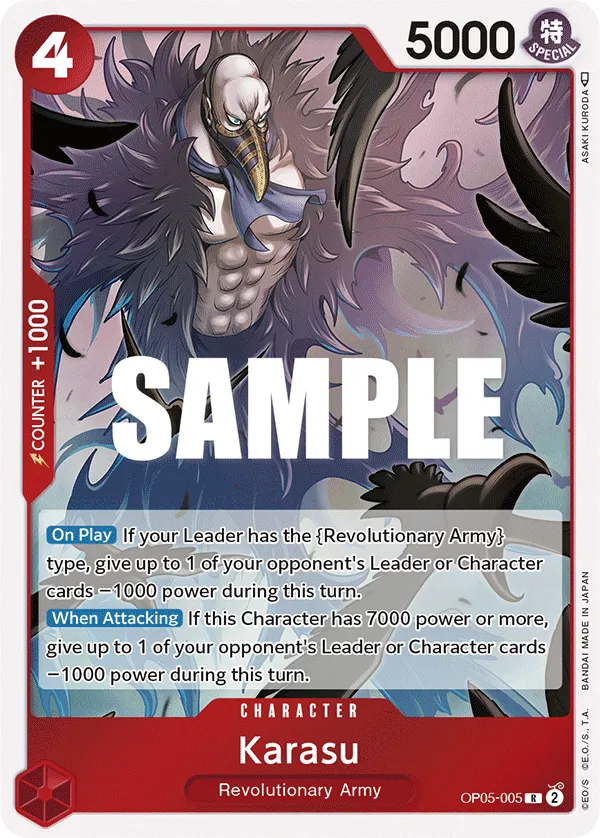
Karasu’s On Play effect reduced the Power of an opponent’s Leader or Character by 1,000. We usually want to go for their Leader with Karasu, making it easier for our attacks to go through and forcing more Counter plays from the opposing player. Karasu remains on the field as a threat, reactivating his Power reduction effect when he goes for the attack with 7,000 Power or more.
If we need to, we can use Koala in combination with Nico Robin or Gum Gum Pistole to hit higher-power Characters.
Counter Events
Bad Manners Kick Course is a 0-cost Event that gives your Leader or one of your Characters a +3,000 Power boost. You do, though, have to trash a card from your hand to activate it, so you’ll often choose a dead card you don’t expect to play in future turns.
Color of the Supreme King Haki does not work on your Leader; instead, you can use it to give one of your Characters a +2,000 Power boost. Then, you can rest 1 of your Don to give a -1,000 Power reduction to the opponent’s Leader and all their Characters, which works best if your opponent has multiple attackers lined up, making it harder for them to get their attacks through.
Radical Beam gives your Leader or one of your Characters a +2,000 Power boost. However, if you’re at 2 Life cards or less, Radical Beam gives +4,000 Power instead, making it your strongest Counter Event to protect you from an attack.
General Tips
- You’re playing an aggressive deck, so prioritize attacking the opponent’s Leader and dropping the low on Life cards as fast as possible. If we’re ahead in the game, we can afford to play it safe by weakening the opponent’s side and making they can’t set up a finsiher.
- When possible, protect Characters like 4-cost and 5-cost Luffy. They’s higher-power Characters that can continue to put pressure on the opposing player throughout the game.
Mulligan Tips
Going First: 1-cost Nami, 3-cost Sanji, 4-cost Luffy.
Going Second: 2-cost Boa Hancock, 4-cost Luffy, 3-cost Sanji.
Other Cards to Include


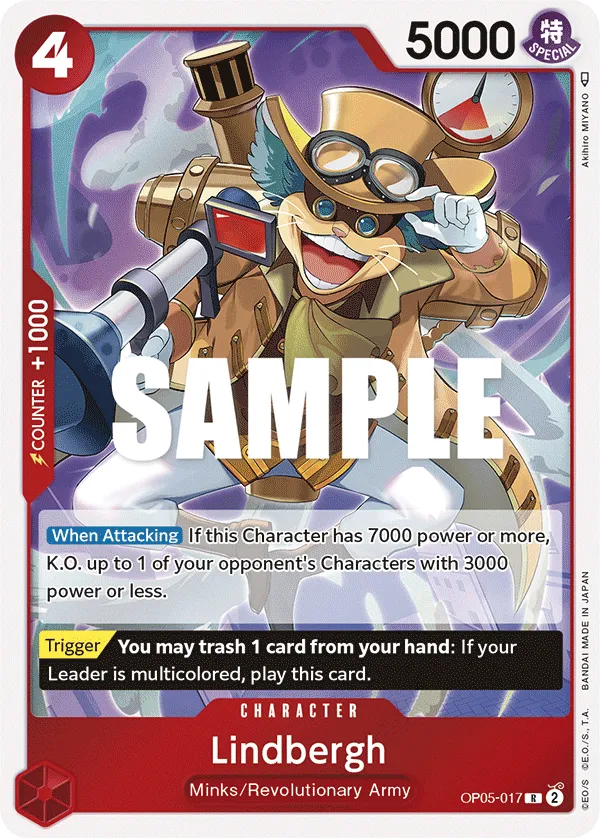
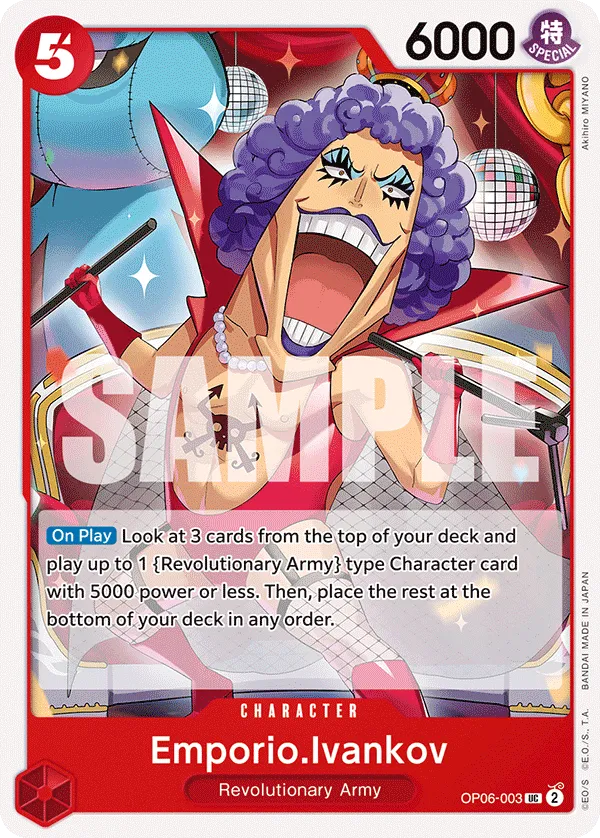

This version is more geared toward the Revolutionary Army package, relying on 4-cost and 5-cost Emporio Ivankov to go wide on the field and overwhelm opponents. Dragon’s ability to move rested Don to another Character makes it easier for you to push Characters like 4-cost Ivankov, Karasu, and Lindbergh to 7,000 Power and activate their effects.
Turn-Based Gameplay
Going First
- Turn 1 (1 Don): 1-cost Nami.
- Turn 2 (3 Don): 3-cost Sanji.
- Turn 3 (5 Don): 4-cost Luffy, Zoro, or 5-cost Luffy.
- Turn 4 (7 Don): 4-cost or 5-cost Luffy.
- Turn 5 (9 Don): 8-cost Monkey D.Dragon.
- Turn 6 (10 Don): 8-cost Monkey D.Dragon.
Going Second
- Turn 1 (2 Don): 2-cost Boa Hanock, Sanji, or Luffy.
- Turn 2 (4 Don): 4-cost Luffy. You can play Zoro if you have a 2-cost Luffy or Boa Hancock.
- Turn 3 (6 Don): 4-cost or 5-cost Luffy.
- Turn 4 (8 Don): 8-cost Monkey D.Dragon.
- Turn 5 (10 Don): 8-cost Monkey D.Dragon.
Closing Words
Red Dragon is an off-meta aggressive deck that aims to go for multiple attacks while relying on the Leader effect for heavier swings. The lits changed a lot in OP12, shifting to a more Straw Hat Crew reliant, but you can still go for the Ivankov Revolutionary Army version.
Although Rayleigh is usually the popular aggressive pick right now, Dragon can still catch opponents off guard and can include high-cost win conditions as he’s not restricted in deck building.


