
Green Yellow Yamato is an off-meta deck that uses Leader’s Double Attack as a core part of its strategy. You’re capable of setting up aggressive turns by focusing on the opponent’s Leader and rushing the game before they get the chance to get their game plan online.
The Starter 28 deck has given Green Yellow Yamato new tools to add to its list, changing the way the deck plays out and giving it better consistency at executing its game plan. Additionally, OP12 introduces Bartholomew Kuma, a great resource to give your Leader an additional Life card to push for an extra turn.
The list is heavy on the Land of Wano Characters, along with Trigger effects, so you can use those triggers to your advantage, putting you ahead of your opponent in the mid-game.
Leader
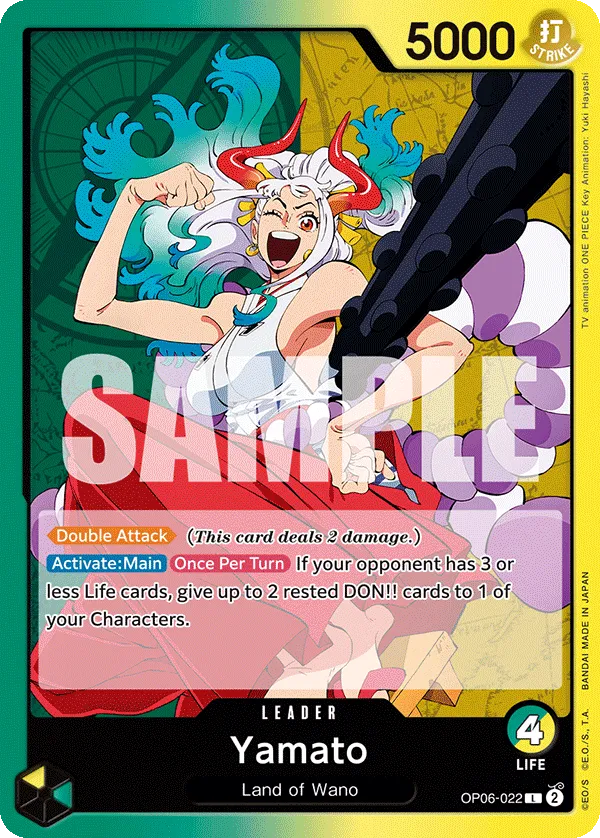
Green Yellow Yamato‘s has the Double Attack keyword, meaning you’ll often focus down the opponent’s Leader with her attack, trying to pressure them to take 2 Life cards in one attack or force them to use their Counter cards. Leader Yamato is a carry on her own, playing aggressively and trying to drop the opposing player down to 0 Life cards as early as possible to start going for the finisher attacks.
Additionally, if your opponent is down 3 Life cards or less, Yamato can attach 2 rested Don to one of your Characters. This boosts their offensive power, making it difficult for opponents to deal with the attack.
Green Yellow Yamato Decklist


How to Play
Searchers
You have to rest Kouzuki Momonosuke and 1 Don to look at the top 5 cards of your deck and add a {Land of Wano} type card to your hand. You also can draw the higher-cost versions of Kouzuki Momonosuke through the 1-cost searcher.
It adds consistency to your deck and forces the opposing player to commit an attack on Kouzuki Momonosuke to prevent you from reactivating the effect. If they don’t have a low-cost Character to attack Kouzuki Momonosuke, they’ll be forced to commit a stronger attack that would have gone on your Leader.
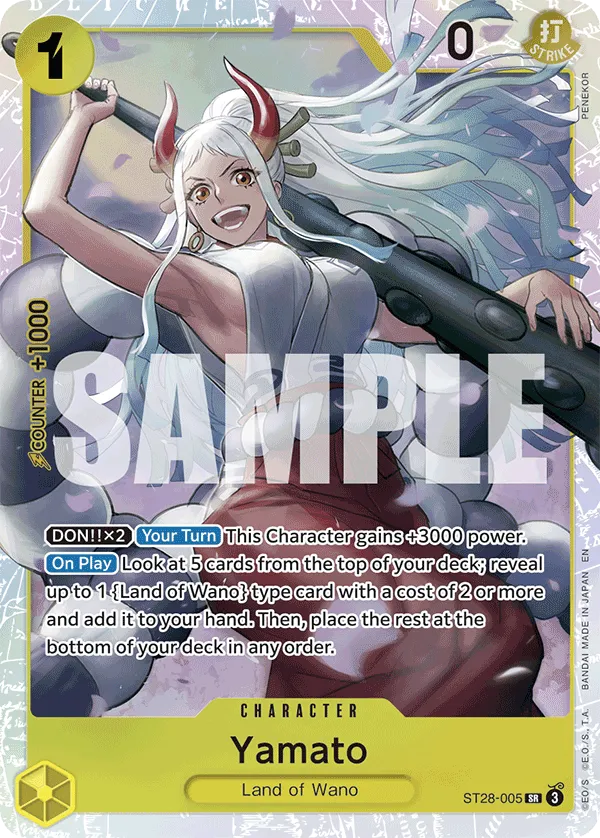
1-cost Yamato is a searcher card, looking at the top 5 cards of your deck to add 1 {Land of Wano} type card with a cost of 2 or more in your hand. This helps you plan your future turns, finding you the cards you need to make sure you continue making meaningful plays on upcoming turns.
Attaching 2 Don to the 1-cost Yamato turns her into an attacker, gaining +3,000 Power to become a 5,000 Power Character, capable of threatening to take a Life card.
Pressuring Life Cards
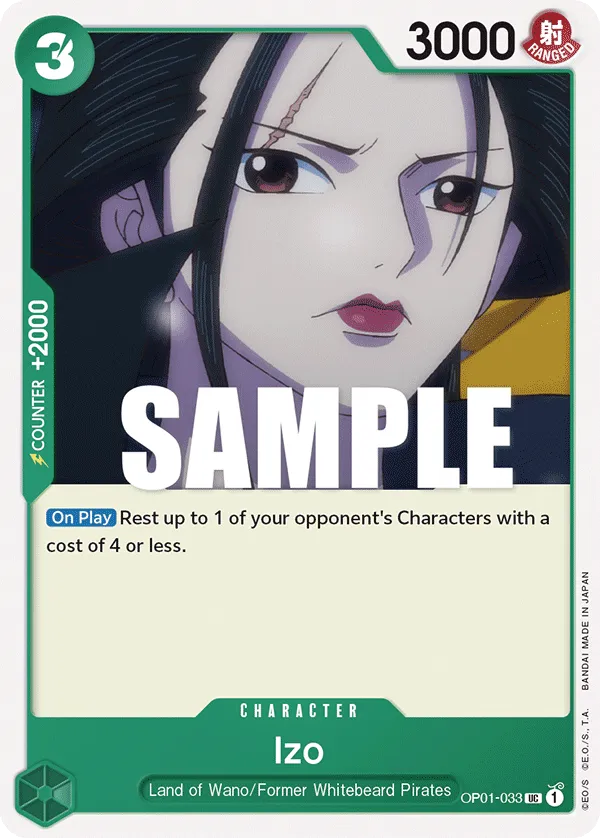
2-cost Izo can give your Leader the Banish keyword, pushing more for the Banish + Double Attack strategy to try and trash the opponent’s Life cards. You can turn Izo into a blocker by attaching 2 Don to her. This can come in handy in the late-game, where surviving one more turn can seal the deal to winning on the upcoming attack turn.
Early Characters
3-cost Mihawk is a +2,000 Counter that can be played on turn 2 to go wider on the field. For 3 Don, you’re developing Mihawk alongside one of your 4-cost Slash attribute Characters, meaning Kikunojo or Basil Hawkins can join the field. This shines the most if you’re going first, capable of playing one of your 4-cost Characters on turn 2 through the Mihawk.
4-cost Kikunojo is your strongest early attacker, having 6,000 Power makes her a nuisance for the opposing player, especially since she can strike a 6,000 Power Leader without Don attachment. Your opponent will have to make the tough call to either ignore Kikunojo or KO her and give you a Life card, giving you more resources. They can use other means to remove Kikunojo, through trash or return effects, but this will mostly depend on the matchup.
Kikunojo trigger effect allows you to play her on the field for free, developing a 6,000 Power Character to shift the game in your favor.
Basil Hawkins is best played early in the game, acting as an additional attacker to keep the pressure going. Your opponent won’t be too eager to KO Basil Hawkins due to his effect, letting you trash an opponent’s Life card if he gets KO’d. If the opponent decided to KO it, they’ll be in a more vulnerable spot later in the game to your attacks and will be trashing a resource that would have gone to their hand.
The Kouzukis
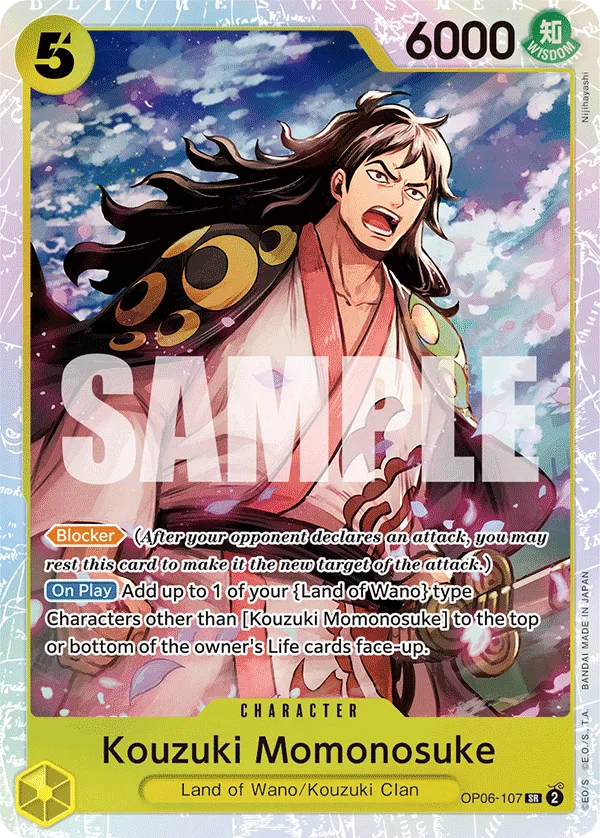
5-cost Kouzuki Momonosuke is a 6,000 Power Blocker that synergizes with your {Land of Wano} type Characters. When played, Kouzuki lets you add 1 {Land of Wano} type Character other than Kouzuki Momonosuke to the top or bottom of your Life Area face-up. This gives you an additional Life card, making it harder for your opponent to close out the game. He’s a massive defensive play, giving you a Life card and a Blocker to force two additional attacks from the opposing player to win the game.
We want to target key characters to place in our Life Area. Kouzuki Hiyori is an option if you need a +2,000 Counter play while also benefiting from her On Play effect to place the card you want from your hand to the top of your Life cards. However, if you want to activate a Trigger effect like Nami’s KO effect or Kikunojo‘s free development effect, we can choose to add those in our Life Area instead.
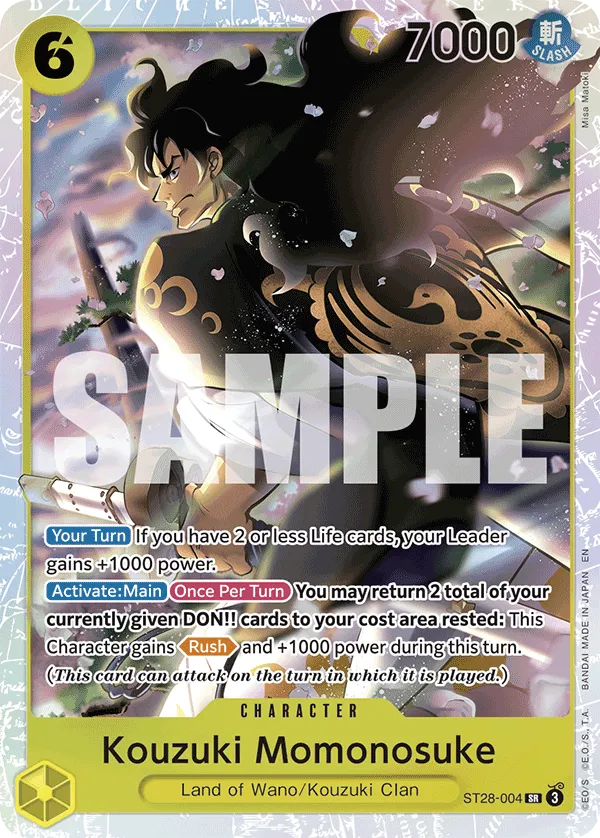
The 6-cost Kouzuki Momonosuke is a 7,000 Power Character that shines the most when you’re at 2 Life cards or less, giving your Leader a +1,000 Power boost during your turn. As long as Kouzuki Momonosuke is in play, Leader Yamato will be at 6,000 Power during your turn, going for heavier attacks to threaten the opponent’s Life cards.
Kouzuki Momonosuke can also become a Rush attacker, returning 2 attached Don to your cost area, rested to gain the Rush keyword and a +1,000 Power boost. Since it’s an Activate: Main effect, you can play Kouzuki Momonosuke first, use Leader Yamato‘s effect to attach 2 Don, and then return them to your cost area to go for a Kouzuki Momonosuke Rush attack.
We can continue to Kouzuki Momonosuke‘s Activate: Main effect later in the game, even if we don’t need the Rush. The +1,000 Power we gain turns Kouzuki Momonosuke into an 8,000 Power attacker, tough for opponents to remove.
Kuma Life
Bartholomew Kuma is one of our strong plays in the mid-game, giving us an additional Life card by trashing a card from our hand and then discouraging players from KOing him. When KO’d Kuma adds the top card of your deck to your Life Area, giving you an extra Life card, making it more difficult for the opponent to win the game.
Since opponents aren’t too thrilled to attack Kuma, they’ll often ignore him, which means we get to use his 7,000 Power offensively to pressure their Leader or KO rested Characters to weaken the state of their board.
Aggressor Hody
Hody Jones joins in and immediately presents a win condition when he’s played. To activate Hody Jones‘ effect, you have to add a Life card to your hand, so you have to be wary of getting aggroed down on the upcoming turn. Hody Jones can rest two of the opponent’s Characters, a great effect if your opponent has blockers in play, preventing you from striking their Leader. With 8,000 Power Rush attack + your Leader Yamato attaching 2 rested Don, you’re creating an aggressive turn to either win the game or put your opponent low enough to close out the game on the upcoming turn.
If there are no Characters worth resting, you can rest 2 of the opponent’s Active Don using Hody Jones‘ effect. This can come in handy against decks holding onto Active Don to use their Counter cards, potentially preventing them from Countering your game-winning attacks.
Control Cards
Ashura Doji can be played early into the game when your opponent has 3 or more Life cards, enabling you to KO a 5-cost or less Character to weaken their presence on the field.
+2,000 Counters
These +2,000 Counter Characters are searchable {Land of Wano} cards that can be useful for their effects in specific situations.
Izo can rest an opponent’s Character with a cost of 4 or less, perfect to shut down a blocker, enabling you to close out the game.
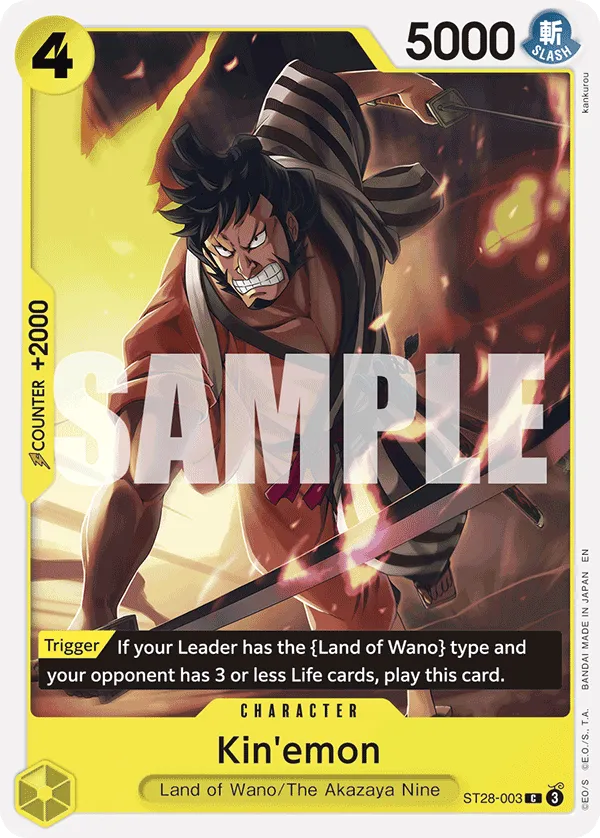
Kin’emon can be played through his Trigger effect, similar to Kikunojo. Kin’emon is a consideration to cheat out to put an additional attack in play and go for more aggressive attacks. However, there are situations where you’ll value the +2,000 Counter more to protect your Life cards.
Events
By resting 3 Don, Demon Aura Nine Sword Style can rest two of the opponent’s Characters or Don, great if you’re trying to go for an offensive turn and there are blockers in your path, or your opponent is planning to play Counter Events and needs their Don Active.
Demon Aura Nine Sword Style can also be played for its Counter effect, giving your Leader a +3,000 Power boost to protect yourself from an attack.
Mulligan Tips
Going First: 1-cost Yamato, 5-cost Kouzuki Momonosuke, 6-cost Kouzuki Momonosuke.
Going Second: 1-cost Kouzuki Momonosuke, 4-cost Kikunojo, 6-cost Kouzuki Momonosuke.
General Tips
- Prioritize using your Leader’s effect to pressure their Life cards. You want to take 2 Life cards through one attack, and even if you don’t, you’re forcing your opponent to commit Counter cards, making it harder for them to Counter upcoming attacks.
- We want them to fall to 3 Life cards. Many of our card effects require our opponent to be at 3 Life cards, so we should try to get an attack through to get access to trigger cards like Kikunojo.
- Although we’re playing an aggressive Leader, we still can control the board. We have a couple of removal options and resting effects, so depending on the state of the game and what we’re up against, we might shift our strategy to removing Characters and winning the field.
Turn-Based Gameplay
Going First
- Turn 1 (1 Don): 1-cost Yamato.
- Turn 2 (3 Don): Attach 3 Don to Yamato and attack their Leader or 3-cost Mihawk + 4-cost Slash Character.
- Turn 3 (5 Don): 5-cost Kouzuki Momonosuke or attach 3 Don to Yamato + Izo Banish.
- Turn 4 (7 Don): Hody Jones and boost his Power with Yamato‘s effect, Kuma, or 6-cost Kouzuki Momonosuke.
- Turn 5 (9 Don): Kouzuki Momonosuke.
- Turn 6 (10 Don): Hody Jones, if we can win the game.
Going Second
- Turn 1 (2 Don): 1-cost Kouzuki Momonosuke.
- Turn 2 (4 Don): 4-cost Kikunojo/Basil Hawkins or 2-cost Izo + Leader attack.
- Turn 3 (6 Don): Kuma or 6-cost Kouzuki Momonosuke.
- Turn 4 (8 Don): Hody Jones.
- Turn 5 (10 Don): Hody Jones.
Other Cards to Include
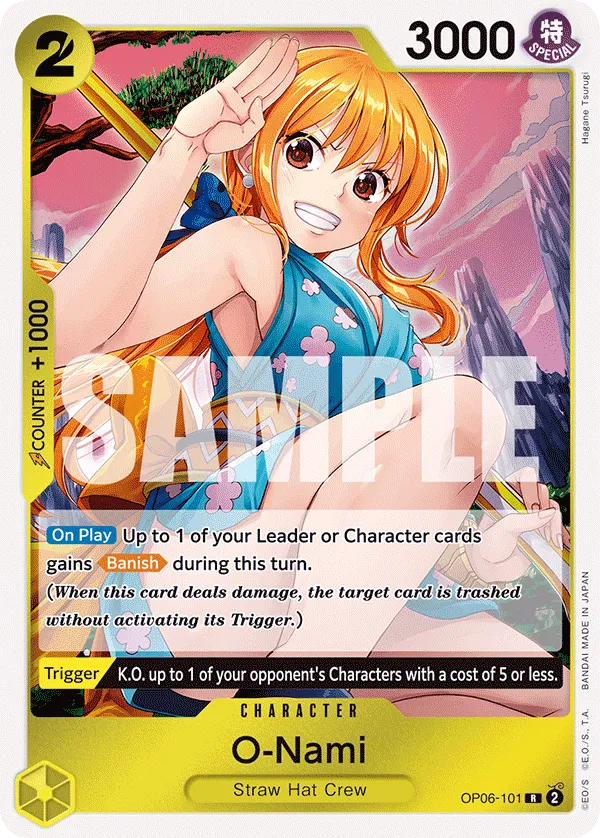


- O-Nami gives your Leader or one of your Characters the Banish keyword. So, if we use it on Leader Yamato, we’re setting up a Double Attack + Banish to trash 2 of the opponent’s Life cards. If it goes through, we’ll be cutting down on the opponent’s resources, making it exceptionally difficult for them to keep up on the upcoming turns. Ideally, we want to use O-Nami if we can boost Leader Yamato‘s attack, ensuring it’s not an easy task for the opposing player to Counter from the Double Attack + Banish combo. O-Nami‘s Trigger effect can be a game-changer, letting you KO a 5-cost or less Character, which can foil the opponent’s aggressive strategy and put them behind on the field.
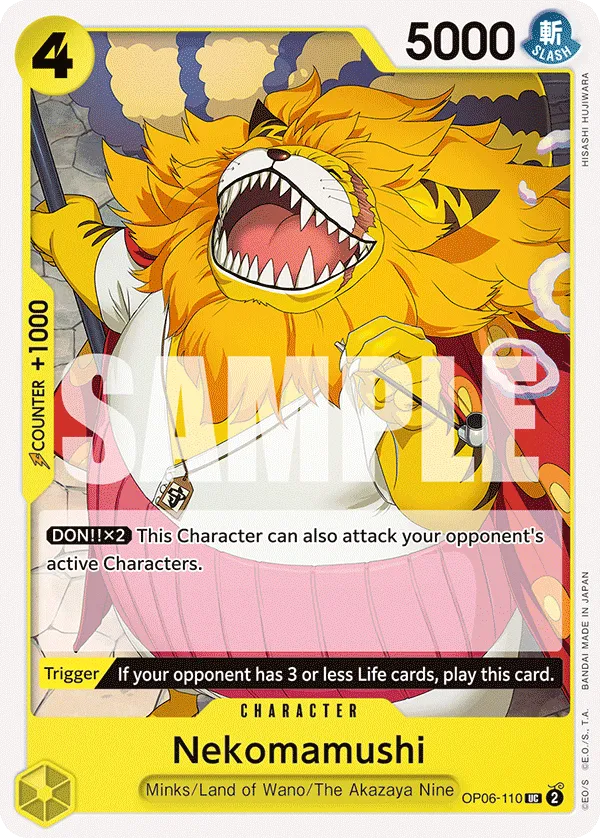
- Nekomamushi can be played through his Trigger effect, forcing opponents to think twice before they attack your Leader. Nekomamushi is a 5,000 Power Character who can attack Active Characters if you attach 2 Don to him. This can be useful if you’re trying to control the field by removing a key Character for the opponent or to KO a blocker, preventing your Leader Yamato from utilizing her Double Attack.
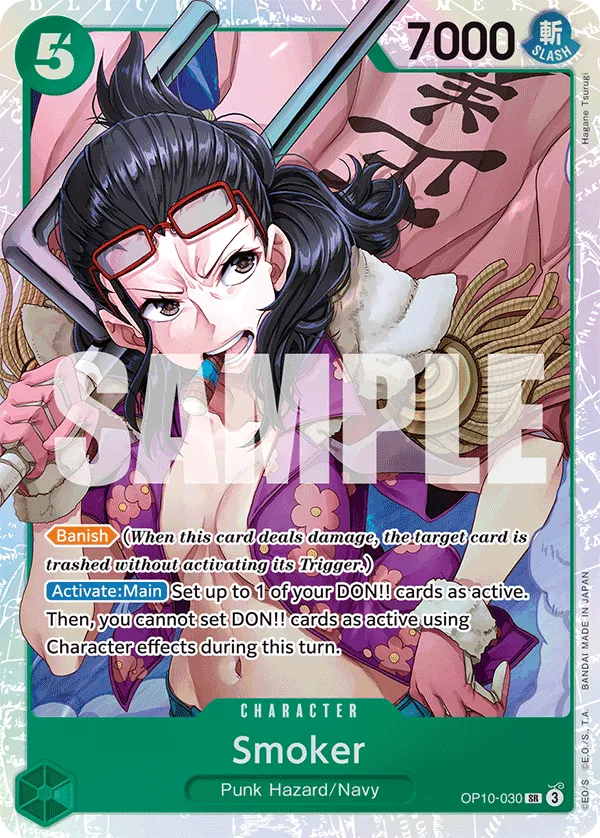
- As for 5-cost Smoker, he’s our strongest play on Don 5 or 6, allowing us to set a rested Don as Active, which we can use to boost the Power of our Leader’s attack. Additionally, Smoker has the Banish keyword, so we’ll prioritize attacking the opponent’s Leader with him, trying to trash one of their Life cards and cut down on their resources.
- Rusher Ace immediately puts aggression on the turn he’s played, especially since Yamato can boost his Power to 9,000. We’re fine taking the first two hits on our Leader so Ace can gain Rush early into the game.
- Kouzuki Hiyori can be comboed with 5-cost Kouzuki Momonosuke. You can use Kouzuki Hiyori to place the card you want at the top of your Life card and then use Kouzuki Momonosuke to place Hiyori in your Life Area, making sure you don’t lose that +2,000 Counter.
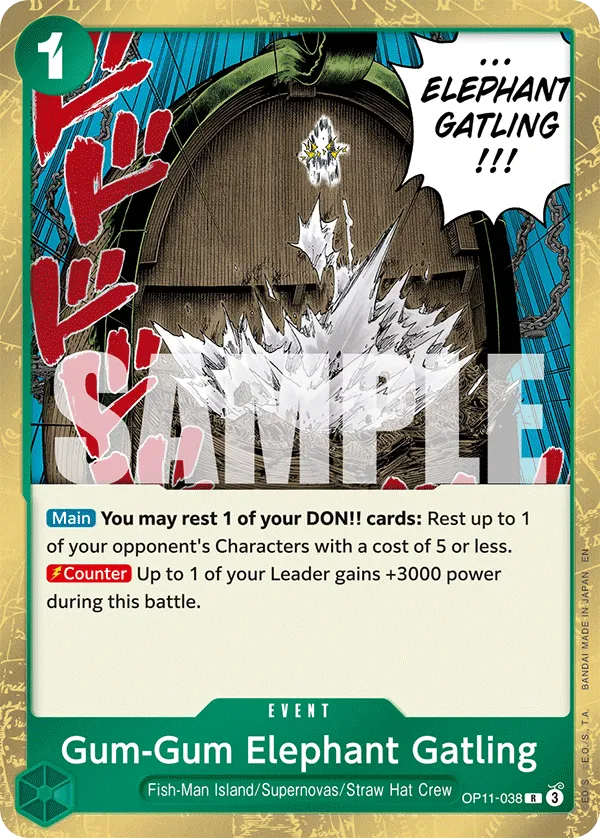


- Gum-Gum Elephant Gatling can rest one of the opponent’s 5-cost or less Characters, a great answer if there’s a blocker in your path. It can also be used as a Counter event, giving your Leader a +3,000 Power boost.
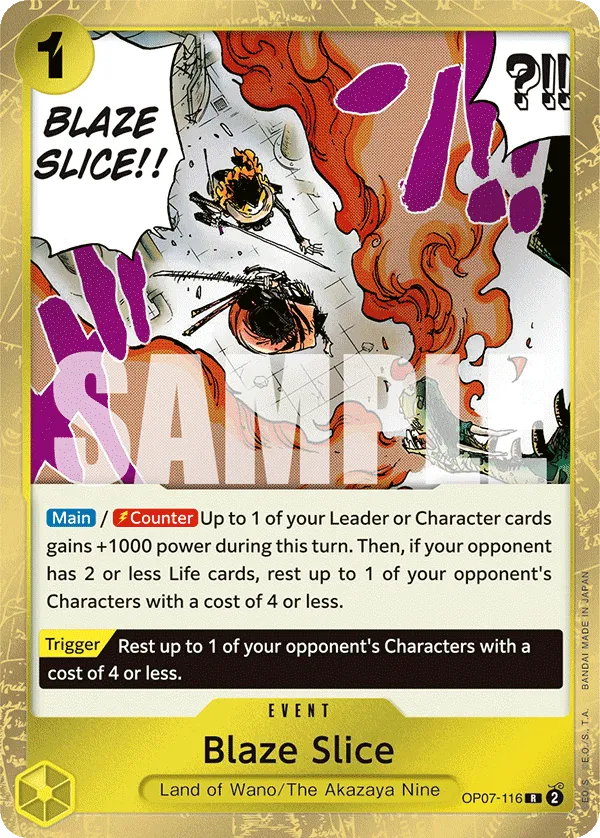
- Blaze Slice can be played either defensively or offensively. If you’re worried opponent is trying to set up a winning play, Blaze Slice gives you a +1,000 Power boost and rests one of their attackers, slowing down their aggression and buying you an extra turn. It can be played on the offense, giving a boost to one of your attackers and resting a 4-cost blocker, letting you attack their Leader directly.
- You’re the One Who Should Disappear is a 0-cost Counter card that gives Leader or a Character +3,000 Power. You will have to trash a card to activate the Event, so choose a card you don’t expect to play in the upcoming turns or that doesn’t have a Counter effect.
- Zeus‘ On Play effect adds 1 Life card to your hand and then KO’s a 5-cost or less Life card. So you are dropping 1 Life card to remove a Character in play, but if you’re removing a pesky attacker or a blocker, it can be worth it.
Closing Words
Green Yellow Yamato is looking stronger than ever with the Starter 28 and OP13 Kuma upgrades, giving it more support cards that work well with its strategy. This Leader is trying to play aggressively with the Double Attack, trying to take two Life cards and put your opponent at risk of losing to your other attackers.
This is it from me! If you want to keep up with my content, consider following me on Twitter or BlueSky.


