Green Purple Monkey D. Luffy is an EB02 Leader that returns 2 Don to your Don deck to give you 2 Active Don and gain +1,000 Power until the end of the opponent’s next turn. So it can create an explosive turn, deramping to empower your turns.
With access to Purple cards, this deck uses multiple Ramp cards to accelerate its strategy, but also has Characters that either deramp or require you to have equal or less Don than opponent to activate their effects.
This deck can go wide on the field, playing multiple Characters in one turn by using the {Straw Hat Crew} type Characters synergy, putting opponent behind on the field and forcing them to take a defensive approach.
Leader

To activate Leader effect, you must only have {Straw Hat Crew} type Characters, returning 2 Don to set 2 Don as Active and gain +1,000 Power until the end of your opponent’s turn. The 2 Active Don can be used to develop an additional Character or to increase the Power of your attacks. The +1,000 Power on your Leader creates a greater offensive attack, but also is useful during your defensive turn, forcing your opponent to go through a 6,000 Power Leader.
We want to be careful when activating Leader effect, as it does put us behind on Don on future turns. However, with the Ramp cards in the list, and cards requiring us to have equal or less Don than the opponent to activate their effects, like Sanji & Pudding, we’ll use Leader’s deramp effect on the turns we want to activate those effects.
To play this deck efficiently, you’ll plan on which turns you want to activate Leader effect for the extra 2 Active Don, and using the ramp Characters, you’ll lower the drawback from deramping.
Green Purple Luffy Decklist


How to Play
1-cost Plays
The 1-cost and 2-cost Namis are searchers that look at the top 5 cards in your deck and lets you choose 1 {Staw Hat Crew} type card to add to your hand. She helps you plan your future turns, ensuring you can make a play on the upcoming turn.
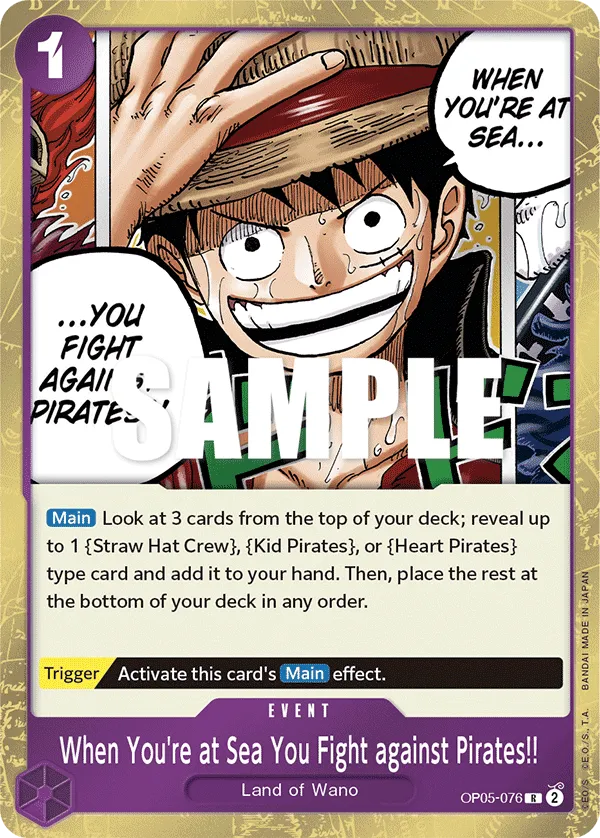
When You’re at the Sea You Fight Against Pirates! is a searcher card to find the {Straw Hat Crew} cards you need. When You’re at the Sea You Fight Against Pirates! and 2-cost Nami can be played through their Trigger effect, which can be useful in certain situations to find the cards you need or if you’re looking for a Counter card.
Usually, we’ll be looking for Sanji & Pudding for the early to mid-game, getting access to our Ramp effect as early as possible.
The Merry Go Stage only works with {Straw Hat Crew} type Leaders, drawing you a card on the turn it is played. Later on, you can rest this Stage and activate its effect only if you have equal or less Don than your opponent, giving one of your {Straw Hat Crew} type Characters +2 cost until the end of the opponent’s upcoming turn. To fulfill this condition, we must first activate the Leader effect to drop on Don, and then gain access to the +2 cost. The +2 cost on Characters like Sanji & Pudding can make it harder for the opposing player to deal with.
You’re not losing on resources by playing it, and giving a Character +2 cost can make things awkward for the opposing player if they rely on your Character’s cost to remove it through an effect.
Early Characters
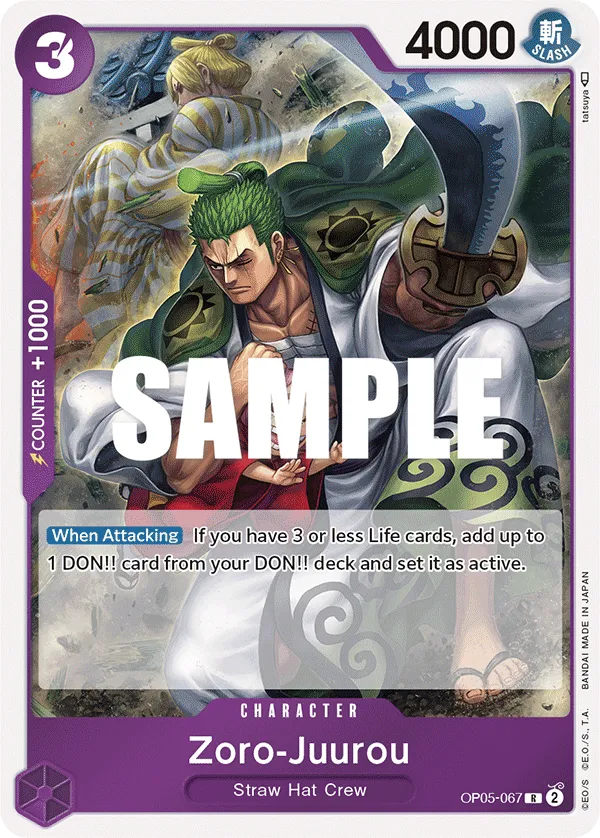
4-cost Zoro-Juuro‘s On Play looks at the top 5 cards of your deck and lets you add 1 Purple {Straw Hat Crew} type card to your hand. The list has multiple Purple cards to choose from, like Uso-Hachi, 5-cost Sanji & Pudding, and 6-cost Monkey D. Luffy.
Zoro-Juuro is a 6,000 Power Character, so he puts offensive pressure and can be challenging for opponents to KO through attacks early into the game. Since he doesn’t have a Counter Power, you almost always want to have him in play to gain the card draw from him, or we might have to use him as discard fodder for cards like Gum Gum Giant.
Monkey.D.Luffy requires you to have a multi-colored Leader to activate his effect, so he’s perfect with Green Purple Luffy. When played during your turn, if your opponent has 7 or less total Don cards, you can force them to rest 1 Don card at the start of their upcoming turn. This is great to shut down certain plays your opponent is planning, messing up their mid-game curve, and putting them behind in the game.
Ramp Sanji & Pudding
Sanji & Pudding is your strongest card in this deck, which will enable you to use your Leader effect in the mid-game without falling behind in the game.
You need to have equal or less Don cards than your opponent’s to activate their On Play effect and draw a card. So the first time we play Sanji & Pudding (turn 3), we won’t be able to activate the On Play draw effect. Additionally, once per turn, whenever you return 2 or more Don cards, you can activate Sanji & Pudding‘s effect to ramp an Active Don.
This means we can use Leader effect to trigger it, and instead of gaining 2 Active Don, you’re now at 3 Active Don to make more plays or create aggressive attacks.
Sanji & Pudding being a 7,000 Power Character makes it a perfect attacker, forcing Counter cards if your opponent wants to stop the attack. While rested, you want to protect Sanji & Pudding from an attacker if possible, making sure you keep ramping for the Active Don to power up your turns.
Sanji & Pudding is a core part of this deck, mitigating Leader Luffy’s drawback effect and allowing us to make more plays as we can play an additional Character or go for more aggressive attacks. If we manage to develop 2 Sanji & Pudding, we’ll be gaining 2 Active Don when we activate Leader effect, which means we won’t be falling on Don anymore and maximizing our upcoming turn.
Going Wide
We’re trying to play Luffy-Tarou as early as possible to cheat out a 5-cost or less purple {Straw Hat Crew} type Character from our hand. So alongside Luffy-Tarou, we’re usually aiming to play Sanji & Pudding or 4-cost Zoro-Juurou. The double development in one turn creates an aggressive field that lines up multiple attacks, which will force the opposing player to shift to a defensive approach.
Rush Aggression
6-cost Monkey D.Luffy gains the Rush keyword if your Leader is multicolored (our leader is multicolored) and your opponent has 5 or more Don cards on the field.
When attacking, you may return 2 of your Active Don cards to set Luffy as Active. Then add 1 card from the top of your Life cards to your hand. We are losing on Life cards, which can put our Leader in a vulnerable spot to your opponent’s attacks if you drop too low. However, getting to attack twice with 6-cost Luffy can push you closer to winning the game.
The ideal moment to set Luffy as Active is when your opponent is down to just 1 Life card, putting them on the brink of defeat. This is your chance to go all-in, putting all your resources into increasing Luffy’s Power. By activating your Leader effect, you gain 2 Active Don, allowing you to push for the game-winning attack.
If you’re not confident you can close out the game just yet, you can avoid the re-stand effect to save a Life card and hold off until the upcoming turn. Remember, we can still go for two attacks with 6-cost Luffy even if we’re at 0 Life cards.
+2,000 Counters
All these cards are searchable since they’re {Straw Hat Crew} type Characters, but you could still play them on the field during specific situations.
Uso-Hachi can be used to rest one of the opponent’s 5-cost or less Characters, enabling you to attack and KO that Character or ignore it if it’s a blocker and focus your attack on their Leader.
6-cost Sanji is a blocker, but you’ll usually play him as a Counter card. However, since you’re deramping with your Leader effect, you could possibly activate his effect and play him for 3 Don.
Fra-Nosuke can be used as a Rush attacker if we need that additional attack to win the game.
Events
Gum-Gum Giant is a defensive Event, giving +4,000 Power and 2 card draws. You will have to return 2 Don and trash a card from your hand to activate the effect.
The 0-cost Gum-gum Jet Gatling can trash one card you need the least in your hand to gain +3,000 Power on your Leader of one of your Characters. In most cases, you’ll trash a card with no Counter effect.
Thunder Bagua is a 2-cost Counter event that gives your Leader or Character +4,000 Power. If you have 2 or less Life cards, it will also ramp us 1 Don, so even if we’ve deramped on the previous turn, we can still make meaningful plays.
By resting 3 Don, Demon Aura Nine Sword Style can rest two of the opponent’s Characters or Don, great if you’re trying to go for an offensive turn and there are blockers in your path, or your opponent is planning to play Counter Events and needs their Don Active. Demon Aura Nine Sword Style can also be played for its Counter effect, giving your Leader a +3,000 Power boost to protect yourself from an attack.
Mulligan Tips
- Going First: Going Merry, Searcher cards, Sanji & Pudding.
- Going Second: Going Merry, searcher cards, 4-cost Zoro Juuro, Sanji & Pudding.
General Tips
- Ramp is critical. Finding Sanji & Pudding is a key part of this deck, as you’ll heavily rely on the ramp effect to get the most out of your Leader without falling behind in the game.
- Identify when to ignore the board. This deck has a lot of Counter Events to protect your Leader or key Characters, so we can, at times, ignore the board entirely to focus on the opponent’s Leader, trying to close out the game as early as possible.
- Be wary when going all out with 6-cost Luffy. 6-cost Luffy carries a heavy proves for re-standing him and going for another attack. Paying 1 Life card and returning 2 Active Don can put you in a vulnerable spot during your opponent’s turn if you can’t close out the game..
- DON!! management: with multiple effects that return DON!!, plan your turn ahead so you stay on curve and prevent you from falling behind.
Turn-Based Gameplay
Going First
- Turn 1 (1 Don): 1-cost Nami or Merry Go.
- Turn 2 (3 Don): 2-cost Nami.
- Turn 3 (5 Don): Sanji & Pudding.
- Turn 4 (7 Don): Luffy-Tarou + Sanji & Pudding/Zoro-Juuro.
- Turn 5 (9 Don): Luffy-Tarou + Sanji & Pudding/Zoro-Juuro. You can activate Leader effect to develop more Characters with Leader effect’s +2 Active Don.
- Turn 6 (10 Don): 6-cost Monkey D.Luffy for aggressive attacks.
Going Second
- Turn 1 (2 Don): 1-cost Nami and Merry Go.
- Turn 2 (4 Don): 4-cost Zoro-Juurou.
- Turn 3 (6 Don): Sanji & Pudding, activate Leader effect and develop Zoro-Juuro.
- Turn 4 (8 Don): Luffy-Tarou + Sanji & Pudding/Zoro-Juuro.
- Turn 5 (10 Don): Luffy-Tarou + Sanji & Pudding/Zoro-Juuro. You can activate Leader effect to develop more Characters with Leader effect’s +2 Active Don. Or 6-cost Monkey D.Luffy for aggressive attacks.
Other Cards to Include
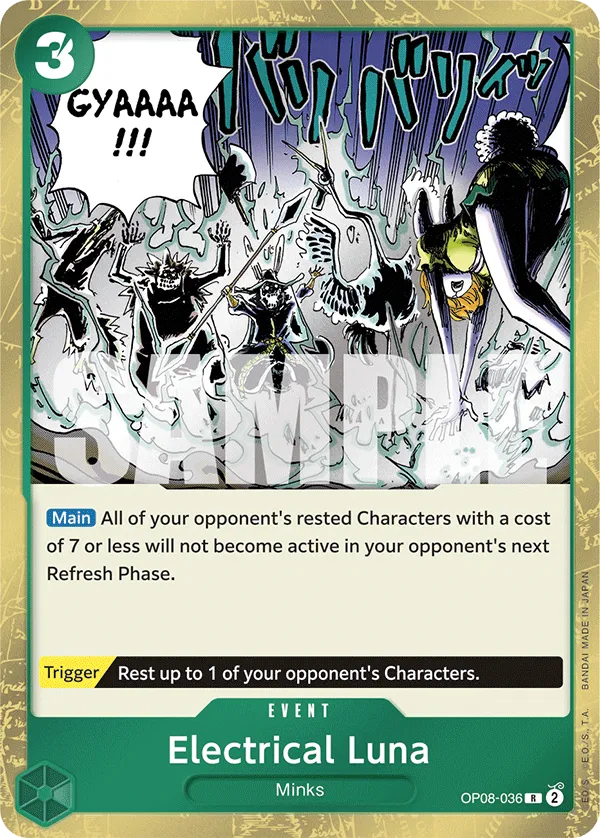


- Electrical Luna can be a huge play in the late-game if your opponent has multiple 7-cost Characters in play, ready to attack you on the upcoming turn. Electrical Luna keeps all rested 7-cost or less Characters from becoming active, allowing you to focus on aggroing down the opponent’s Leader rather than controlling the field.
- 3-cost Nico Robin is a blocker to protect you from an opponent’s attack, she’s an option to play if you need the defensive Character to prevent opponent from damaging your Leader or KOing an important Character. On KO, Nico Robin returns 1 Don to look at the top 3 cards of your deck and add 1 {Straw Hat Crew} type card to your hand. With Nico Robin, you’re playing a defensive blocker while also maintaining your overall card resources.
- Tony Tony Chopper ramps 1 Don if you have equal or less Don than your opponent. He is also a useful low-cost blocker to protect you from one of your opponent’s attacks.
- You have to take the first hit to your Leader and fall to 3 Life cards to activate 3-cost Zoro-Juuro‘s ramp effect. When Zoro-Juuro attacks, he ramps 1 Active Don, allowing you to make stronger plays. Since he’s a 4,000 Power Character, you often will attach 1 Don to make a threatening attack, but in some cases, you’ll have to attack without the Don attachment, just to gain the 1 Active Don.


- Your Green Roronoa Zoro can gain a pseudo rush if your opponent has 2 or more Characters in play, allowing you to attack one of their rested Characters or their Leader. With Roronoa Zoro‘s effect, you can rest one of their Characters with a cost of 4 or less, allowing you to attack and KO it or even remove a blocker from the equation, leaving their Leader vulnerable to your attacks.
- As for Gum-Gum Giant Pistol, up to 1 of your {Straw Hat Crew} type Characters gains +6000 power during this turn. Then, the selected Character will not become active in your next Refresh Phase.
So we usually want to use it as a finisher play, combined with 6-cost Monkey D.Luffy‘s ability to attack twice. It’ll be almost impossible for most decks to Counter out of your two attacks, and if they manage to Counter one attack, they’ll be low on resources that another attack should get you the win.
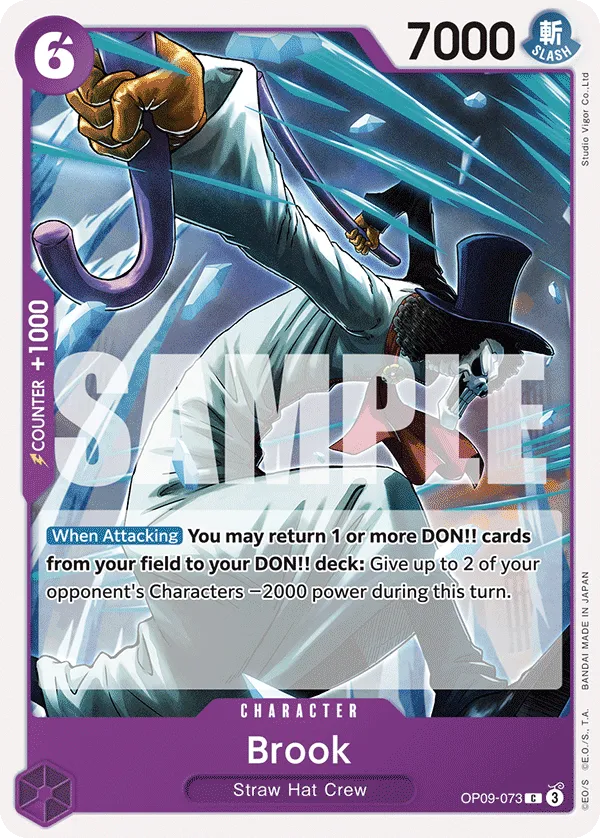
Gum-Gum Giant Pistol‘s Trigger effect lets you rest one of the opponent’s 4-cost Characters, great when used defensively to shut down one of the opponent’s attackers. - When Attacking, Brook gives two of your opponent’s Characters -2,000 Power, making it easier for your attacker to KO them. Brook being a 7,000 Power Character and can activate his Power reduction effect whenever he attacks will be a problem for the opposing player.
Closing Words
Green Purple Monkey D.Luffy remains one of the strongest options to play in OPTCG, using Sanji & Pudding to play more aggressively and force opponents to go for a more defensive approach. The deck has strong supporting cards, giving it a consistent strategy to aggro opponents down.


