Heya everyone! Today, we’re covering the Pirate Empress, Boa Hancock! She’s a Blue Yellow Leader that relies on her synergy with Amazon Lily and Kuja Pirates cards. UY Boa Hancock is a value Leader, so she doesn’t run out of resources easily, and she runs multiple cards to gain Life cards, which can make it a challenge for opponents to set up a winning turn.
The OP14 Boa Hancock has been seeing a lot of success in tournaments, and honestly, her effect, along with her supporting cards, makes her a tough contender in the meta and a solid choice to pick up for your locals.
Leader
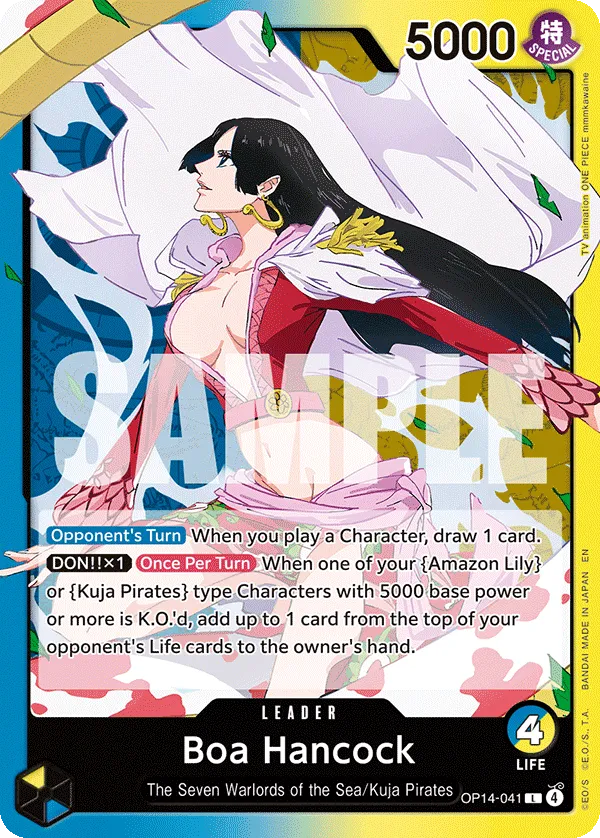
Boa Hancock is a 5,000 Power Leader with 4 Life cards. She has two effects, the first lets you draw a card when you play a Character during the opponent’s turn. While the second effect requires you to attach a Don to your Leader and once per turn, if one of your {Amazon Lily} or {Kuja Pirates} type Characters with 5000 base power or more is K.O.’d, add up to 1 card from the top of your opponent’s Life cards to the owner’s hand.
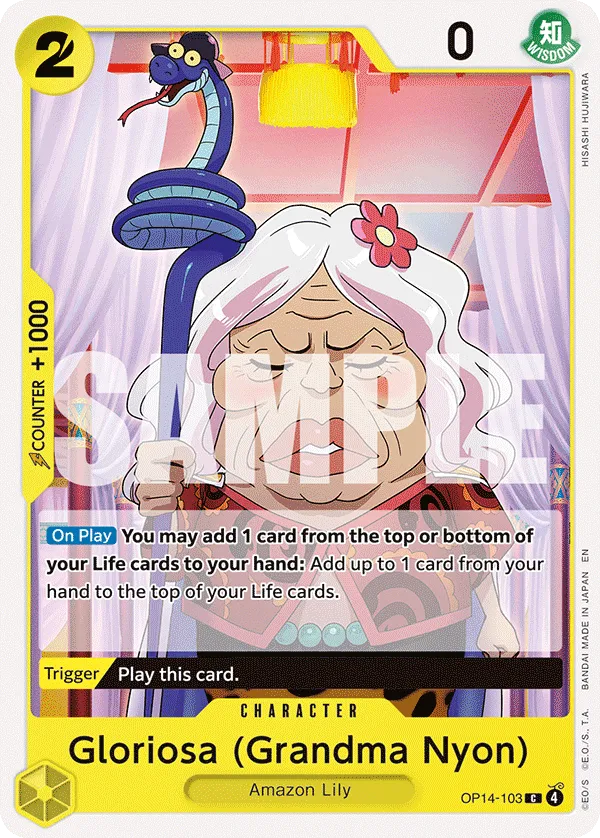
Let’s talk about the first effect first. Getting a card draw when you play a Character during the opponent’s turn means we’re gaining more resources that will benefit us in the late-game. Now, you might be wondering how we’ll play Characters during the opponent’s turn, and this is where the Trigger effect comes into play. Characters like Ran and Shakuyaku can be played through their effects, letting you trigger your Leader’s effect for the card draw. We also have ways to manipulate our Life Area using Gloriosa (Grandma Nyon), allowing us to place the card we want at the top of our Life Area.
As for the second effect, it will discourage the opposing player from attacking our low-power Characters, as losing a Life card might not seem too worthwhile for them as a trade-off.
Decklist


Searcher
1-cost Sengoku is an early searcher to play, helping us find one of our {The Seven Warlords of the Sea} type cards. Basically, you get to draw your Boa Hanocks, Gorgon Sisters, Bartholomew Kuma, or Perfume Femur.
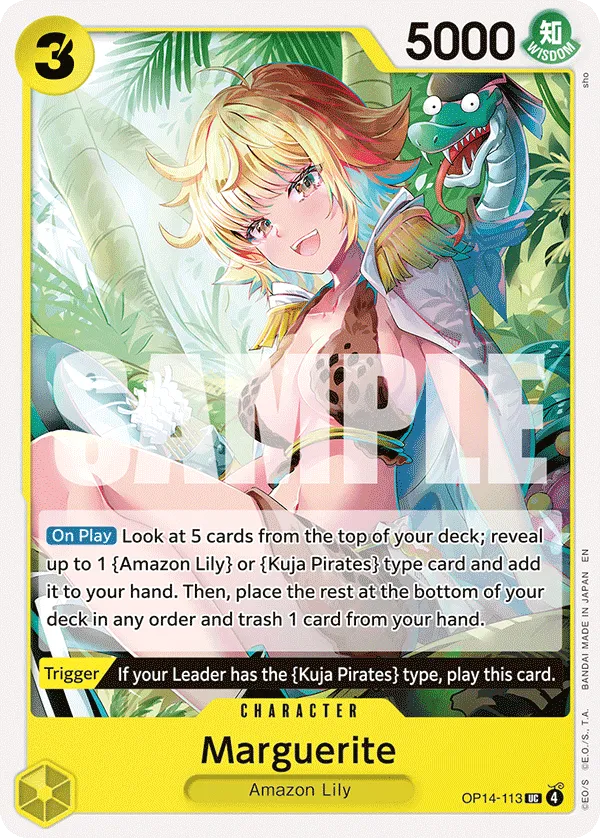
Marguerite can look at the top 5 cards of your deck to add 1 {Amazon Lily} or {Kuja Pirates} type card other than Gloriosa to your hand. She helps you shape up your upcoming turns by finding key cards you need as you get to draw cards like Boa Hancock, Gorgon Sisters, and Boa Hancock. Marguerite is also a 5,000 Power Character that can be played through her trigger effect, fits perfectly in the list and can become an attacker to put more pressure.
Early Boa
The 4-cost Boa Hancock is your strongest early-game development piece. Her effect lets you look at the top three cards of your deck and either reorder them on top or send them to the bottom. This gives you control over your upcoming draws and adds consistency to your game plan. After resolving this effect, you also attach 1 rested Don to your Leader or to one of your Characters.
Boa enters as a 6,000 Power Blocker, capable of protecting you from an attack while also threatening offensive pressure when needed. The Don she provides is especially valuable in the early game. If you play her on Don 4, that extra Don enables your Leader Boa to swing into a 6,000 Power Leader on the same turn, forcing the opposing player to commit a Counter card or lose a Life card.
Boa being a blocker means we can force the opposing player to KO her when they attack, getting them to add a Life card to their hand and put them in a more vulnerable spot.
Trigger Characters
This list has multiple Characters that we can play through their Trigger effect, which enables us to activate our Leader’s effect to gain a card draw. Ran, Gorgon Sisters, and Shakuyaku all have 5,000 Power, which means our opponent will have to think twice before KOing them if your Leader has an attached Don. If they do get KO’d, your opponent is forced to add a Life card to their hand, making it easier for you to start planning a winning turn.
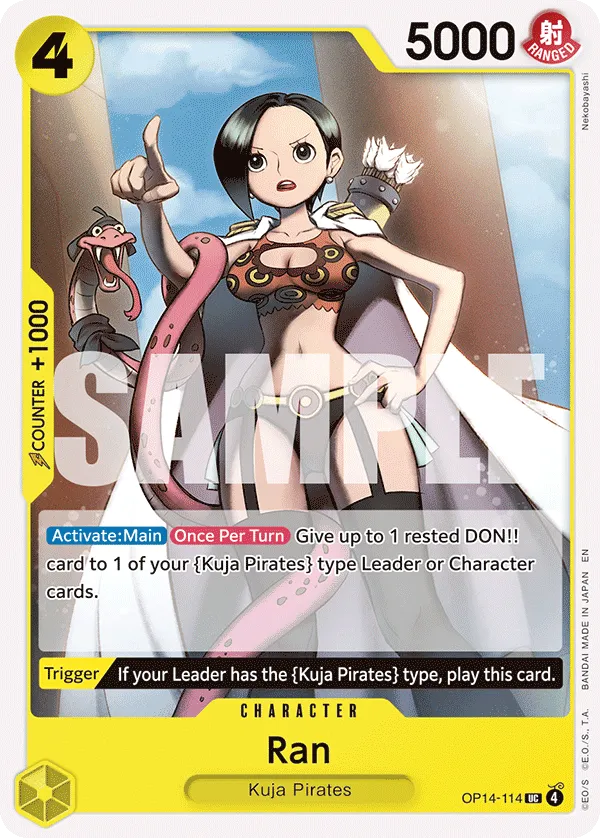
Ran is another strong option to play in the early game. She’s a 5,000 Power Character with an Activate: Main effect that lets you attach a rested Don to your Leader or one of your Characters. You can activate this once per turn, so you can continue generating value from Ran throughout the game, setting up for stronger attacks.
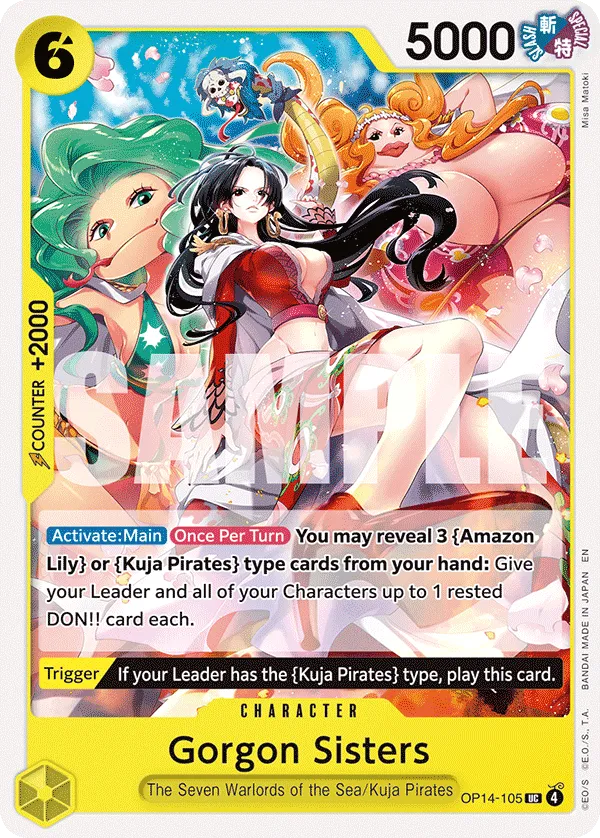
Another Character that helps you set up strong attacks is the Gorgon Sisters. You have to reveal 3 {Amazon Lily} or {Kuja Pirates} type cards from your hand to give your Leader and all of your Characters up to 1 rested Don card each. You’re giving your opponent information on the 3 cards you’re holding, but the Don you’re attaching to your Characters, and Leader is definitely worth it, letting you set up for an extremely stronger attack if you have multiple attackers lined up.
Lastly, Shakuyaku is the weakest when it comes to field pressure, but she remains an attacker we want to develop and gain card draws through her effect. When played, if your opponent has 3 or less Life cards, you get to draw 2 cards and trash 2 cards from your hand, basically gaining a draw and filtering your hand for better cards. We can trash cards we don’t want, for example, the 4-cost Boa Hancock doesn’t have a Counter, so we can trash her if we don’t plan on developing her as a blocker.
The 2-cost Gloriosa is another unit with a Trigger effect that lets you play her, which means she can activate Leader Boa’s draw effect. On top of that, Gloriosa lets us add the top or bottom Life card to our hand and replace it with a card from our hand to the top of the Life Area. This means we can place Ran, Gorgon Sisters, or Shakuyaku to the top of the Life Area to get their trigger effect off.
Kouzuki Hiyori is a +2,000 Counter Character, which can serve as a Gloriosa replacement if we don’t have her in hand. She lets us add the top or bottom Life card to hand and then replace it with another card at the top of our Life Area.
2-cost Gloriosa and Kouzuki Hiyori can be later returned to hand through Slave Arrow, letting us use them as Counter cards.
Resource Burn
Pudding can lower the number of cards in the opponent’s hand, cutting down on their resources. You’ll often play her if your opponent is holding on to at least 6 cards in their hand, but if they have more than 6 cards, then Pudding is a premium play as you could likely get rid of key cards in their hand and drop down on the Counter resources.
Life Card Plays
If your opponent has 3 Life cards or more, Nami can join in the mid-game to force them to add a Life card to their hand, dropping them lower on Life cards and making it an easier job to set up a winning turn later in the game. Her On Play effect is also attaching a Don to your Leader, so even when played on Don 5, you can still threaten a 6,000 Power attack afterwards.
Your opponent won’t be too happy KOing Nami, as her KO effect lets you play a Character with 6000 power or less from your hand. So a card like 4-cost Boa Hancock would be a great development if Nami is KO’d, and you’re triggering your Leader’s effect for the card draw.
Bartholomew Kuma is one of our strong plays in the mid-game, giving us an additional Life card by trashing a card from our hand and then discouraging players from KOing him. When KO’d Kuma adds the top card of your deck to your Life Area, giving you an extra Life card, making it even more difficult for the opponent to win the game.
Since opponents aren’t too thrilled to attack Kuma, they’ll often ignore him, which means we get to use his 7,000 Power offensively to pressure their Leader or KO rested Characters to weaken the state of their board.
The 9-cost Boa Hancock is how we win games. When played, Boa Hancock gives you a Life card and forces the opponent to add the top card in their Life Area to their hand. She’s making it harder for the opponent to set up a winning turn, while allowing you to close out the game with fewer attacks. Boa Hancock stays on the field as a 10,000 Power heavy hitter, capable of threatening the opponent’s Leader and forcing them to expend resources.
Boa Hancock is perfect to put opponents in a vulnerable spot. The Life card you’re taking away makes it easier for your attackers to start forcing their way through and set up a finishing blow.
Events
Slave Arrow is a massively strong event, letting you return a 2-cost or more Character to your hand and give your Leader or one of your Characters a +4,000 Power boost. We can return low-cost Characters, but can also target our +2,000 Counter Characters if we don’t need them on the field anymore and prefer the Power boost.
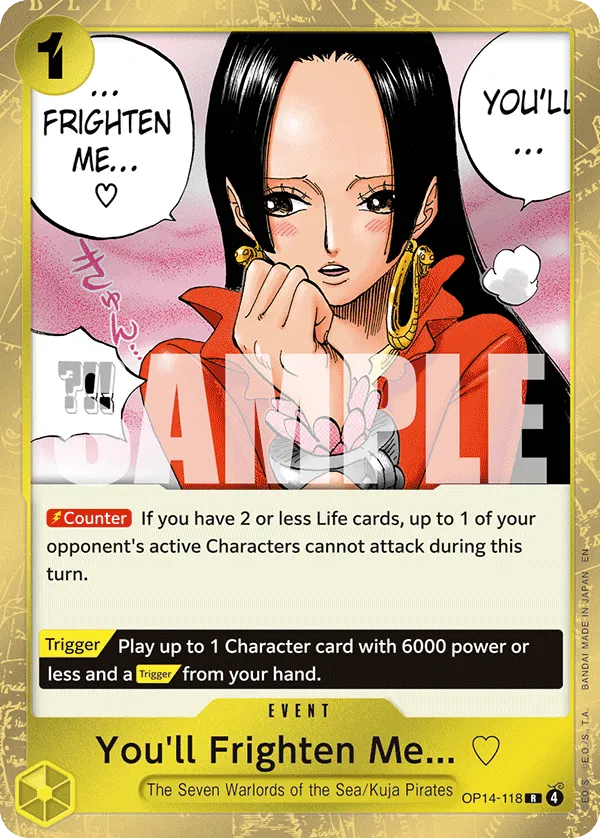
You’ll Frighten Me… ♡ can only be used if you have 2 or less Life cards, letting you halt one of the opponent’s Active Characters from attacking. This is usually useful if your opponent has multiple attackers lined up, and you can halt a heavy hitter from swinging. You’ll Frighten Me… ♡ also has a Trigger effect that lets you play a 6,000 Power or less Character with a Trigger effect from your hand. So, you get to cheat out a Character and activate your Leader’s effect to draw a card.
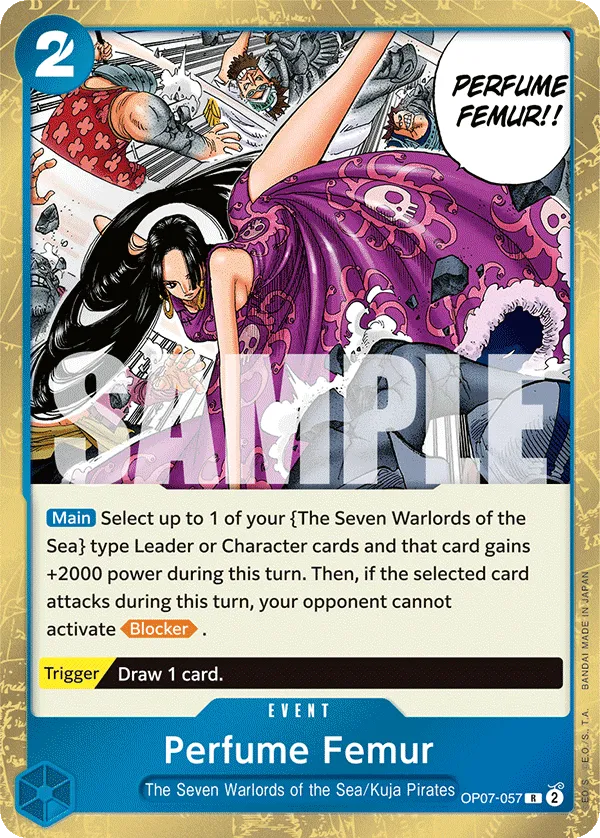
Perfume Femur is great as a finisher event, allowing you to bypass the opponent’s blocker and go for a straight attack on their Leader to win the game. You’re spending 2 Don and gaining a +2,000 Power boost, so you’re not sacrificing on Power when playing Perfume Femur.
General Tips
- Don’t be afraid of taking damage. Taking early hits is part of your strategy, especially if you know what the card at the top of the Life Area is. This allows you to play Characters through Trigger effects, develop more on the board, and add more resources to your hand.
- Use your Life Card takers. If your opponent is down to 1 Life card and can’t threaten a winning turn, we want to first play our Boa Hancock to force them to take the Life card and then start going for attacks.
- Perfume Femur win condition. In the late game, when we’re planning a finishing turn, even if the opponent doesn’t have a blocker, we can use Perfume Femur to gain a +2,000 Power boost and rest Don. If we have cards like Ran and Gorgon Sisters in play, we can use the rested Don to attach them to our attackers, maximising our offensive pressure.
Mulligan Tips
Going First: Sengoku, Gloriosa, Marguerite, Nami.
Going Second: Gloriosa, Ran or 4-cost Boa Hancock, Kuma.
Other Cards to Include


- Gloriosa can look at the top 5 cards of your deck to add 1 {Amazon Lily} or {Kuja Pirates} type card other than Gloriosa to your hand. She helps you shape up your upcoming turns by finding key cards you need as you get to draw cards like Boa Hancock, Gorgon Sisters, and Boa Hancock.
- Gum Gum Red Roc is your removal play to deal with high-cost win conditions. You can remove a Character from the field and place it at the bottom of the opponent’s deck, so KO immunity doesn’t work here, as you’re not technically KOing a Character. There are tons of late-game win conditions in the current meta that you’d be happy to remove with Gum Gum Red Roc, buying yourself more time and keeping the board state in check.
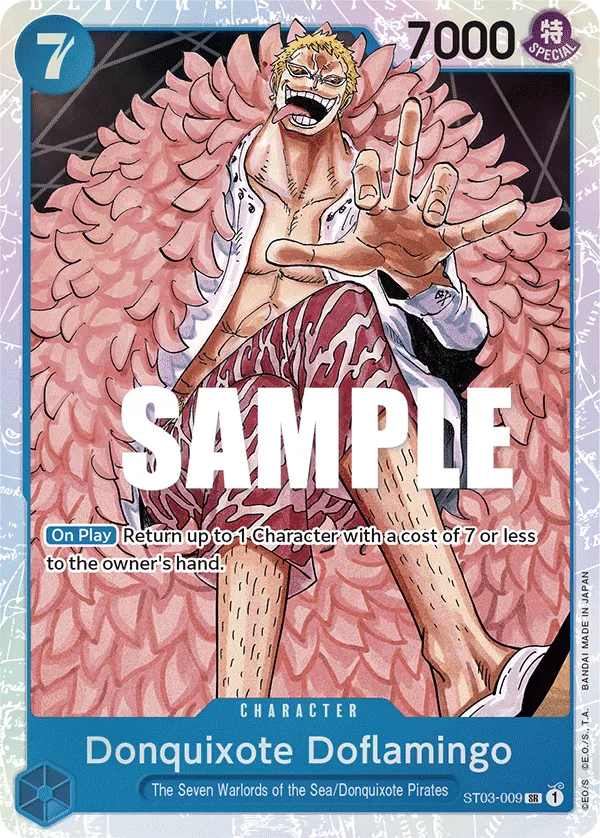
- Donquixote Doflamingo is a control option, letting you return a 7-cost or less Character to the owner’s hand. He’s also a Seven Warlords of the Sea, so Sengoku can draw him.
Turn-Based Gameplay
Going First
- Turn 1 (1 Don): Sengoku.
- Turn 2 (3 Don): Marguerite or Gloriosa.
- Turn 3 (5 Don): Nami.
- Turn 4 (7 Don): Bartholomew Kuma.
- Turn 5 (9 Don): 9-cost Boa Hancock.
- Turn 6 (10 Don): 9-cost Boa Hancock.
Going Second
- Turn 1 (2 Don): Gloriosa or Sengoku.
- Turn 2 (4 Don): 4-cost Boa Hancock.
- Turn 3 (6 Don): Bartholomew Kuma or Nami.
- Turn 4 (8 Don): Bartholomew Kuma.
- Turn 5 (10 Don): 9-cost Boa Hancock.
Closing Words
Blue Yellow Boa Hancock has been performing well in the tournament scene, managing to top a Championship Series and proving it has great potential in the OP14 meta. It combines card value with board pressure, giving it a strong strategy that can be tough for most decks to keep up with.